Les problèmes informatiques sont inévitables de temps en temps, vous devez donc être prêt à agir dans n’importe quel scénario. Par exemple, s’il y a aucun son provenant de votre PC Windows 10 , cela pourrait être causé par divers problèmes, tels que l’erreur de rendu audio. Mais il n’ya pas lieu de paniquer car vous pouvez résoudre ce problème en suivant les instructions ci-dessous.
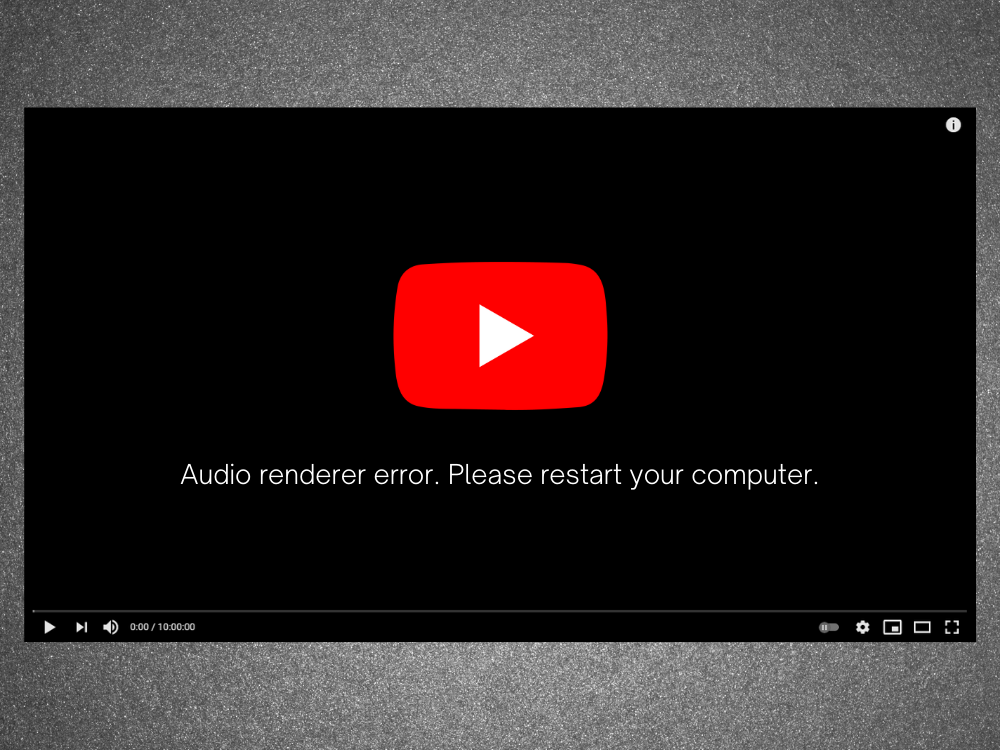
Erreur de rendu audio: veuillez redémarrer votre ordinateur!
Erreur de rendu audio, veuillez redémarrer votre ordinateur est un message d’erreur qui apparaît à l’écran lorsque votre ordinateur ne parvient pas à lire les pistes audio. Cela peut se produire n’importe où, que vous essayiez de regarder une vidéo sur YouTube ou un film dans votre lecteur multimédia.
Le comportement est étrange. Parfois, l’audio est lu sans aucun problème jusqu’à ce que l’erreur se produise soudainement et désactive tous les sons provenant de votre ordinateur. Il vous demande gentiment de redémarrer votre ordinateur, ce qui semble résoudre le problème.
Cependant, le redémarrage du PC n’est qu’une solution de contournement temporaire puisque l’erreur réapparaît finalement. À ce stade, vous êtes obligé d’entrer dans une boucle de redémarrage de l’ordinateur juste pour maintenir le son. Il est facile de comprendre pourquoi c’est si frustrant pour les utilisateurs, en particulier lorsque la racine du problème n’est pas claire.
Nous avons testé ce problème, discuté avec divers utilisateurs et rassemblé une liste de solutions possibles qui résout l’erreur de rendu audio sur la plupart des PC exécutant Windows 10.
Comment corriger une erreur de rendu audio sous Windows 10
L’erreur de rendu audio peut être causée par un problème avec votre navigateur Web ou les paramètres de votre ordinateur. Il est important de vous armer de patience, car cela peut prendre un certain temps avant d’épuiser toutes les options.
Avant de commencer à résoudre ce problème ennuyeux, il est sage de configurer un point de restauration système . Il vous permet de ramener Windows 10 à un état stable au cas où vous rencontriez plus de problèmes en cours de route.
1. Vider le cache de navigation
De nombreux utilisateurs signalent avoir reçu une erreur de rendu audio sur YouTube. Cela peut être dû à un problème de navigateur, tel que le cache enregistré et les cookies. Un moyen simple de résoudre ce problème consiste à actualiser votre navigateur Web . Pour ce faire, sélectionnez simplement l’onglet YouTube et appuyez sur Ctrl + Maj + R . Ensuite, vérifiez si vous obtenez toujours l’erreur.
Ce n’est cependant qu’une solution temporaire, car vous devez toujours vider le cache du navigateur de la manière traditionnelle.
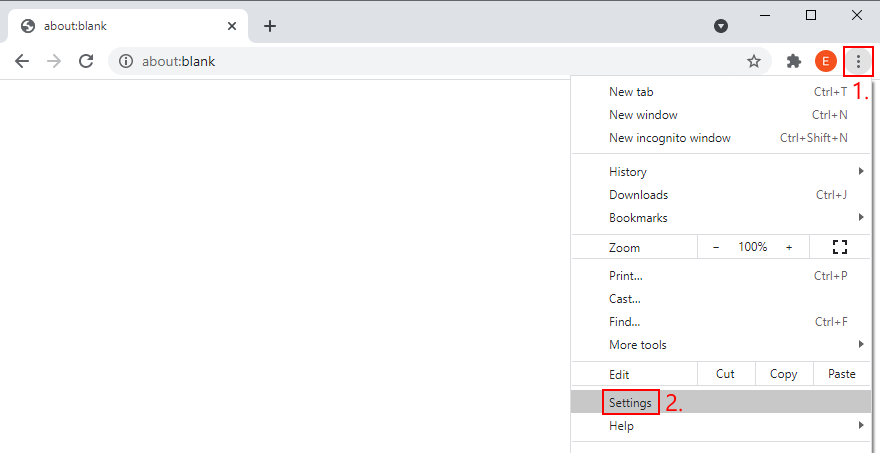
Comment vider le cache Chrome:
- Lancez Chrome et ouvrez le menu Plus dans le coin supérieur droit
- Accédez à Paramètres
- Accédez à Confidentialité et sécurité sur le côté gauche
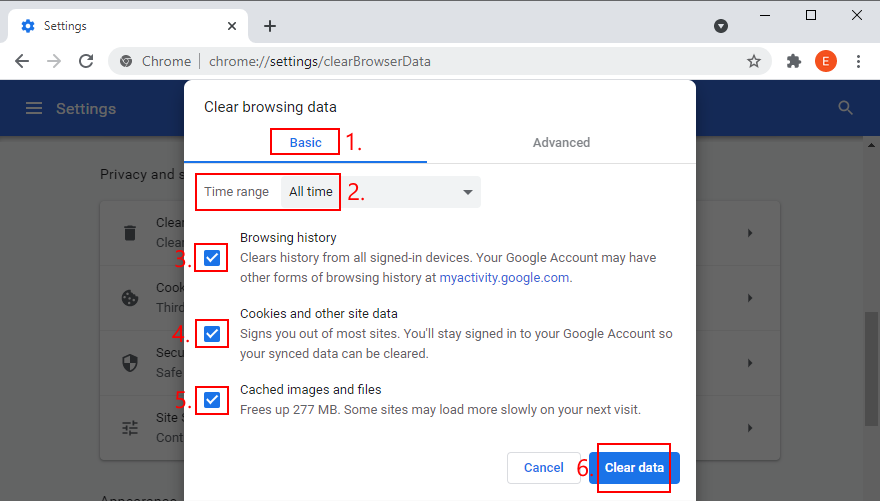
- Cliquez sur Effacer les données de navigation . Vous pouvez également saisir l’adresse
chrome://settings/clearBrowserData
- Restez dans la section Basique
- Définissez Période sur Toutes les périodes
- Assurez-vous que les options suivantes sont activées:
- Historique de navigation
- Cookies et autres données de site
- Images et fichiers mis en cache
- Cliquez sur Effacer les données
- Redémarrez Chrome et essayez de regarder YouTube maintenant
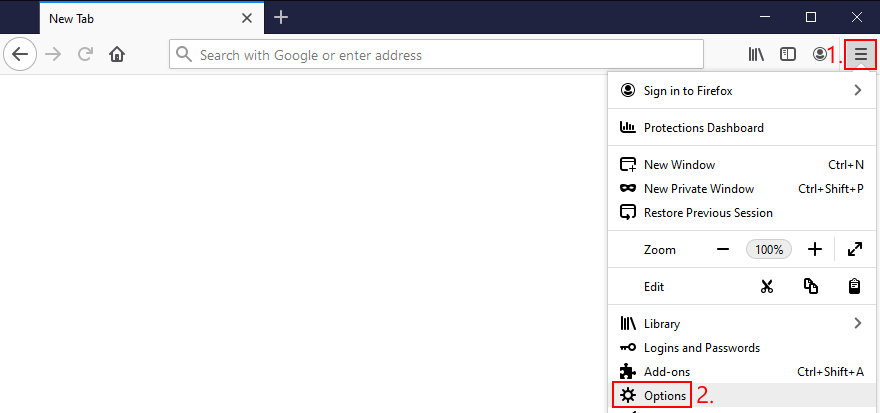
Comment vider le cache de Firefox:
- Ouvrez Firefox et cliquez sur le bouton ≡ hamburger
- Sélectionnez Options
- Accédez à Confidentialité et sécurité et cliquez sur Effacer les données

- Vérifiez que les paramètres suivants sont sélectionnés:
- Cookies et données de site
- Contenu Web mis en cache
- Cliquez sur Effacer
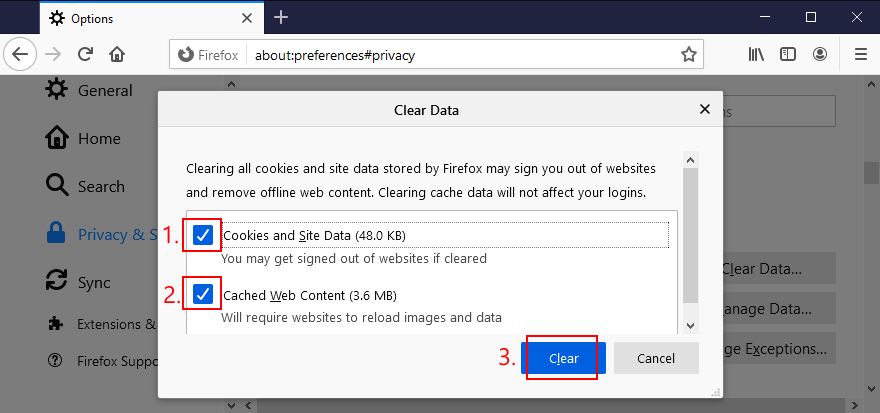
- Relancez Firefox et recherchez les erreurs audio

Comment vider le cache Microsoft Edge:
- Démarrez Microsoft Edge
- Cliquez sur le bouton Plus dans le coin supérieur droit
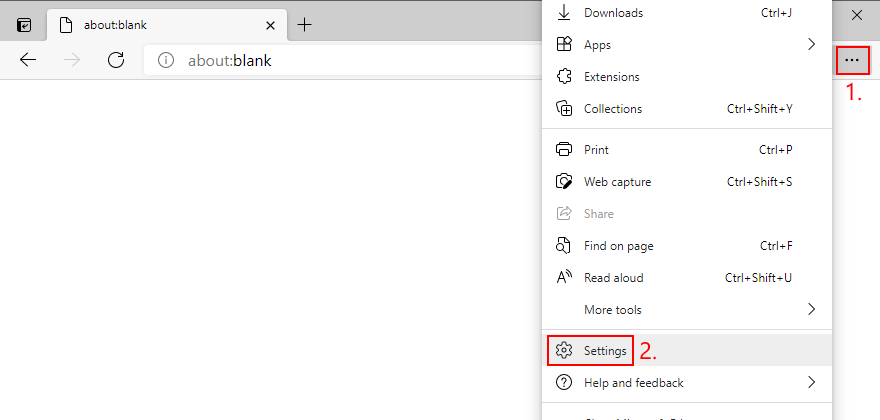
- Sélectionnez Paramètres
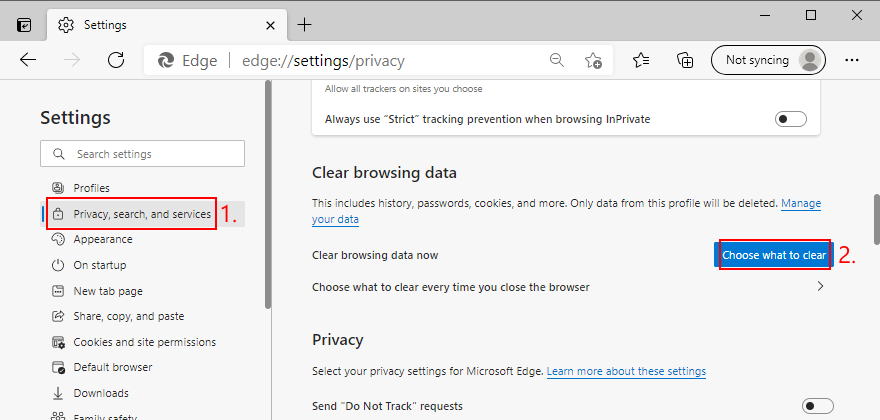
- Accédez à Confidentialité, recherche et services . Sinon, vous pouvez utiliser l’adresse
edge://settings/privacy- Dans Effacer les données de navigation maintenant , cliquez sur Choisir les éléments à effacer
- Définissez Période sur Toutes les périodes
- Cochez les cases des options suivantes:
- Historique de navigation
- Historique des téléchargements
- Cookies et autres données de site
- Images et fichiers mis en cache
- Cliquez sur Effacer maintenant
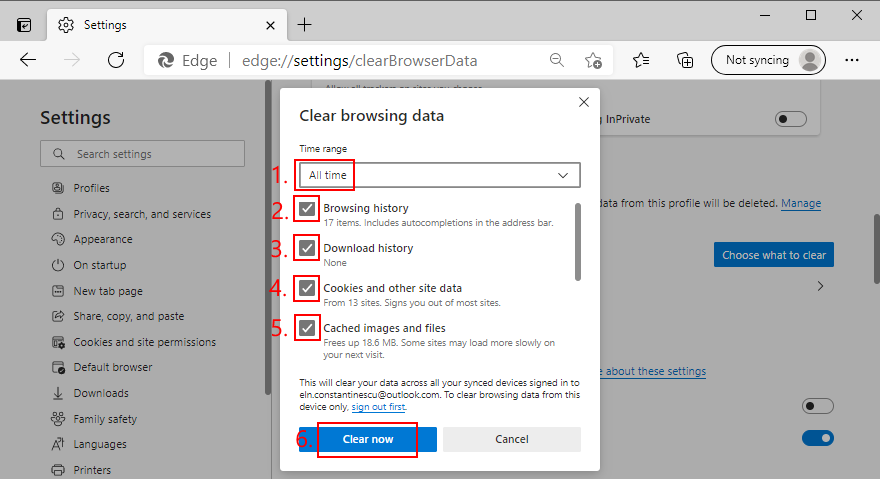
- Redémarrez Edge et essayez de profiter de YouTube sans problèmes audio
- Accédez à Confidentialité, recherche et services . Sinon, vous pouvez utiliser l’adresse

2. Exécutez l’utilitaire de résolution des problèmes audio
Windows 10 est livré avec un outil de dépannage intégré qui résout les problèmes audio courants. Cela vaut la peine d’être essayé si vous en avez assez de gérer l’erreur de rendu audio.
- Cliquez avec le bouton droit sur le bouton Démarrer de Windows 10 et accédez à Paramètres
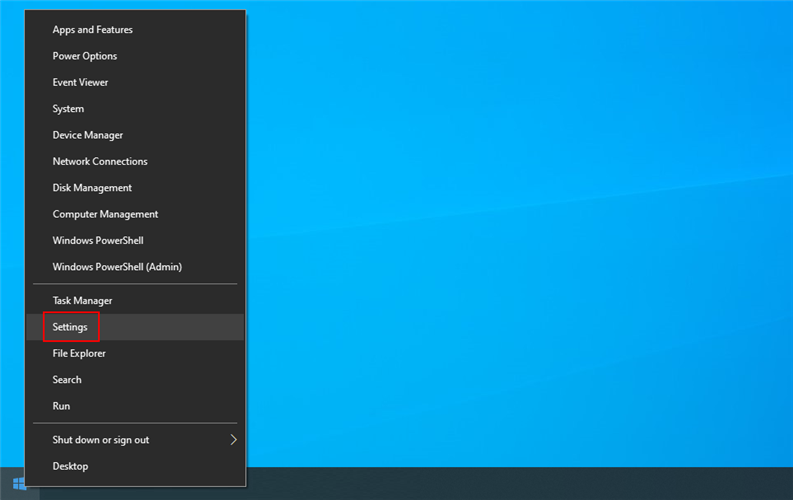
- Sélectionnez Mise à jour et sécurité
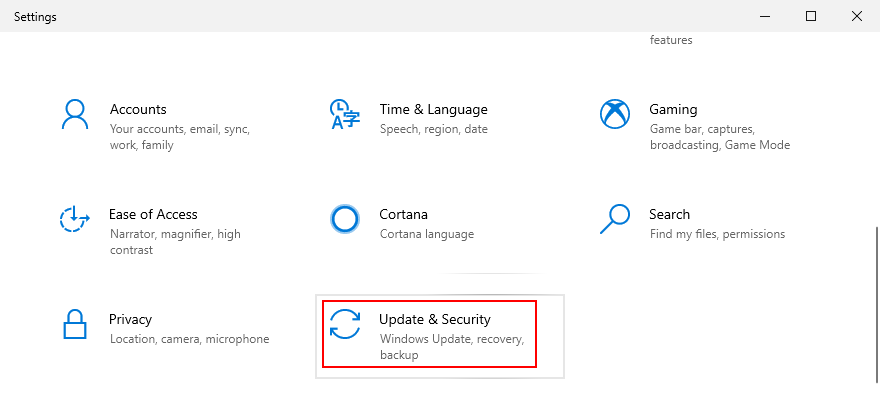
- Accédez à Dépanner sur le côté gauche
- Cliquez sur Outils de dépannage supplémentaires
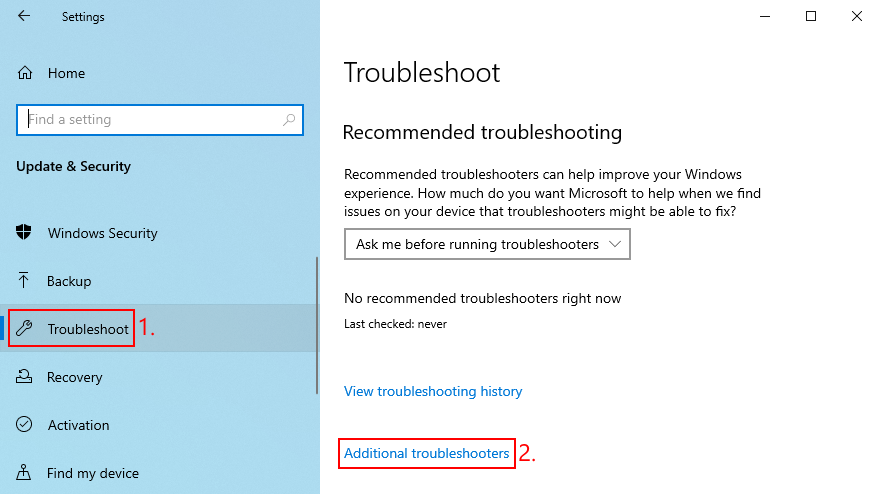
- Sélectionnez Lecture audio et cliquez sur Exécuter l’utilitaire de résolution des problèmes

- Suivez les instructions à l’écran
- Rechercher les erreurs audio
3. Activer le périphérique audio
Si vous avez connecté plusieurs périphériques audio à votre ordinateur, vous avez peut-être sans le savoir modifié les paramètres du périphérique audio et désactivé l’adaptateur audio principal. Voici comment le réactiver:
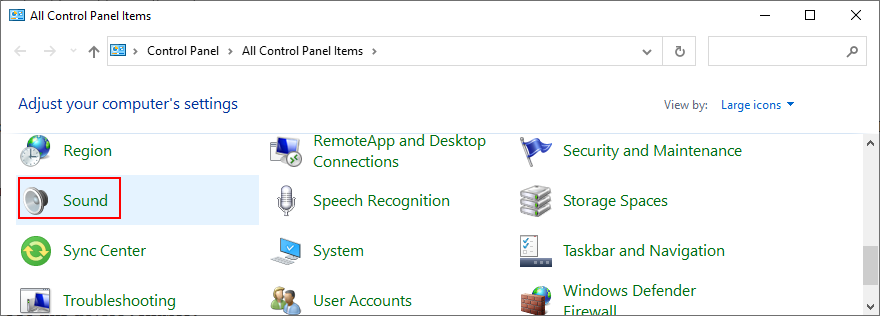
- Cliquez sur le bouton Démarrer , saisissez Panneau de configuration et ouvrez cette application
- Accédez à la section Son
- Passer à l’onglet Lecture
- Sélectionnez votre appareil audio dans la liste
- Cliquez sur Propriétés
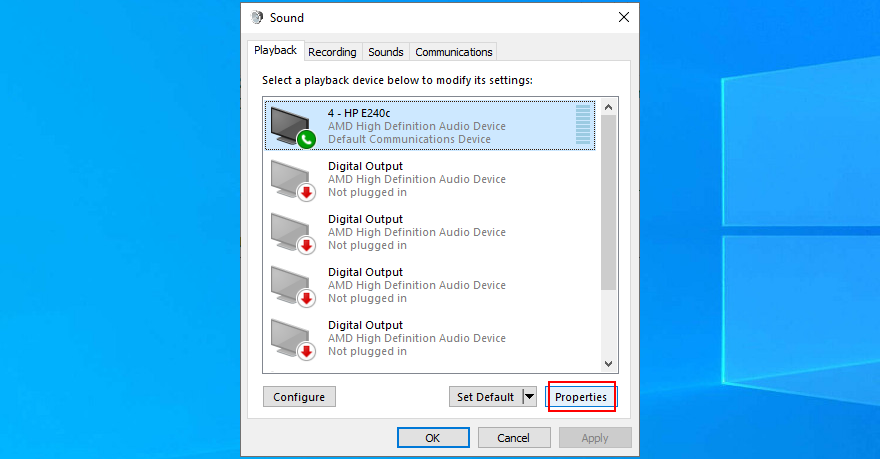
- Dans l’onglet Général , définissez Utilisation de l’appareil sur Utiliser cet appareil (activer)
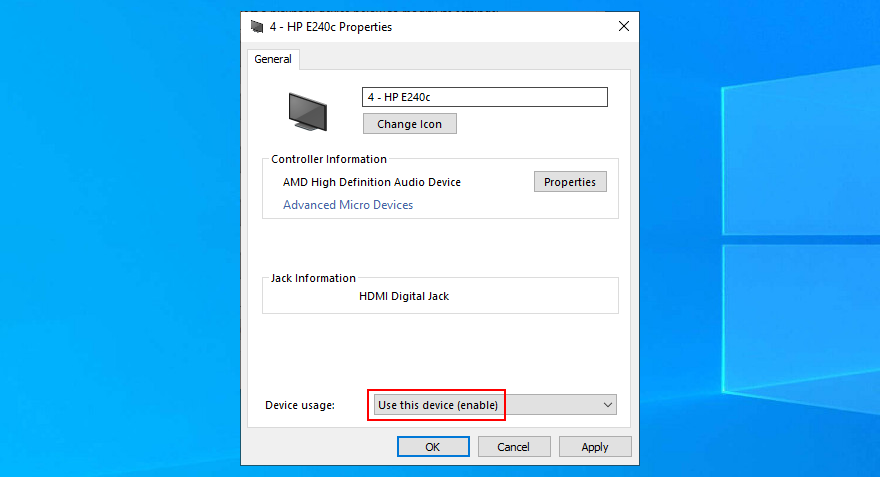
- Cliquez sur Appliquer et quittez
- Vérifiez les problèmes audio maintenant
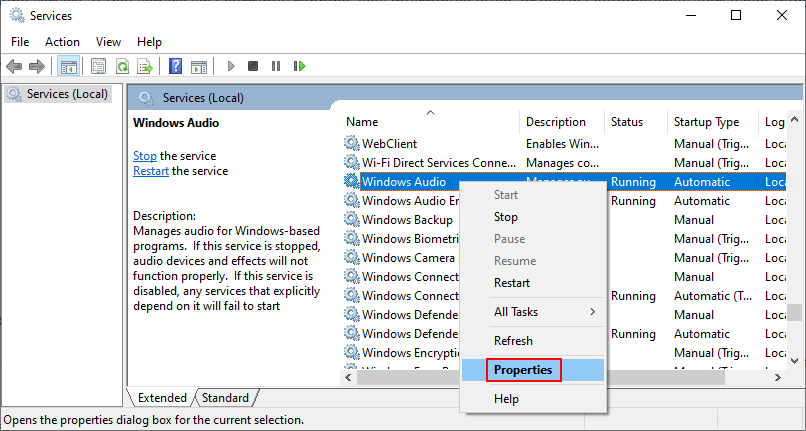
4. Redémarrez le service Windows Audio
Tous les sons sortant de votre ordinateur sont gérés par un service d’arrière-plan. Si ce service n’est pas en cours d’exécution, est souvent interrompu ou ne démarre pas automatiquement au démarrage de Windows, vous devez vous attendre à des problèmes tels que l’erreur de rendu audio.
Mais vous pouvez résoudre ce problème en redémarrant le service Windows Audio. Voici comment:
- Appuyez sur la touche Windows , saisissez Services et ouvrez cette application
- Recherchez et cliquez avec le bouton droit sur Windows Audio
- Accédez à Propriétés
- Rester dans l’onglet Général
- Définissez Type de démarrage sur Automatique
- Si État du service indique Arrêté , cliquez sur le bouton Démarrer
- Cliquez sur Appliquer et quittez
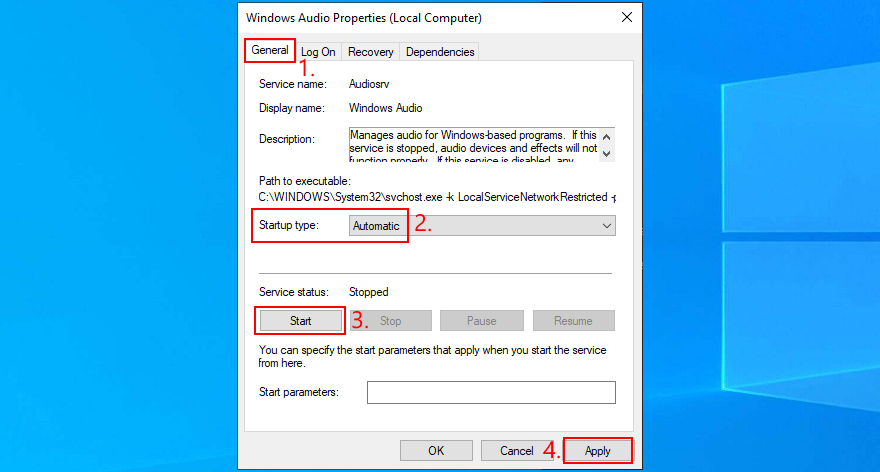
- Rechercher les problèmes audio
5. Synchroniser la fréquence audio (pilotes ASIO)
Les utilisateurs équipés de pilotes ASIO4ALL ont signalé des conflits avec les paramètres audio du système. Plus précisément, si la fréquence d’échantillonnage n’est pas définie à la même valeur dans les deux parties, l’ordinateur commence à rencontrer des problèmes de son. Voici comment résoudre facilement ce problème:
- Cliquez sur le bouton Démarrer , saisissez Panneau de configuration et appuyez sur Entrée
- Sélectionnez la zone Son
- Dans l’onglet Lecture , sélectionnez votre périphérique audio et cliquez sur Propriétés
- Passer à l’onglet Avancé
- Notez la fréquence d’échantillonnage spécifiée au Format par défaut
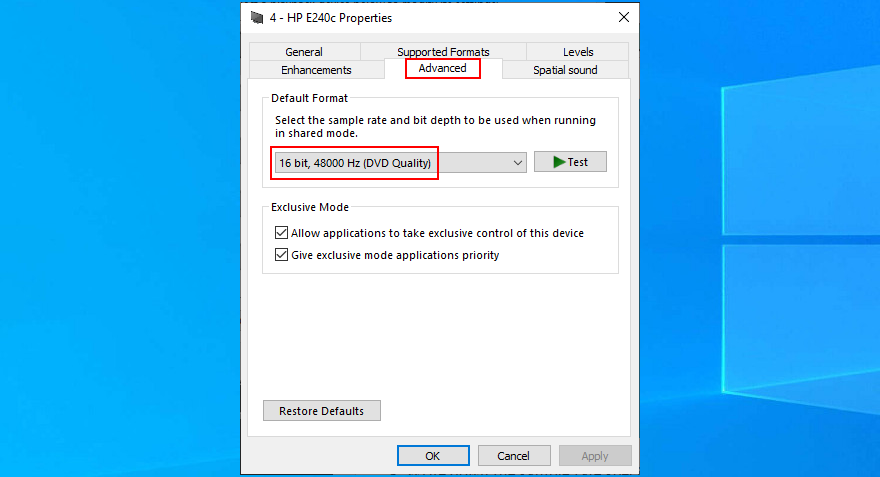
- Quitter cette zone
- Ouvrez l’utilitaire ASIO
- Passer à l’onglet Audio
- Définissez Taux d’échantillonnage sur la même valeur que dans Windows
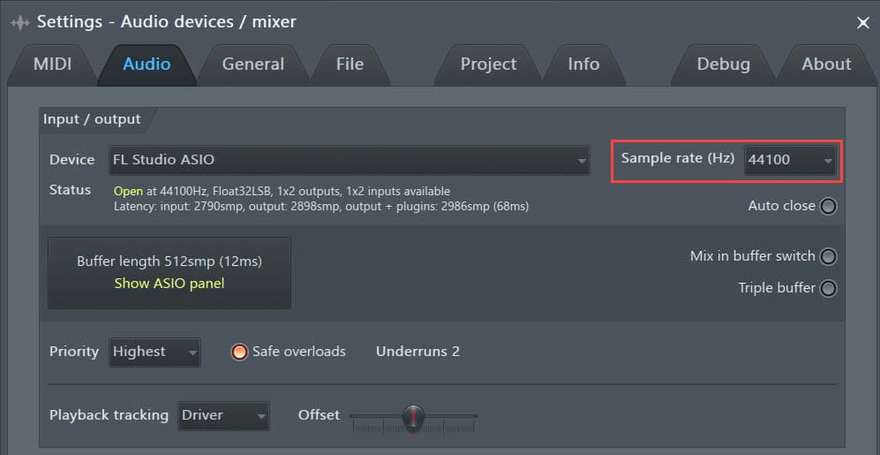
- Redémarrez votre PC et inspectez les résultats
- Sélectionnez la zone Son
6. Exécutez des tests audio (ordinateurs portables HP)
Les utilisateurs HP peuvent se tourner vers un outil de diagnostic audio appelé HP PC Hardware Diagnostics (UEFI). Voici comment l’utiliser:
- Redémarrez votre ordinateur portable HP
- Lors du redémarrage, appuyez rapidement sur la touche qui vous donne accès à HP PC Hardware Diagnostics (UEFI)
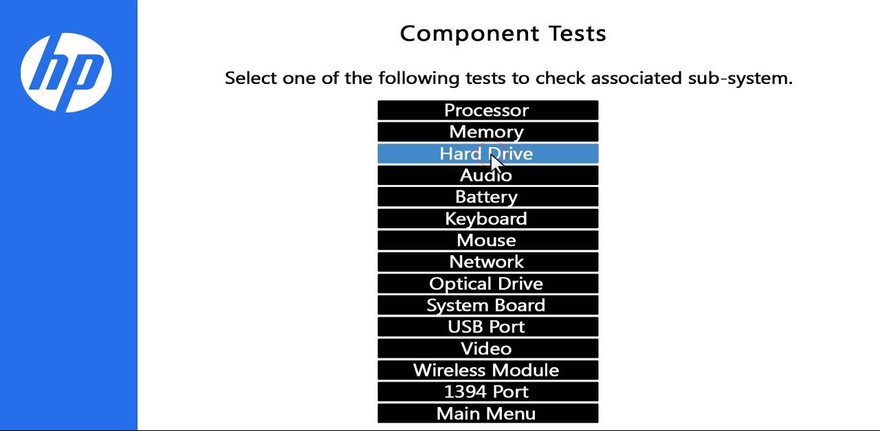
- Accédez à la section Audio
- Cliquez sur Exécuter une fois pour commencer à évaluer vos appareils audio
- Sélectionnez Haut-parleur et suivez les instructions à l’écran
- Terminez le test et démarrez Windows
- Rechercher les problèmes audio
Vous pouvez également télécharger HP Audio Check à partir du site officiel et utilisez-le pour exécuter des tests supplémentaires.
7. Définir le périphérique audio par défaut
Windows a parfois du mal à identifier le périphérique audio par défaut. Et c’est aussi pourquoi il pourrait afficher l’erreur de rendu audio, que vous l’obteniez sur YouTube ou ailleurs. Pour résoudre ce problème ennuyeux, il vous suffit de définir à nouveau votre périphérique audio préféré par défaut. Voici comment:
- Appuyez sur la touche Win , saisissez Panneau de configuration et ouvrez cette application
- Cliquez sur Son
- Choisissez votre appareil audio dans l’onglet Lecture
- Cliquez sur Définir par défaut
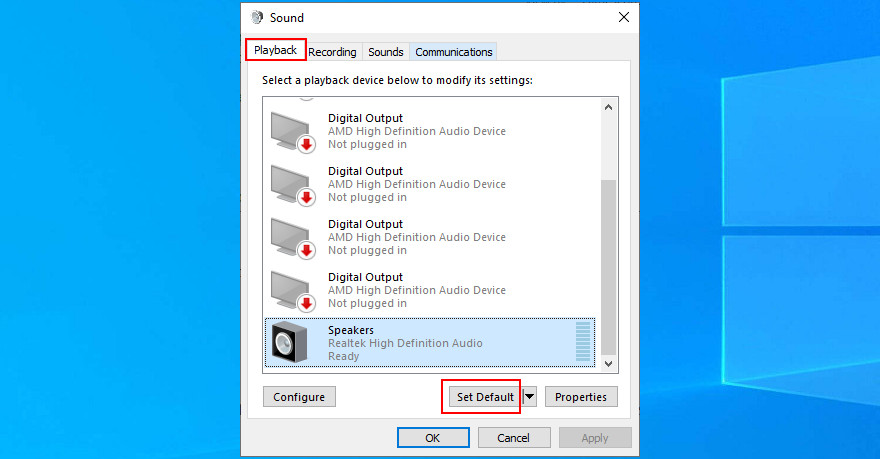
- Si le bouton Définir par défaut est grisé, sélectionnez un autre appareil pour le définir par défaut, puis revenez à votre première option
- Cliquez sur Appliquer et quittez cette zone
- Rechercher les problèmes audio
8. Réinstallez l’adaptateur audio
Votre adaptateur audio n’est peut-être pas correctement connecté à votre ordinateur. Cependant, vous pouvez le réinstaller sans effort sans endommager votre PC dans le processus. Voici ce que vous devez faire:
- Cliquez avec le bouton droit sur le bouton Démarrer et sélectionnez Gestionnaire de périphériques
- Extend the Audio inputs and outputs group
- Identify your main audio device, right-click it, and select Uninstall device
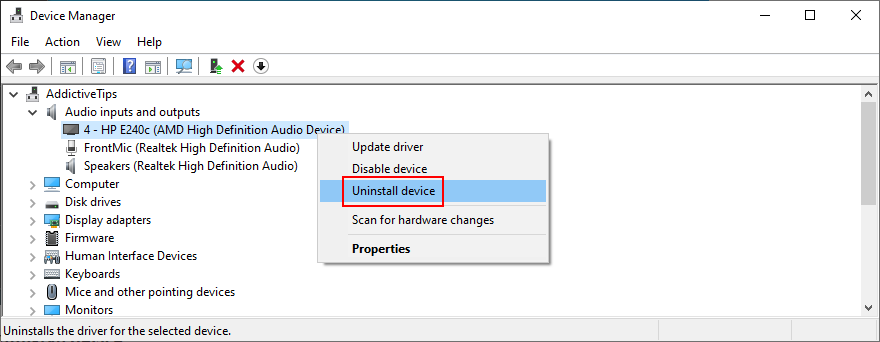
- Select any entry from the list
- Open the Action menu and click Scan for hardware changes
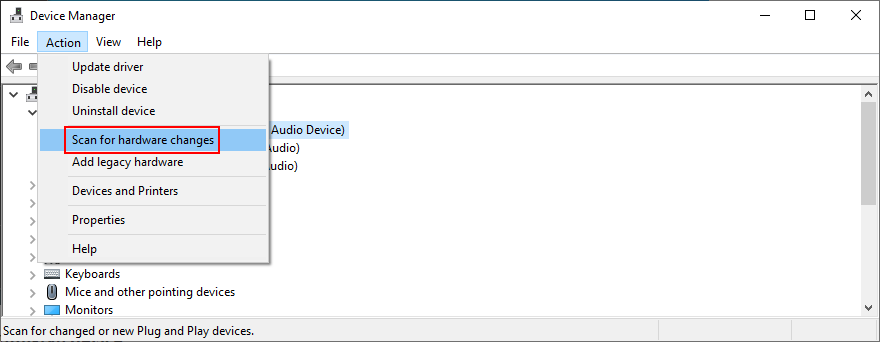
- Restart your computer. Windows will auto-reinstall the missing audio driver
- Check for sound problems
9. Update the audio driver
Even if your sound adapter is correctly installed, perhaps it’s equipped with an obsolete driver that’s no longer supported by Windows 10. It would certainly explain the audio renderer error. However, you can easily update the audio driver:
- Click the Start button, type Device Manager, and press Enter
- Expand the Audio inputs and outputs category
- Right-click your primary audio adapter and select Update driver
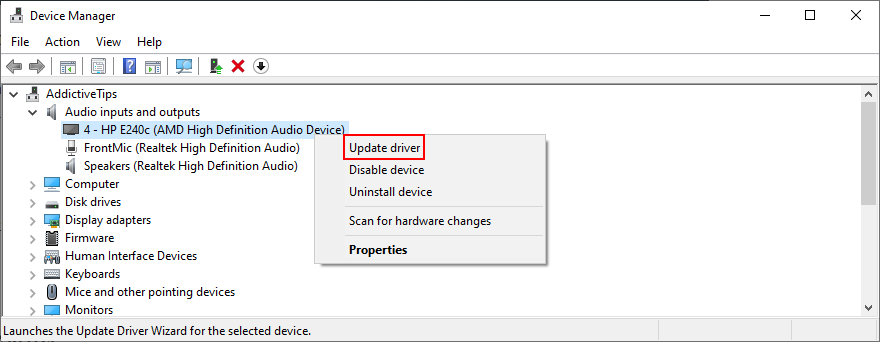
- Click Search automatically for updated driver software
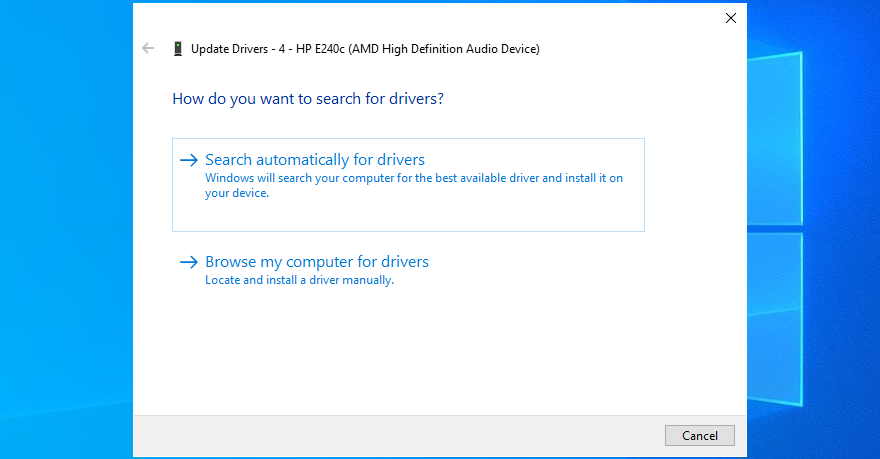
- If you see the The best drivers for your device are already installed message, click Search for updated drivers on Windows Update

- Reboot your PC and check for additional audio issues
It’s possible that Microsoft fails to find a newer audio driver using Windows Update. In that case, you should head over to the manufacturer website of your sound adapter, then find, download, and install a newer driver that’s compatible with your OS configuration.
However, if you don’t want to go through that trouble as well as risk installing an incompatible driver that could cause more problems, we suggest opting for a driver updating software solution. You can use it to keep all your device drivers in check.
10. Roll back the audio driver
If you have recently updated your sound driver, perhaps you installed an incompatible version that’s throwing you the audio renderer error. To fix it, you should roll back to the previous driver version. Here’s how:
- Head over to Device Manager
- Right-click your audio device and go to Properties
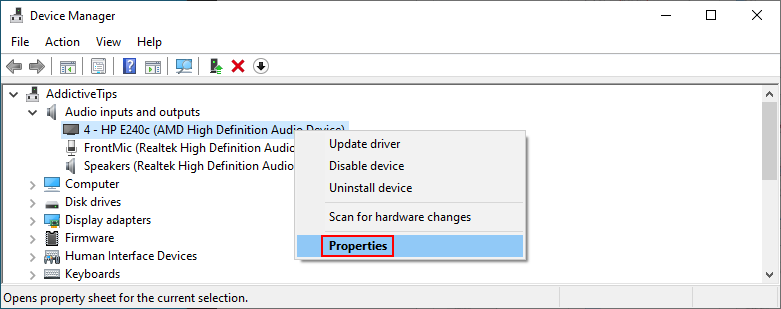
- Select the Driver tab
- Click Roll Back Driver and follow the given instructions
- If the button is greyed out, it means that your operating system doesn’t have the previous driver version, so you can skip this solution
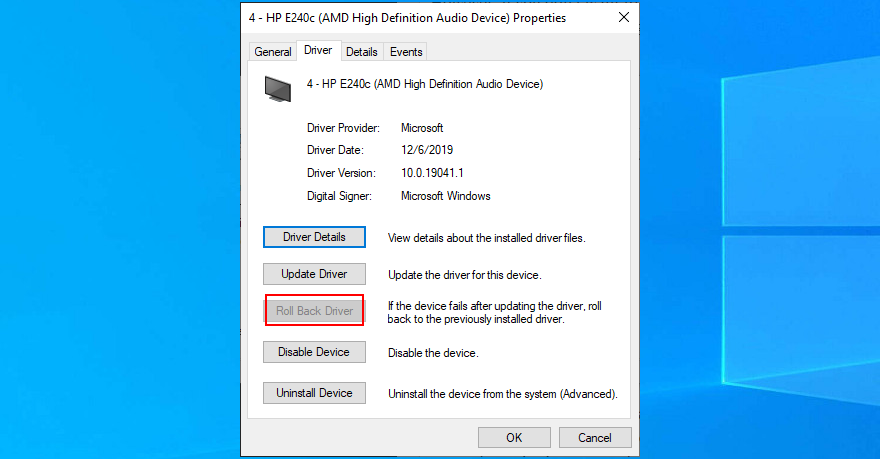
- Restart your computer and inspect results
11. Check the audio cable
It’s a good idea to check your audio cable to see if there’s anything wrong with it since hardware problems can cause audio renderer errors, too. If you have multiple audio inputs on your computer, try sticking the audio jack somewhere else in case you have malfunctioning jacks.
In fact, if you have several external playback devices plugged into your machine, it’s a good idea to remove the ones you’re not currently using. Furthermore, make sure that you didn’t accidentally swap the audio and microphone jacks in the process.
12. Disable audio mixing software
Certain audio mixing tools are not fully compatible with the Windows 10 sound drivers, resulting in conflicts and the audio renderer error message. As soon as you start an audio mixing tool and configure sound drivers, the application overrides the system settings, causing various problems.
To fix this problem, you just need to disable your audio mixing tools when trying to watch a movie offline or a clip on YouTube.
13. Update your web browser
If you’re getting the audio renderer error message on YouTube when trying to enjoy a video, it’s a good idea to update your web browser to the latest version.
How to update Google Chrome:
- Open the More menu on the top-right corner
- Visit the Help submenu and click About Google Chrome. Alternatively, you can visit the
chrome://settings/helpaddress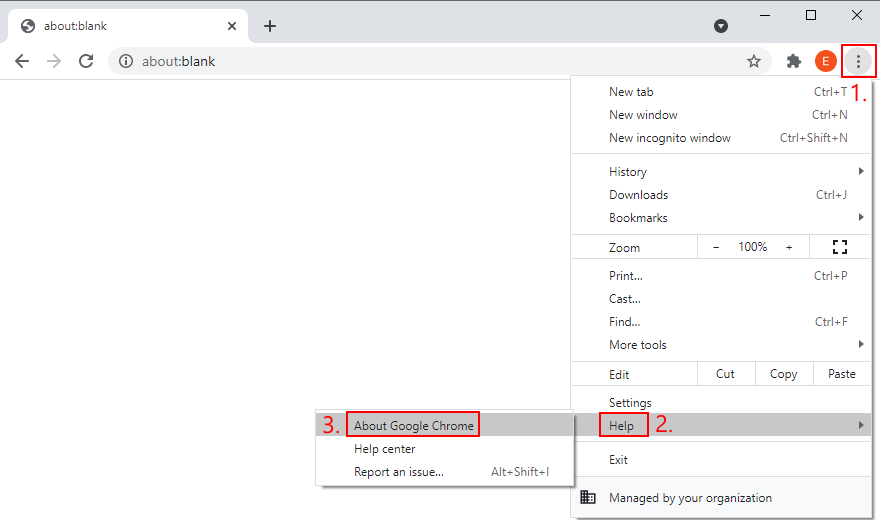
- Wait until Chrome downloads and installs any available updates
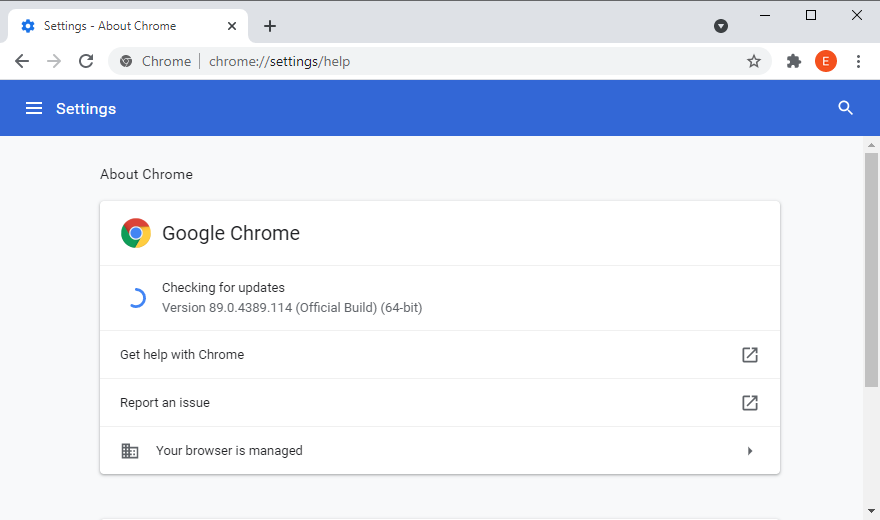
- Click Relaunch and try to watch YouTube
How to update Mozilla Firefox:
- Open the ≡ hamburger menu on the upper-right corner
- Select the Help section and click About Firefox
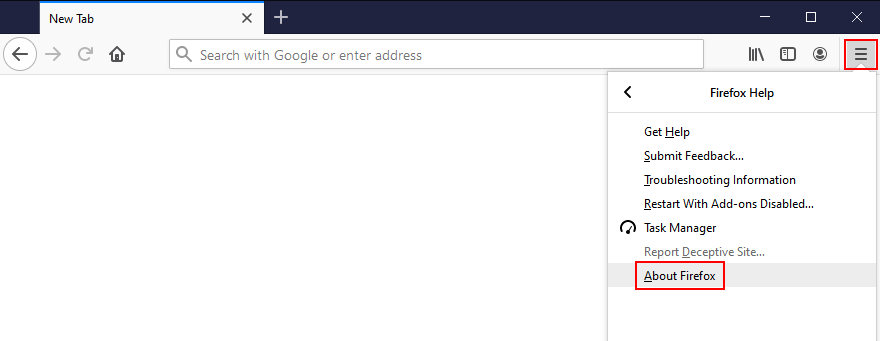
- If Firefox finds any updates, give it time to install them
- When it’s over, restart the web browser and check for audio issues
How to update Microsoft Edge:
- Click the More button on the top-right corner
- Go to the Help & feedback menu and click About Microsoft Edge
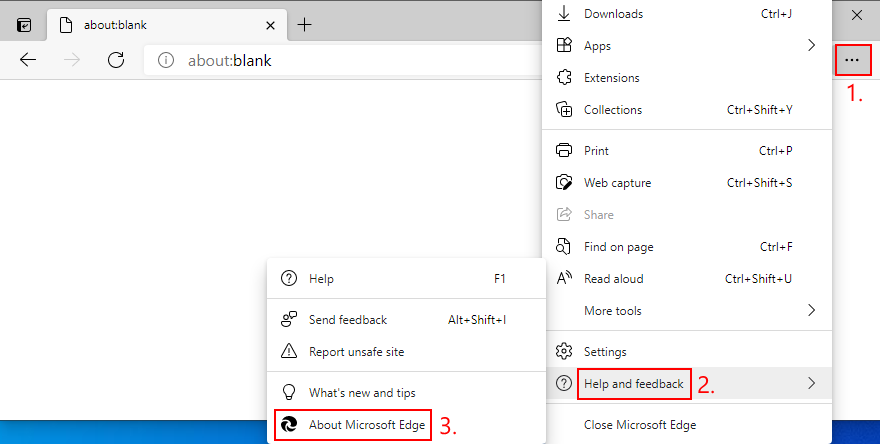
- Else, you can go to the
edge://settings/helpaddress - Wait until Edge finds and installs any updates
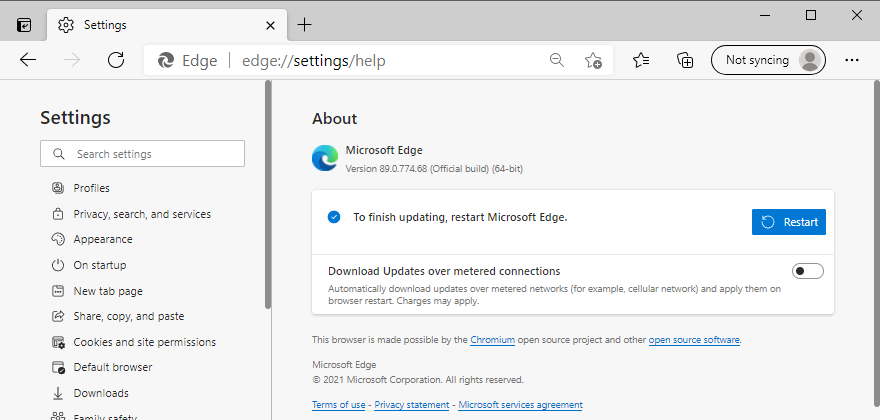
- Restart the browser and inspect results
14. Disable hardware acceleration
Modern web browsers take advantage of your computer’s hardware acceleration to improve the page loading speed and enhance your overall browsing experience. However, users report that it has interfered with the audio driver, causing rendering errors. To fix this issue, you have to turn off hardware acceleration for each browser.
How to disable hardware acceleration in Google Chrome:
- Open the More button and go to Settings
- Scroll down to the bottom of the page and click Advanced
- At System, turn off Use hardware acceleration when available
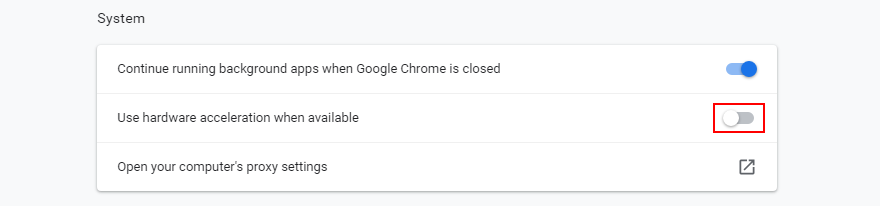
- Relaunch Chrome and check for audio errors
How to disable hardware acceleration in Mozilla Firefox:
- Click the ≡ hamburger button and go to Options (or visit the
about:preferencesaddress) - In the General tab, scroll down to Performance
- Uncheck Use recommended performance settings
- Also uncheck Use hardware acceleration when available
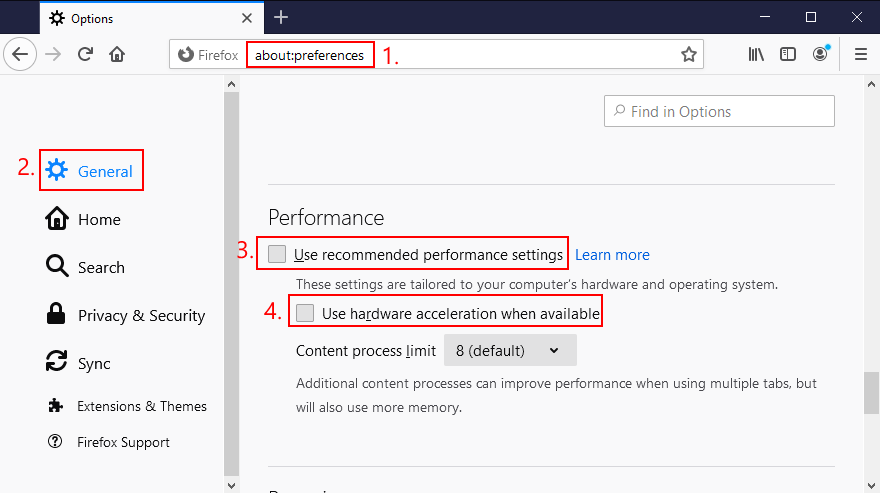
- Restart Firefox and check for audio errors
How to disable hardware acceleration in Microsoft Edge:
- Open the More menu and head over to Settings
- Jump to the System section on the left side (or visit
edge://settings/system) - Turn off Use hardware acceleration when available
- Click the Restart button
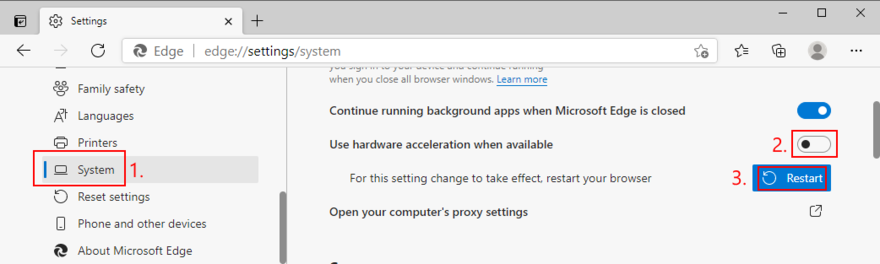
- Watch YouTube and check for audio errors
15. Disable your ad blocker
Many YouTube users who have encountered the audio renderer error said that they managed to fix this problem by deactivating the ad blocker built into the web browser. Otherwise, you should whitelist YouTube to make sure that video ads are permitted.
For example, if you’re using Adblock Plus, here’s how you can whitelist YouTube:
- Go to the Adblock Plus settings panel
- Jump to the Whitelisted websites area
- Type
youtube.comand click Add website
- Go to YouTube and check for audio rendering issues
16. Try using a different web browser
An unforeseen number of browser settings can interfere with multimedia features, so it’s a good idea to change your web browser. Switch to an application that has default settings. You can import your bookmarks and other website data, but make sure to leave the browser configuration untouched.
Then, head over to YouTube or the platform that throws the audio renderer error to test it out. If it works, you can stick to the new browser for audio and use your preferred application for everything else.
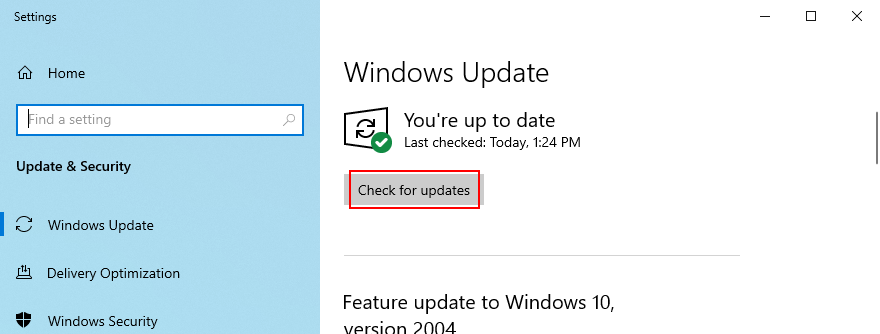
17. Update Windows 10
It’s essential to keep Windows 10 updated to the latest edition so that you can take advantage of the newest features, hotfixes, and security patches. If there’s a known problem with the audio, it will likely get fixed in the upcoming system update.
How to run Windows Update:
- Press the Win key, type Check for updates, and press Enter
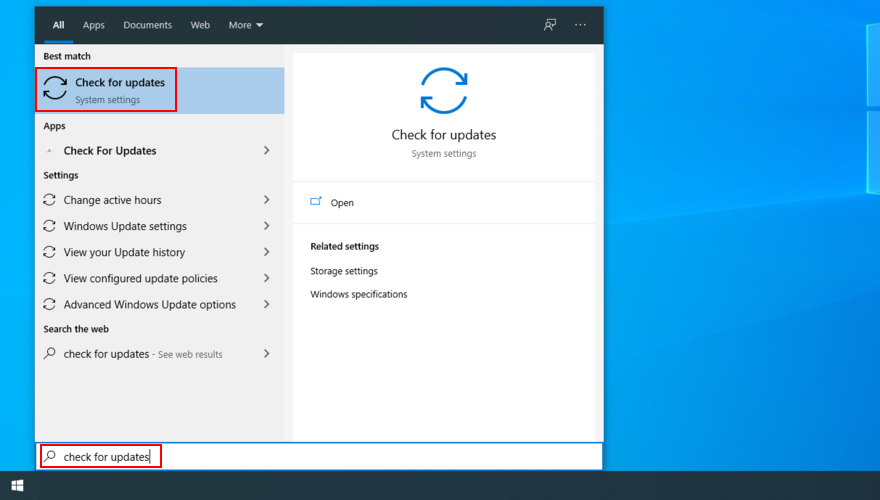
- Click Check for updates and wait
- If it finds any updates, click Download
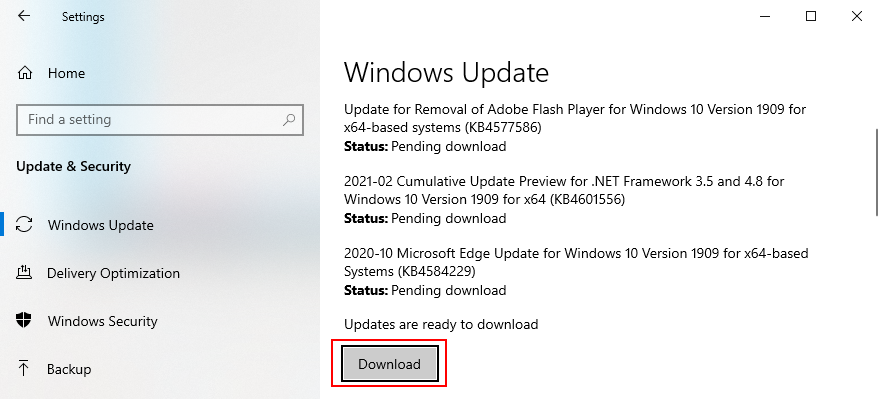
- Leave your PC unattended while it’s busy with updates. It might restart several times
- Check for audio rendering issues
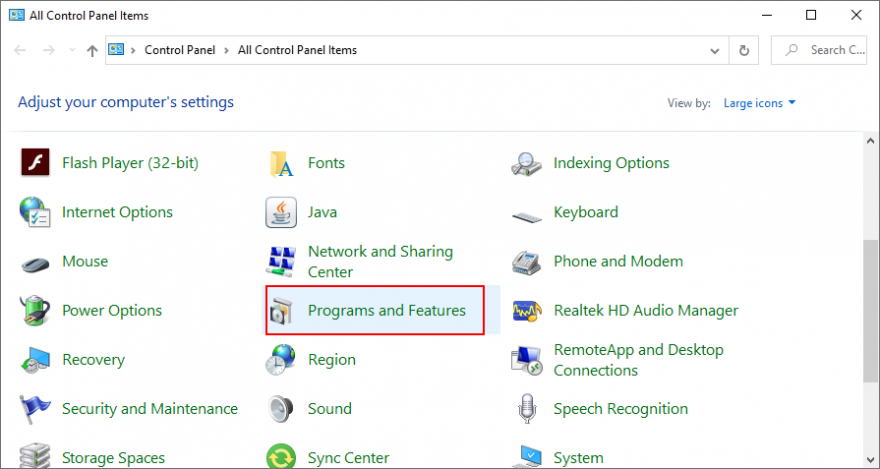
18. Uninstall system updates
On the other hand, a recent Windows update may have compromised your entire operating system, causing various problems like the audio renderer error. When this happens, you have to uninstall the malfunctioning update. Here’s how:
- Press the Win key, type control panel, and hit Enter
- Go to Programs and Features
- Click View installed updates on the left side
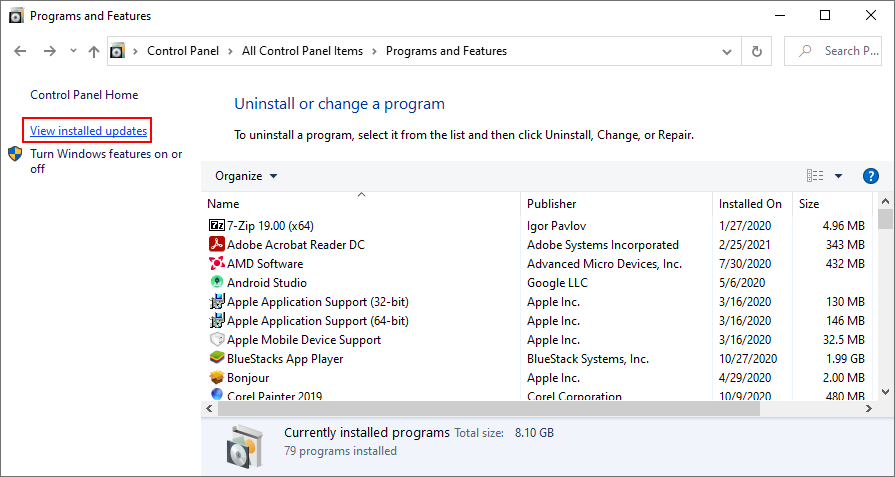
- Click the Installed On column to sort the updates (newest first)
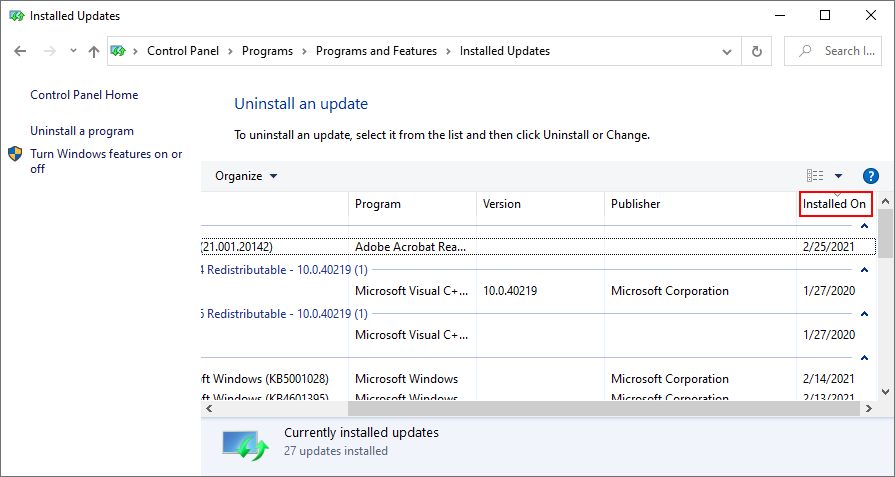
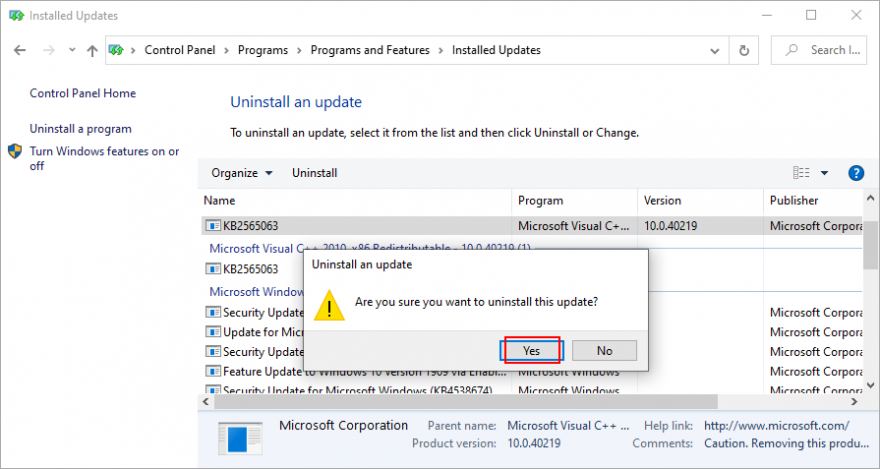
- Right-click the first update in the list and select Uninstall
- Click Yes to confirm
- Restart your PC and check for audio errors
19. Sign in with a different PC account
Windows 10 sometimes experiences issues due a lack of permissions caused by your account. To solve this problem, you can try signing in with a different profile. For example, if you’re currently logged in with the Microsoft account, switch to a local user account (or the other way around).
How to sign in with a Microsoft account:
- Right-click the Start button and select Settings
- Go to Accounts
- Click Login to your Microsoft account
- Enter your email address and password
- Click Verify to confirm your identity
- Log out of Windows 10
- Log back in using the Microsoft account
- Check for audio renderer errors
How to create a local user account:
- Right-click the Start button and go to Settings
- Select Accounts
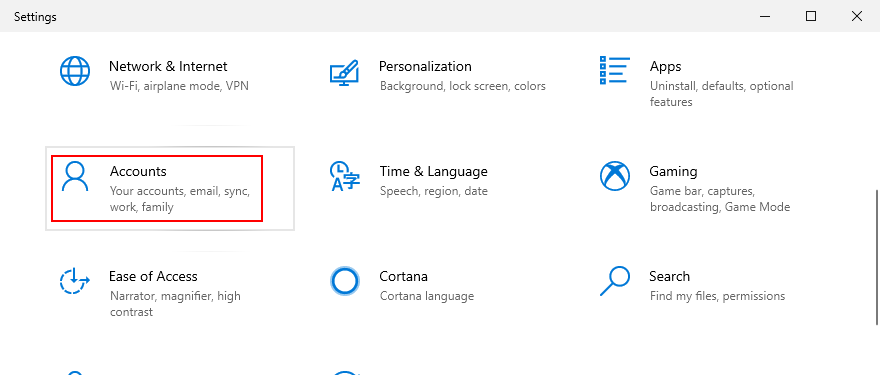
- Click Sign in with a local account instead
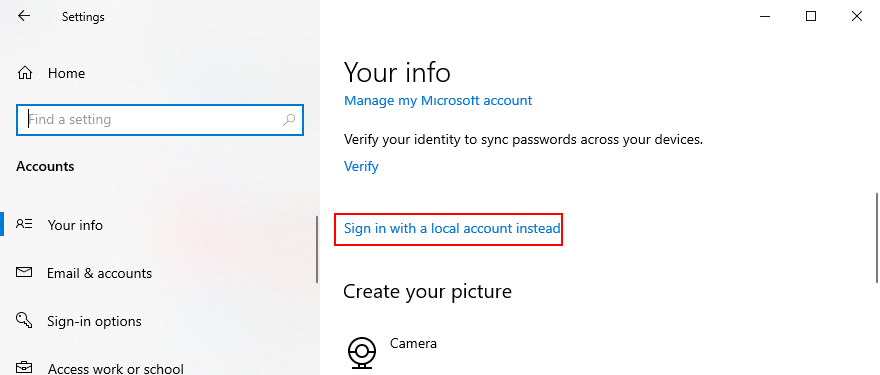
- Specify your computer password or PIN
- At Enter your local account info, set a new username and password

- Click Next and then Sign out and finish
- Log back in to Windows 10 using the new local account
- Check for audio issues
20. Reset BIOS
DELL users have reported that they were experiencing the audio renderer error due to incorrect BIOS settings. And they were able to solve it by restoring BIOS to default settings. Here’s how you can easily do that:
- Restart your computer
- During reboot, rapidly press the key displayed on the screen to access BIOS
- Locate and access the advanced BIOS options
- Enable the setting that resets BIOS configuration data
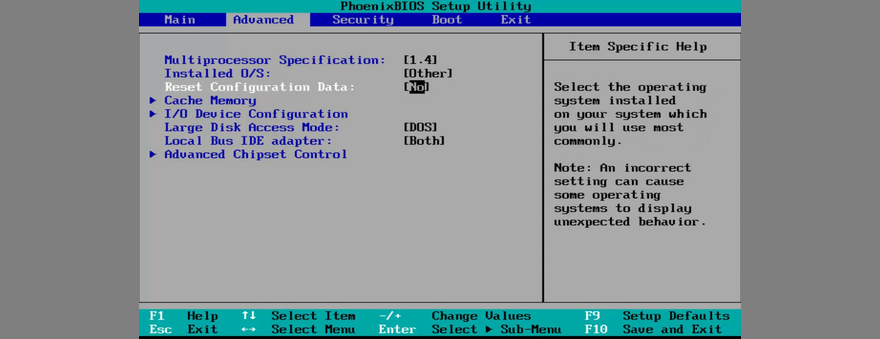
- Save the current BIOS settings and exit
- Wait until Windows boots, then check for audio issues
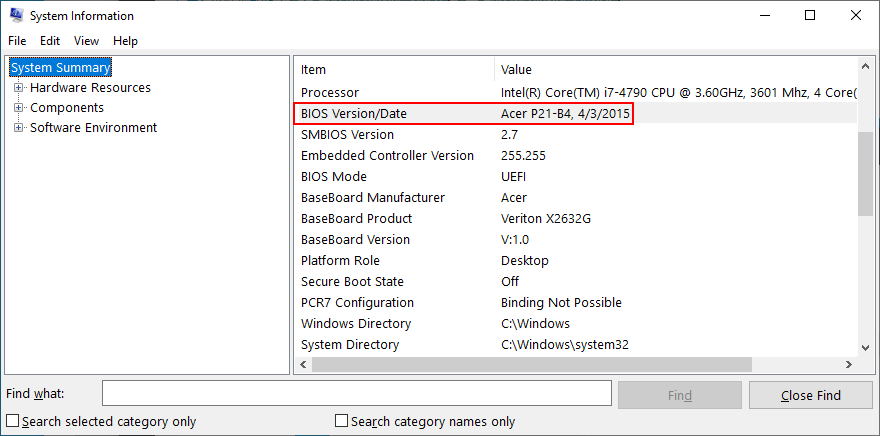
21. Update BIOS
Another way to deal with BIOS issues on DELL systems is by updating it to the latest version since an obsolete BIOS is known to cause system stability and even audio problems. Here’s how:
- Press the Win key, type System Information, and open this app
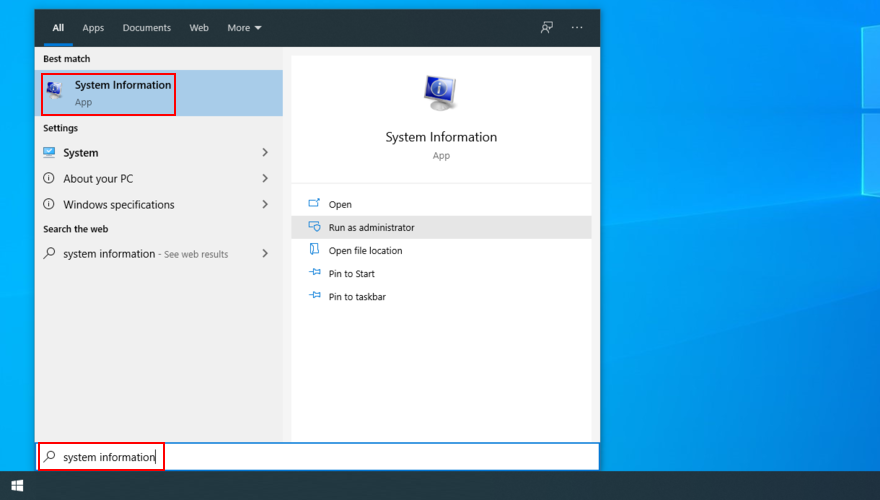
- Go to the System Summary section
- Write down the info displayed at BIOS Version/Date
- Go to the website of your BIOS manufacturer
- Find and download a newer BIOS version that’s compatible with your PC
- Unzip the BIOS setup file to a USB flash drive
- Restart your computer and access BIOS
- Back up the current BIOS version to the pen drive
- Start BIOS setup

- Don’t turn off or restart your PC during setup
- Boot Windows as normal and check for audio issues
22. Use System Restore
If the audio renderer error was caused by a software event that you can’t pinpoint, you can fix it by rolling back Windows 10 to a previous restore point. Here’s how to do its easily:
- Make sure you’re logged in to Windows 10 with admin rights
- Press Win key + R, type control panel, and press Enter
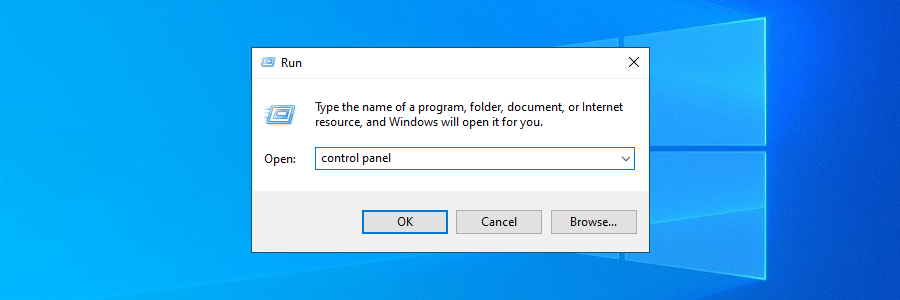
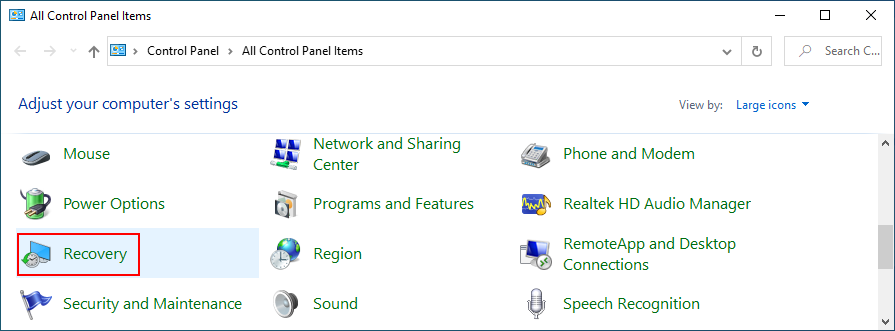
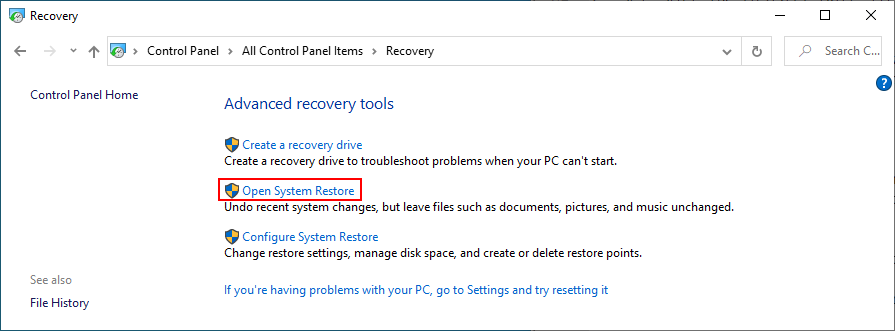
- Go to the Recovery area
- Click Open System Restore
- Select a system restore point from the list
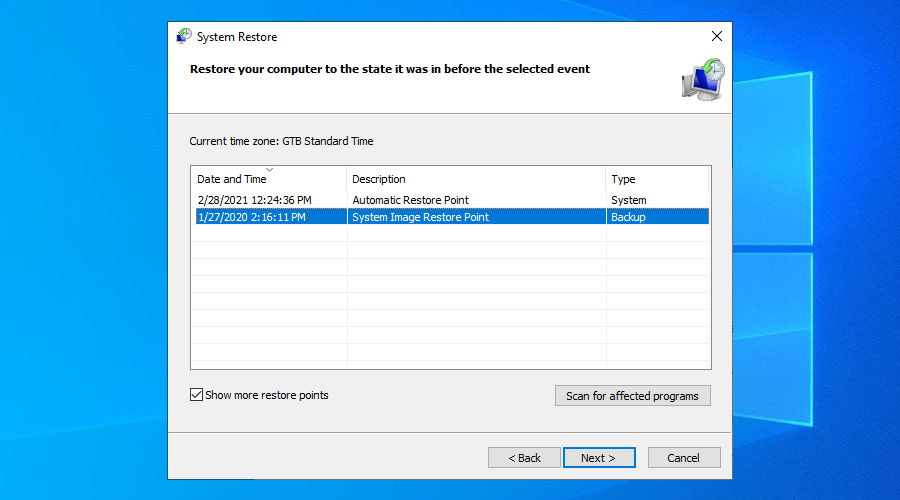
- Click Next and follow the on-screen instructions
- Restart your PC and check for audio issues
The Audio renderer error can be fixed
To review, you can stumble upon the audio renderer error when trying to watch a video on YouTube, in your media player, or anywhere else. It’s caused by a hardware or software issue which you should be able to fix.
For instance, you can clear browser cache, run the audio troubleshooter, make sure the sound device is enabled and set as default, restart the Windows Audio service, synchronize the sample rate for ASIO drivers, as well as run audio tests on HP laptops.
It’s also a good idea to reinstall the audio adapter, update the audio driver or roll back to a compatible version, check the cables and remove extra peripheral devices, disable any audio mixing software, update your web browser, as well as disable hardware acceleration.
Furthermore, you can turn off your ad blocker, try using a different browser, update Windows 10 or uninstall unstable system updates, sign in to Windows 10 using a different account, reset BIOS and update it to the latest version, as well as roll back Windows 10 using System Restore mode.
How did you manage to finally get rid of the audio renderer error? Did we miss any essential steps? Let us know in the comment area below.