AppStoreは優れたサードパーティのメモアプリ。しかし、あなたが私のようなら、iPhoneとiPadに組み込まれているAppleNotesアプリを好むでしょう。それは、私のランダムな考えの捨て場になることから、テキストの書式設定からスケッチや他の人とのコラボレーションまで、ほとんどすべての頼りになる場所になるまでに長い道のりを歩んできました。

はい! Notesアプリは、これだけでなく、さらに多くのことを実行します。あまり知られていないハイライトのロックを解除する準備はできていますか?基本から始めて、iPhoneとiPadでNotesアプリを使用するための28のヒントとコツを紹介します。

  1. 新しいメモを作成する
  2. iPhoneのメモを編集する
  3. iPhoneでメモを削除する
  4. 削除されたリカバリメモ
  5. 使用iOS 15Notesアプリのタグ
  6. iPadOS15のiPadでのクイックノート
  7. iPhoneで重要なメモをピン留めする
  8. Siriを使用してメモを作成する
  9. 他のアプリからメモを作成
  10. チェックリストを作成する
  11. Notesアプリでテキストをフォーマットする
  12. Notesアプリでさまざまなフォントを使用する
  13. メモアプリで紙のスタイルを変更する
  14. メモアプリにメディア(写真とビデオ)を追加
  15. Notesアプリを使用してドキュメントをスキャンする
  16. すべての添付ファイルを1か所で表示
  17. 機密メモをパスワードでロックする
  18. リストからサムネイルビュー
  19. メモの内側に描画してスケッチする
  20. Notesアプリ内を検索
  21. メモを日付またはタイトルで並べ替える
  22. コントロールセンターへのメモのショートカットを追加
  23. ロック画面にメモを追加
  24. iPhoneのホーム画面にNotesアプリウィジェットを追加する
  25. 作成メモを整理するためのフォルダとサブフォルダ
  26. 共同作業のために1つまたは複数のメモフォルダにユーザーを追加する
  27. メモを同期するiCloud、Googleなどへ
  28. iPhoneまたはiPadにメモをPDFとして保存

1。新しいnot e

  1. Notesアプリを開きます。
  2. 作成ボタン(四角いボックス)をタップします。ペンで)。
  3. 入力を開始します。
  4. 上級者向けのヒント:何かをすばやく書き留めたいですか?ホーム画面で、メモアプリのアイコンを長押しして、新しいメモを選択します。 (下の右の画像を参照) アップルノートアプリで新しいノートを作成する

2。 iPhoneのメモを編集する

  1. メモアプリを開き、編集するメモを見つけてタップします。
  2. 開いているメモの任意の場所をタップします。編集を開始します。
  3. 終了したら、[完了]をタップします。
3。 iPhoneでメモを削除する

エントリは不要になりましたか?

  1. メモアプリを開いて、目的のメモを入力します。
  2. その他のアイコン(円の中に3つのドット)をタップします
  3. 削除をタップします。
メモを削除するその他の方法

ヒント:[メモ]フォルダから、メモを右から左にスワイプして、赤いゴミ箱アイコン(下の左の画像)をタップすることもできます。または、メモを長押しして削除 (右下の画像)を選択することもできます。

iPhoneで複数のメモを削除

上級者向けのヒント:メモフォルダから複数のメモを削除するには、その他のアイコンをタップします。次に、メモの選択をタップし、削除するエントリを選択して、最後に削除をタップします。

4。削除されたメモを復元する

私たちは人間であり、誤ってメモを削除してしまうことがあります。まあ、心配しないでください! 30日(まれに40日)で取得できます。 を学ぶここでそれを行う方法

タグを使用すると、メモをすばやく簡単に分類および整理できます。更新されたNotesアプリでタグを使用するのは簡単です。メモを作成するときに、ハッシュタグ記号を追加して単語を入力します。たとえば、 #mango です。タグが作成されたことを示す黄色に変わります。

iOS15ノートアプリでタグを使用する

フォルダセクションに移動し、一番下までスクロールしてすべてのタグを表示します(Appleはこのタグブラウザと呼ぶのが好きです)。 1つをタップすると、このタグが付いているすべてのメモが表示されます。 2つ以上のタグの組み合わせをタップすると、選択したすべてのタグが含まれるメモが表示されます。

iOS15のNotesアプリのすべてのタグを表示

追加情報 カスタムスマートフォルダー:iPhoneはカスタムスマートフォルダーを作成し、メモで使用するタグに基づいて、適格なメモをフォルダーに自動的に配置できます。

6。 iPadOS15のiPadに関するクイックノート

これで、 iPad とMacでクイックノートを作成し、タップで情報、住所、連絡先情報、リンクなどを簡単に書き留めることができます。そのうえ?クイックノートは、同じApple IDを持つすべてのAppleデバイス間で同期され、iOS15で更新されたiPhoneのノートアプリでも表示および編集できます。

7。重要なメモをiPhoneに固定する

1000を超えるメモがあります。確かに、私は必要なものを見つけるために検索することができます。ただし、最も頻繁に1回トップに固定するはより効率的です。

iPhoneの一番上に重要なメモを固定する

メモを固定するには、Notesアプリを開きます。また、メモフォルダからメモを左から右にスワイプします。最後に、ピンアイコンをタップします。同じ手順に従って固定を解除します。

8.8。 Siriを使用してメモを作成する

内蔵のAppleの音声アシスタントであるSiriを使用すると、音声を使用して簡単にメモを作成できます。

このため、サイドボタンを押してSiriを呼び出す/ホームボタンまたは「HeySiri」と言ってから、「デリー行きの電車がプラットフォーム番号6に到着し、コーチがエスカレーターの近くに配置されることに注意してください。」のように尋ねます。

9。他のアプリからメモを作成する

iOS/iPadOS共有シートのメモのアプリアイコンのおかげで、iPhoneまたは他のアプリから直接メモを簡単に作成できます。写真のようなiPad。方法は次のとおりです。

  1. 他のアプリを開きます。 Flipkartを使用しています
  2. 共有アイコンをタップします。
  3. アプリアイコンの横の列をスライドして、をタップします。メモ
  4. 新しいメモを作成するか、既存のメモに保存するかを選択します。
  5. 次に、必要に応じてテキストを追加します。
  6. 最後に、保存をタップします。 他のアプリからメモを作成
Safariからテキストを選択してNotesに追加

上級者向けのヒント:Safariから、記事のリンク全体を記事名とともに保存できます(上記の手順)。ただし、テキストを選択して共有をタップすることもできます。次に、メモを選択して、選択したテキストのみでメモを作成します。記事の完全なリンクではなく、記事の一部(引用符や図など)をメモアプリに保存する場合に便利です。

10。チェックリストを作成する

食料品の買い物リストまたはやることリスト? Notesアプリを使用すると、チェックリストを簡単に作成できます。方法は次のとおりです。

Apple NotesAppでチェックリストを作成する

最も簡単な方法:ホーム画面で、Notesアプリのアイコンを長押しし、新しいチェックリストを選択します。ここで、最初のエントリを入力します。キーボードの戻るをタップしてさらに追加します。

または、メモアプリを開いて、作成アイコンをタップします。キーボードの上部から、チェックリストアイコン(チェックマークの付いた丸)をタップして入力を開始します。

11。 Notesアプリでテキストをフォーマットする

太字、斜体、箇条書きなどのない長いテキストは単調に読むことができます。スパイスを効かせて読みやすくする方法は次のとおりです。

  1. メモを開いて単語、文、段落を選択します。
  2. をタップします。 BIU をクリックし、太字、斜体、下線を選択します。
  3. 他のツールが必要ですか?キーボードの上にある Aa をタップして、タイトル、見出し、ストライクスルー、箇条書き、インデントなどを使用します。 Notesアプリでテキストをフォーマットする

メモアプリ内にテーブルを挿入

ヒント:すべての新しいメモをタイトル、本文の順に開始する場合は、設定アプリ→メモ→を開きます。 新しいメモの開始→目的のオプションを選択します。

12。ノートアプリでさまざまなフォントを使用する

ノートの作成中は、デフォルトのフォントに制限されません。 Pages、Numbers、Twitter、Instagram、その他のいくつかのアプリと同様に、Notesアプリもサードパーティのフォントをサポートしています。 インストール方法と使用方法を学ぶことができますiPhoneで

13。ノートアプリで用紙のスタイルを変更する

デフォルトでは、ノートアプリの背景は真っ白です。必要に応じて、線とグリッドを使用。これは、iPadでApple Pencilを使用して何かを手書きする場合に特に役立ちます。

テキストだけでなく、写真、ビデオ、地図、ハイパーリンクなどをメモに追加できます。方法は次のとおりです。

  1. 新しいメモの作成を開始するか、既存のメモを編集します。
  2. カメラアイコンをタップします。
  3. 写真またはビデオを選択または写真またはビデオを撮るをタップします。 以下のスクリーンショットでは、 前者を選択しました。
  4. 1つ以上のファイルを選択し、[追加]をタップします。 li>
  5. 最後に、[完了]をタップしてメモをメディアに保存します。 写真とビデオをNotesアプリに追加
AppleNotesにマップを追加

:地図を追加するには、Apple Mapsを開き、場所を検索し、少し上にスワイプして共有ボタンを表示し、それをタップします。最後に、メモを選択し、保存をタップします。右上の共有アイコンをタップすると、Googleマップでも同じことができます。

15。 Notesアプリを使用してドキュメントをスキャンする

ドキュメントをスキャンして追加する手順は上記と同様です。

Notesアプリを使用してドキュメントをスキャンする

または、ホーム画面のメモアプリアイコンを長押しして、ドキュメントのスキャンを選択することもできます。次に、カメラをドキュメントに向けてキャプチャします。コーナーを調整し、満足したら、スキャンを続ける保存をタップします。

16。すべての添付ファイルを1か所で表示

Notesアプリを使用すると、すべての添付ファイルを1か所で簡単に表示できます。このため:

  1. このアプリを開き、notesフォルダーにいることを確認します。 (iCloud、Notesなどの場合があります)
  2. 円の中にある3つのドットアイコンをタップします。
  3. 添付ファイルを表示をタップします。 円のアイコン内の3つのドットをタップし、[添付ファイルの表示]をタップします
  4. 次に、写真またはビデオをタップして表示します。
  5. オプション [メモに表示] をタップして、元のメモにすぐに移動することもできます。この添付ファイルはその一部です。 写真またはビデオをタップして表示する

17。機密メモをパスワードでロックする

  1. メモを開き、 3つのドットアイコンをタップします。
  2. をタップします。強い>ロック。 初めての場合は、パスワードを設定する必要があります。それを行う。簡単にするために、FaceIDまたはTouchIDを使用することもできます。 iPhoneのパスワードでメモをロッ​​クする
  3. メモのロックパスワード(またはバイオメトリクス認証)を入力し、<をタップします完了したら、上部にあるstrong>ロックアイコンを開く。メモは即座にパスワードで保護されます。 メモアプリのパスワードを入力し、[ロックアイコンを開く]をタップします

18。リストからサムネイルビューに変更

メモのリストからサムネイルビューに変更

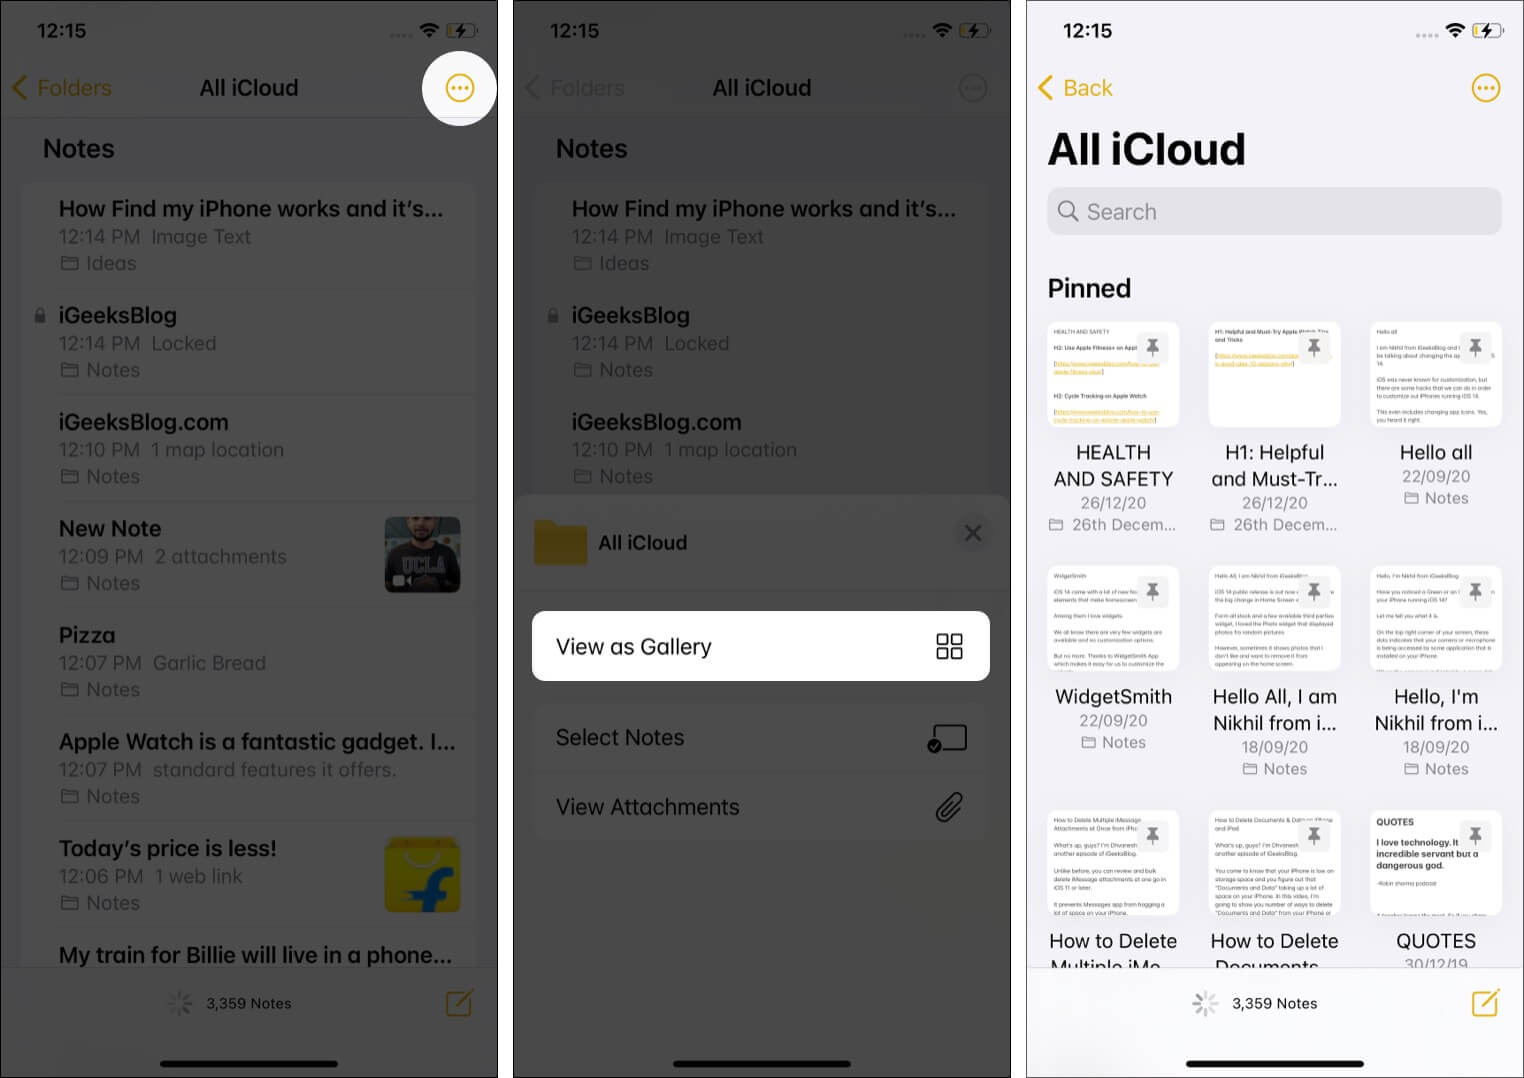
デフォルトでは、メモはリストとして表示されます。ただし、サムネイルビューが必要な場合は、メモフォルダに入ったら 3つのドットアイコンをタップしてください。 Next, tap View as Gallery.

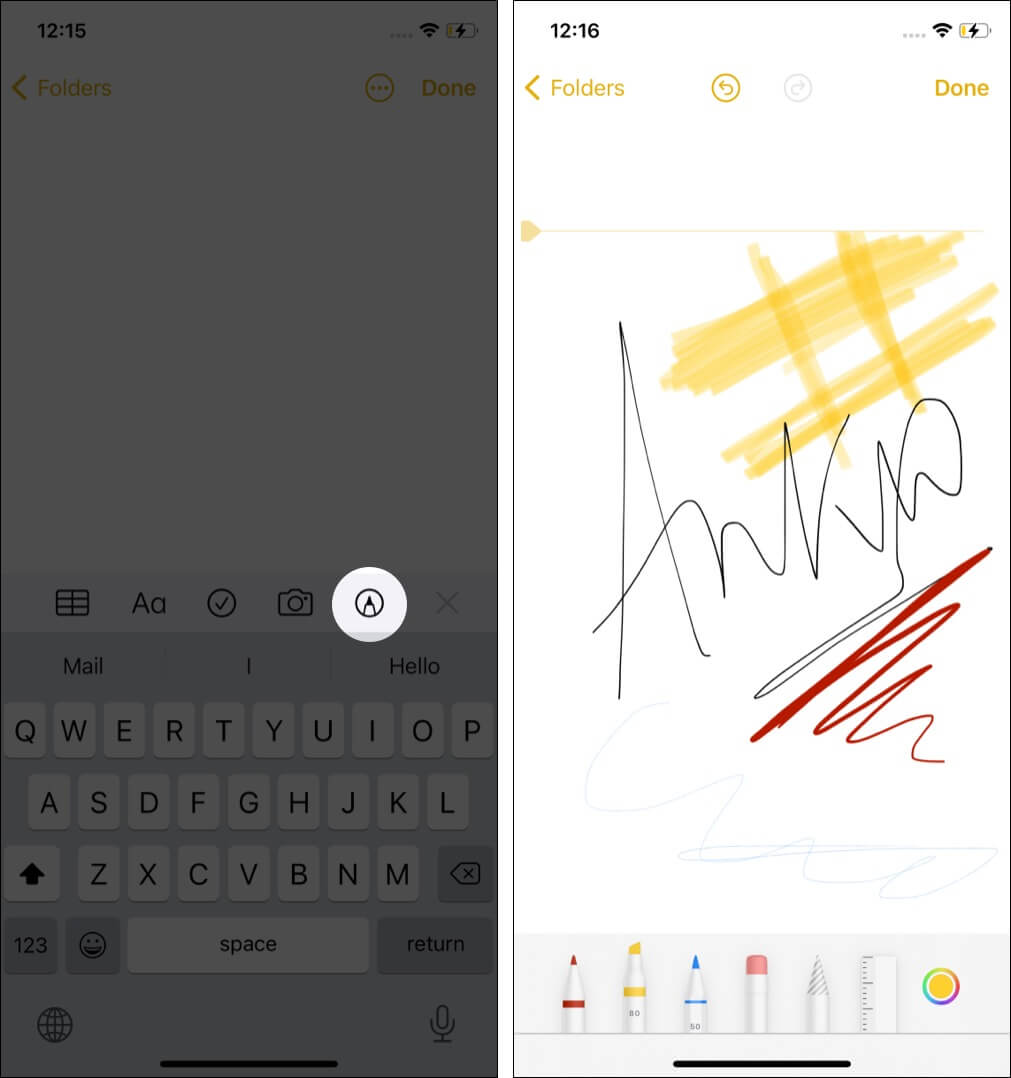
19. Draw and sketch inside notes

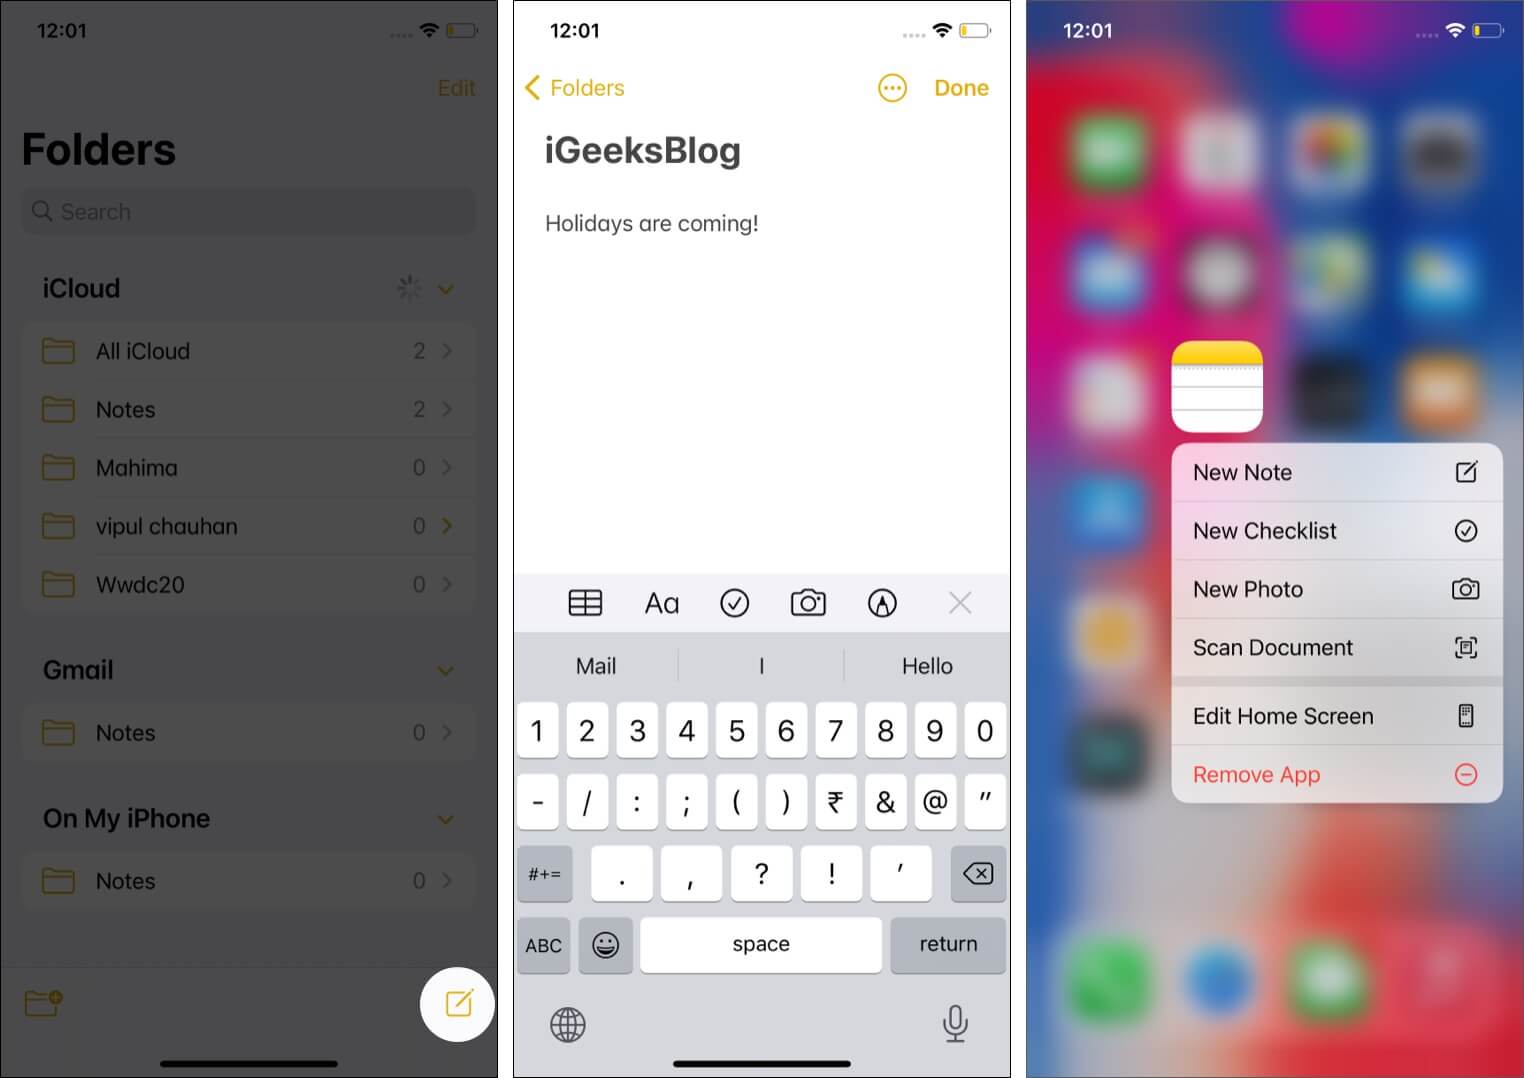
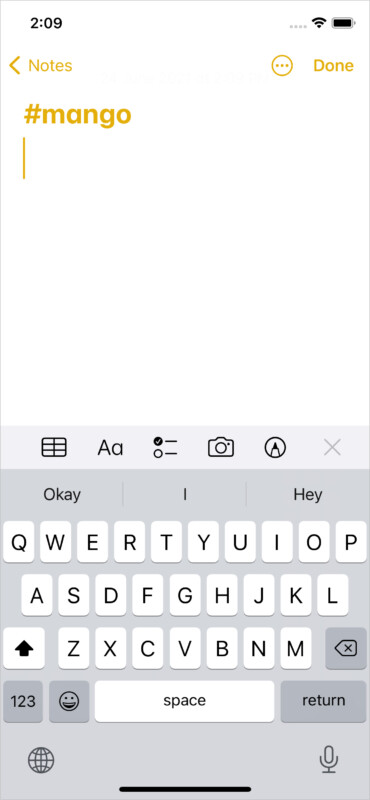
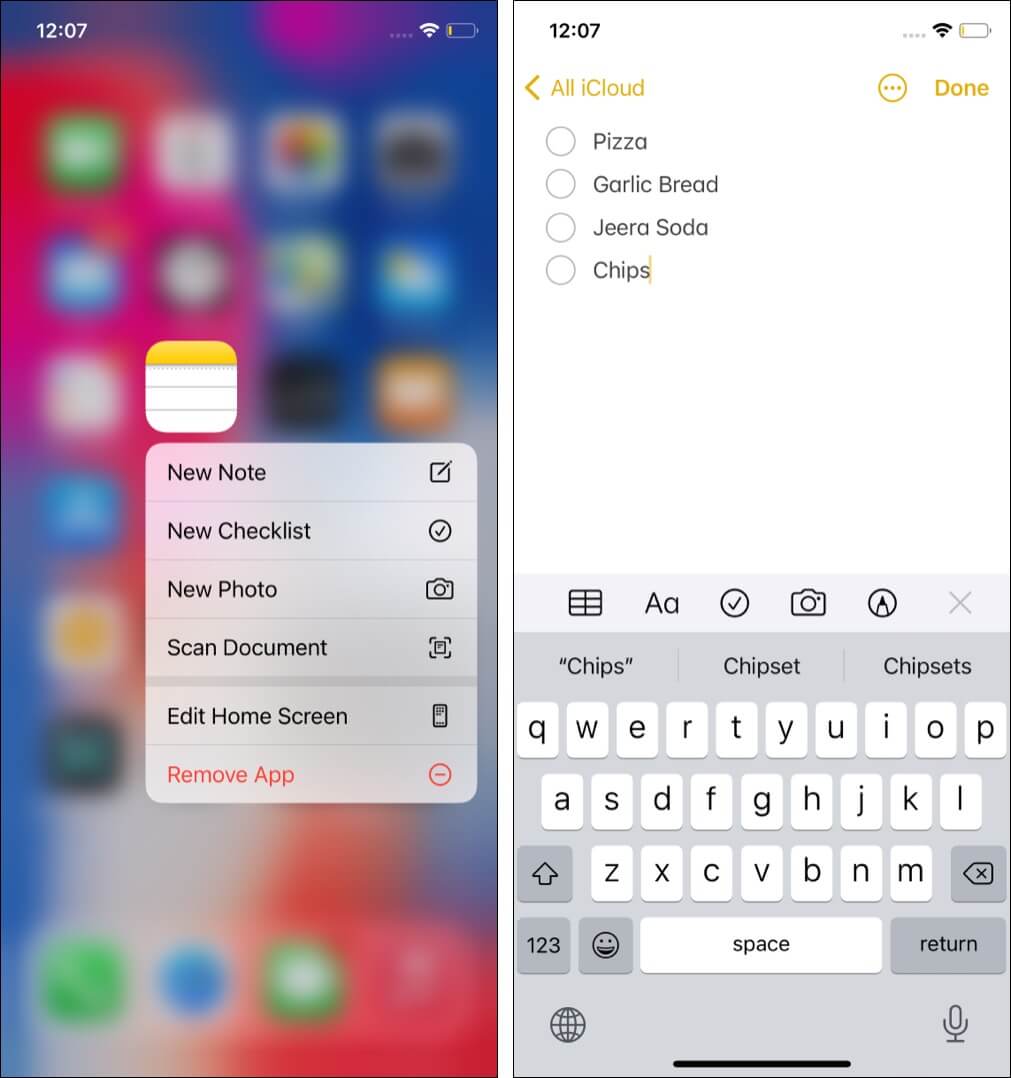
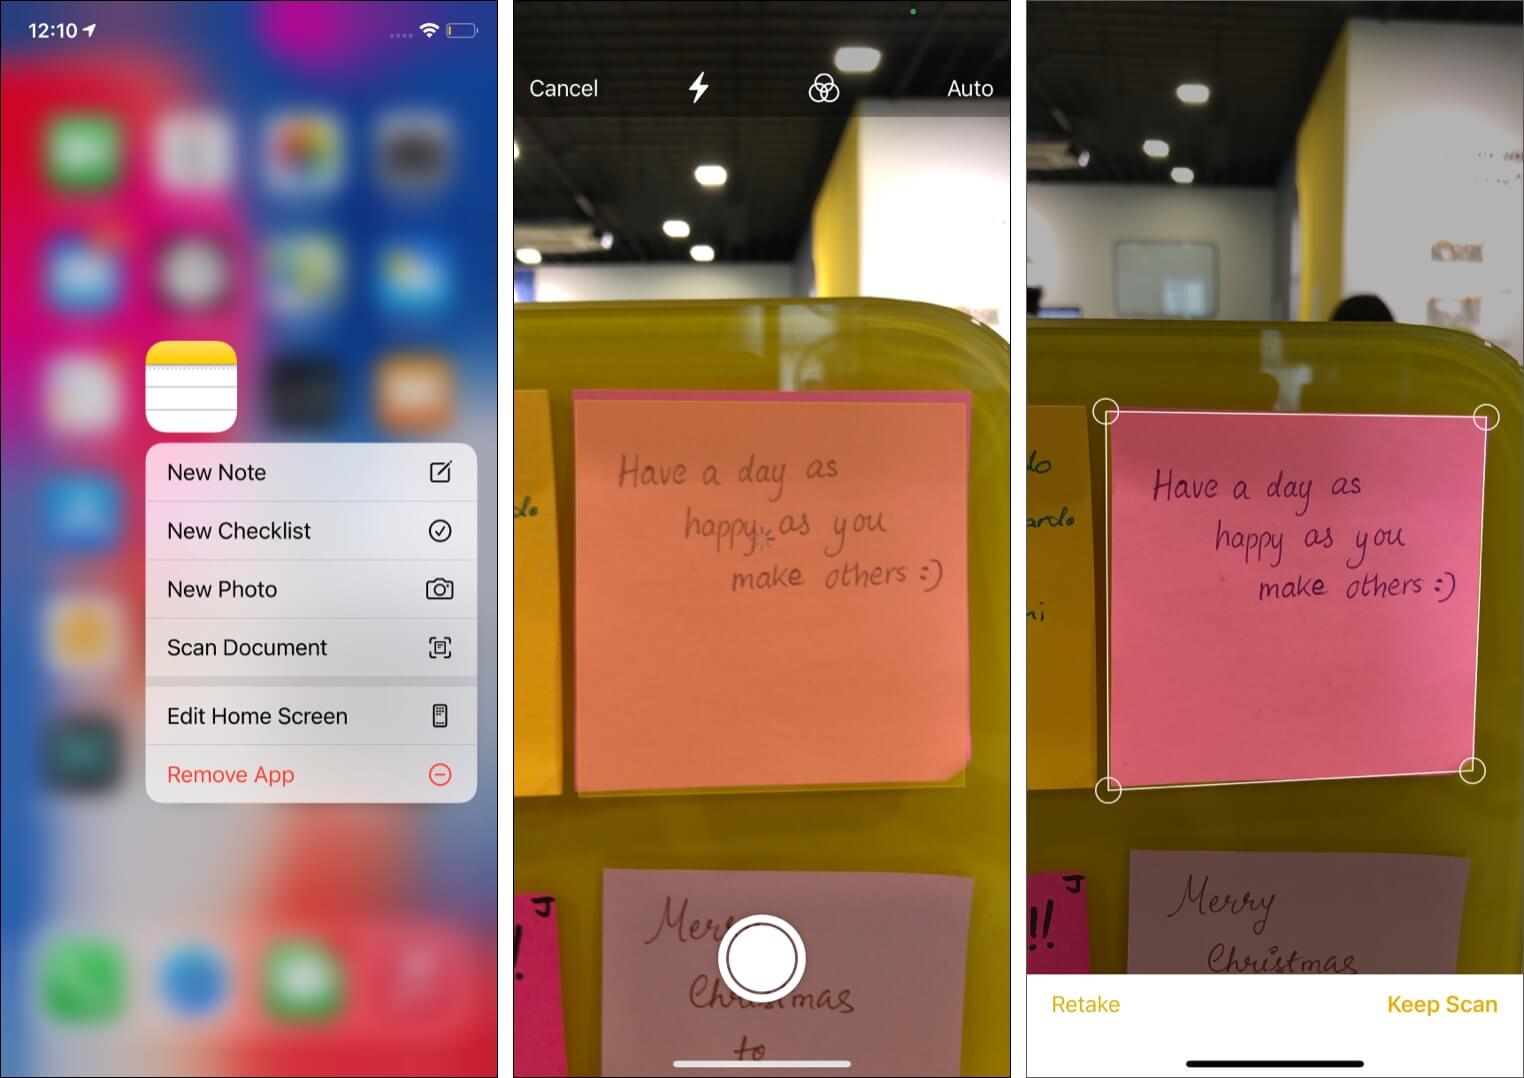
  1. Start a new note or edit an existing one.
  2. Tap the ‘pen inside a circleicon to see the drawing tools.
  3. Use the pen, pencil, thick brush, eraser, lasso, ruler, and different colors to create your sketch.
  4. To scroll while drawing, use two fingers.Draw and sketch inside notes app on iPhone and iPad

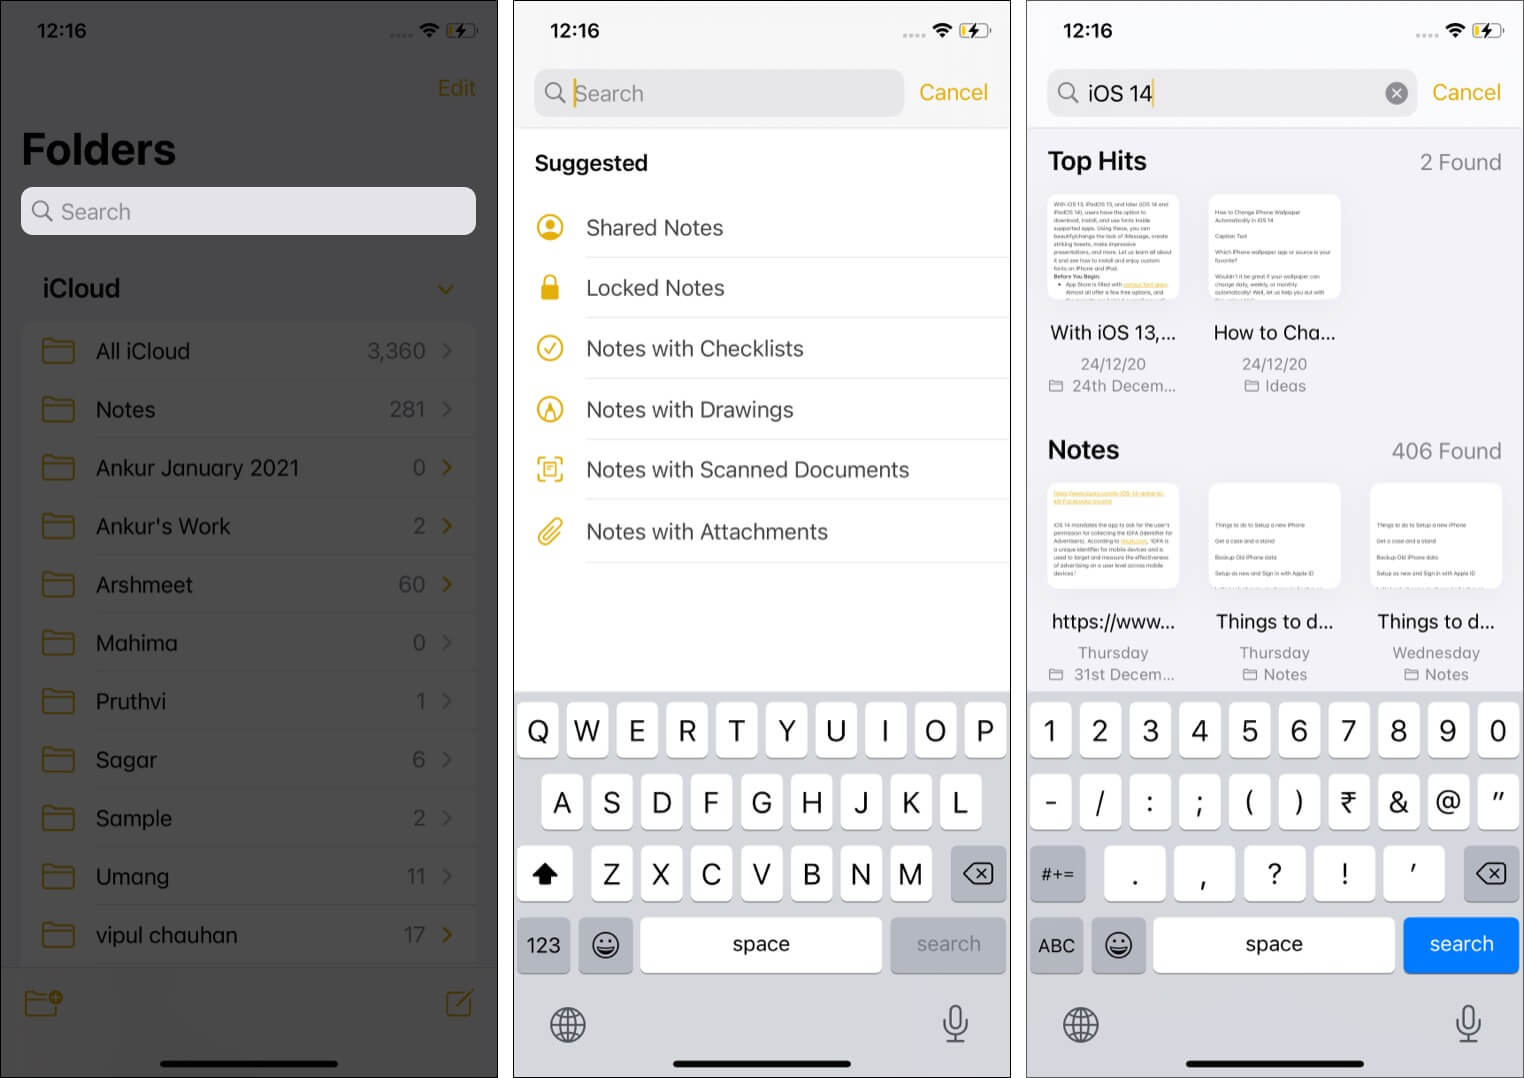
20. Search inside the Notes app

Search inside Notes app

Open the Notes app and swipe down to reveal the search bar. Choose an option from under ‘Suggested.’ Or, type your query to find the exact note you are looking for.

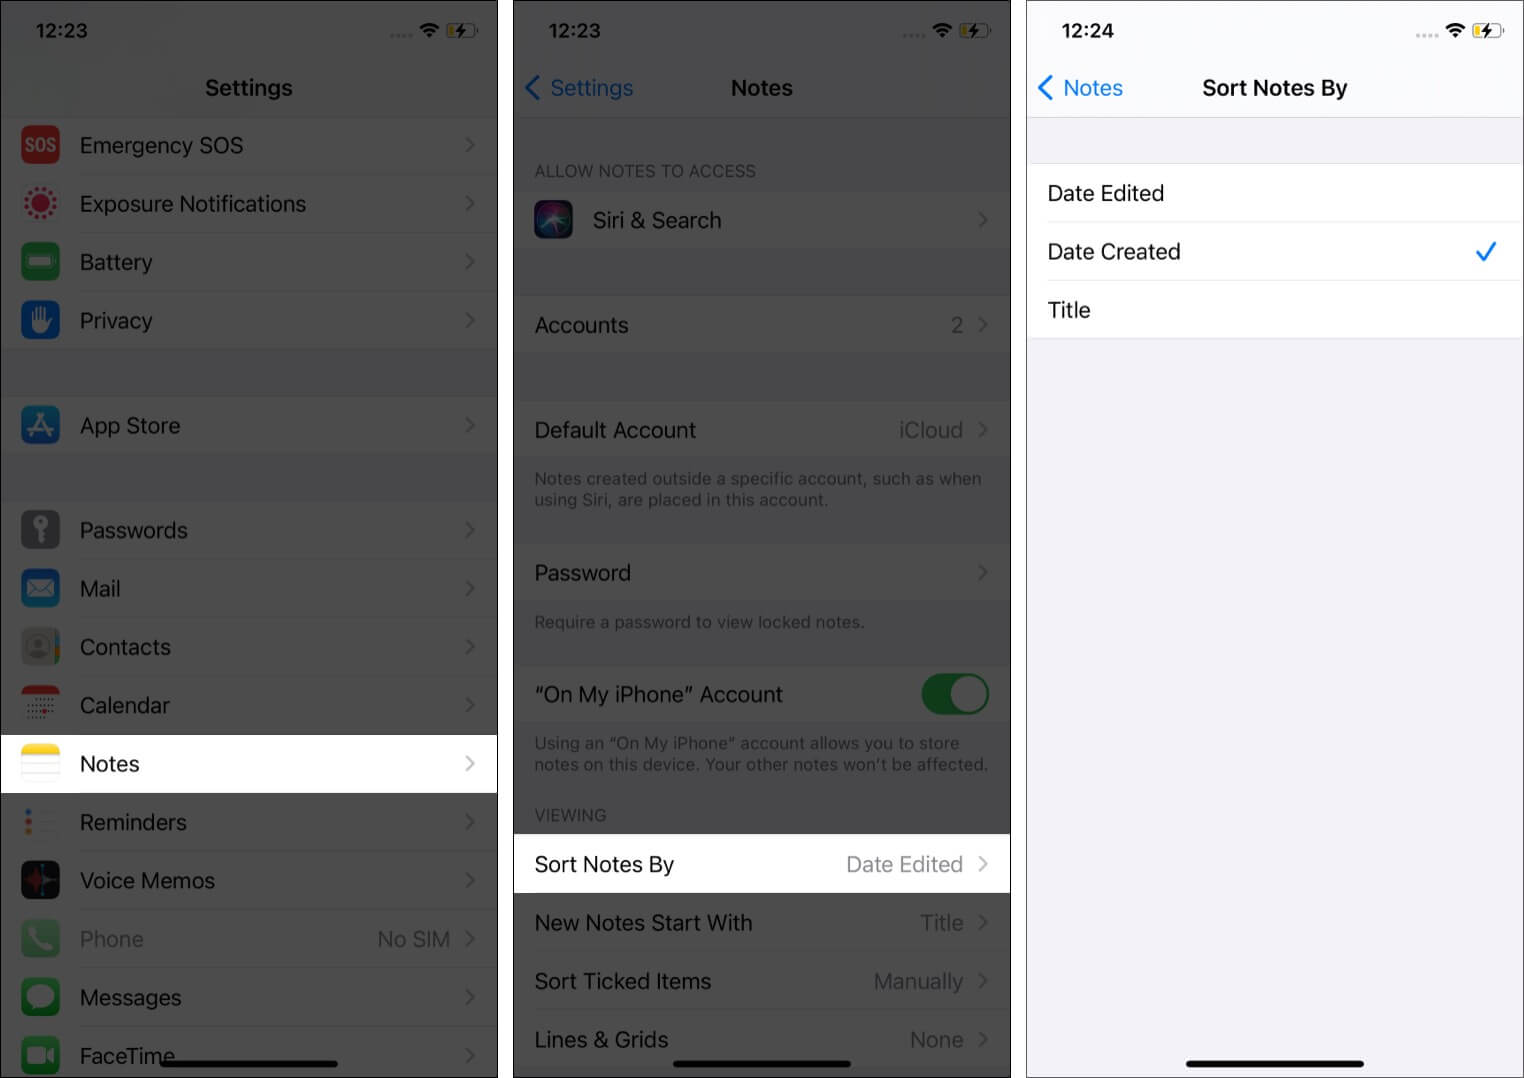
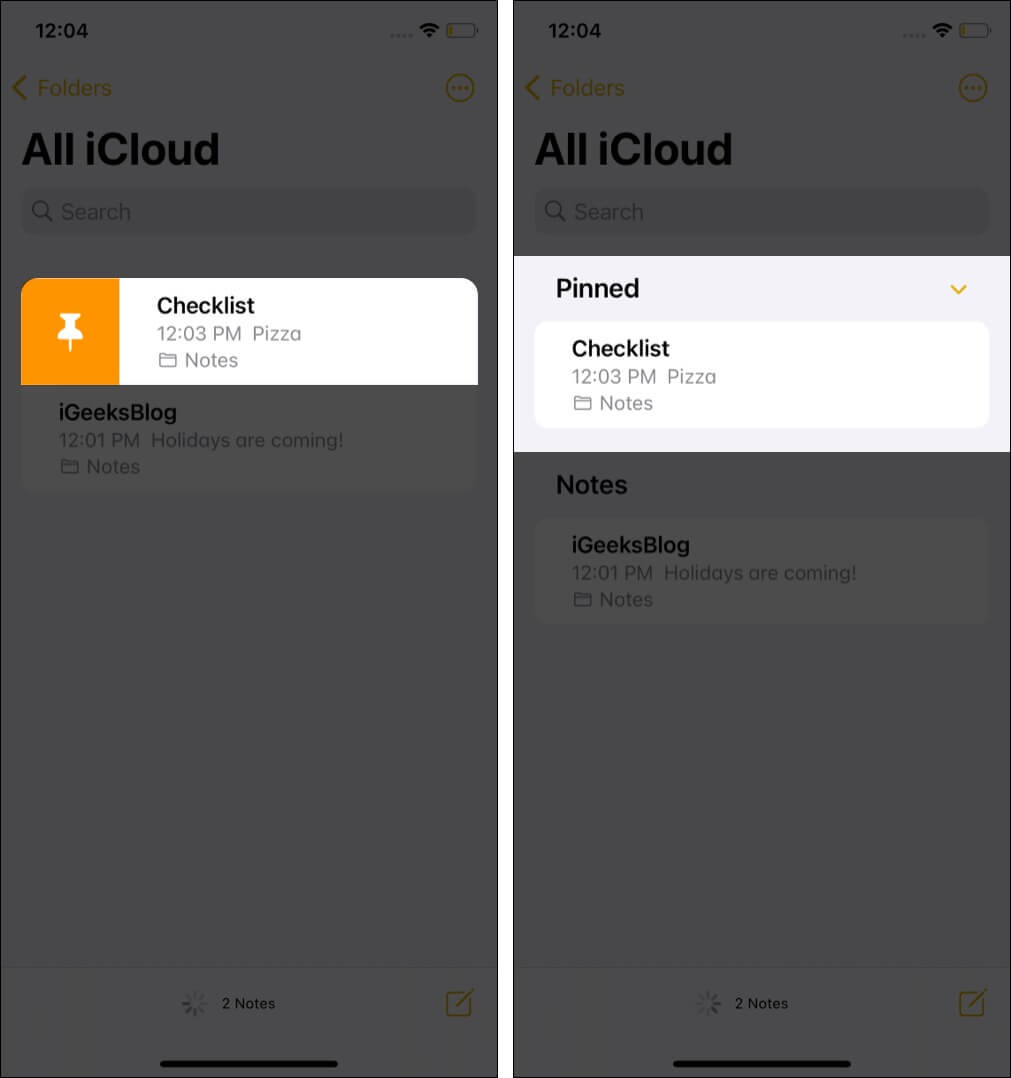
21. Sort notes by date or title

  1. Open the Settings app and tap Notes.
  2. Tap Sort Notes By.
  3. Choose one of the desired options.Sort notes by date or title

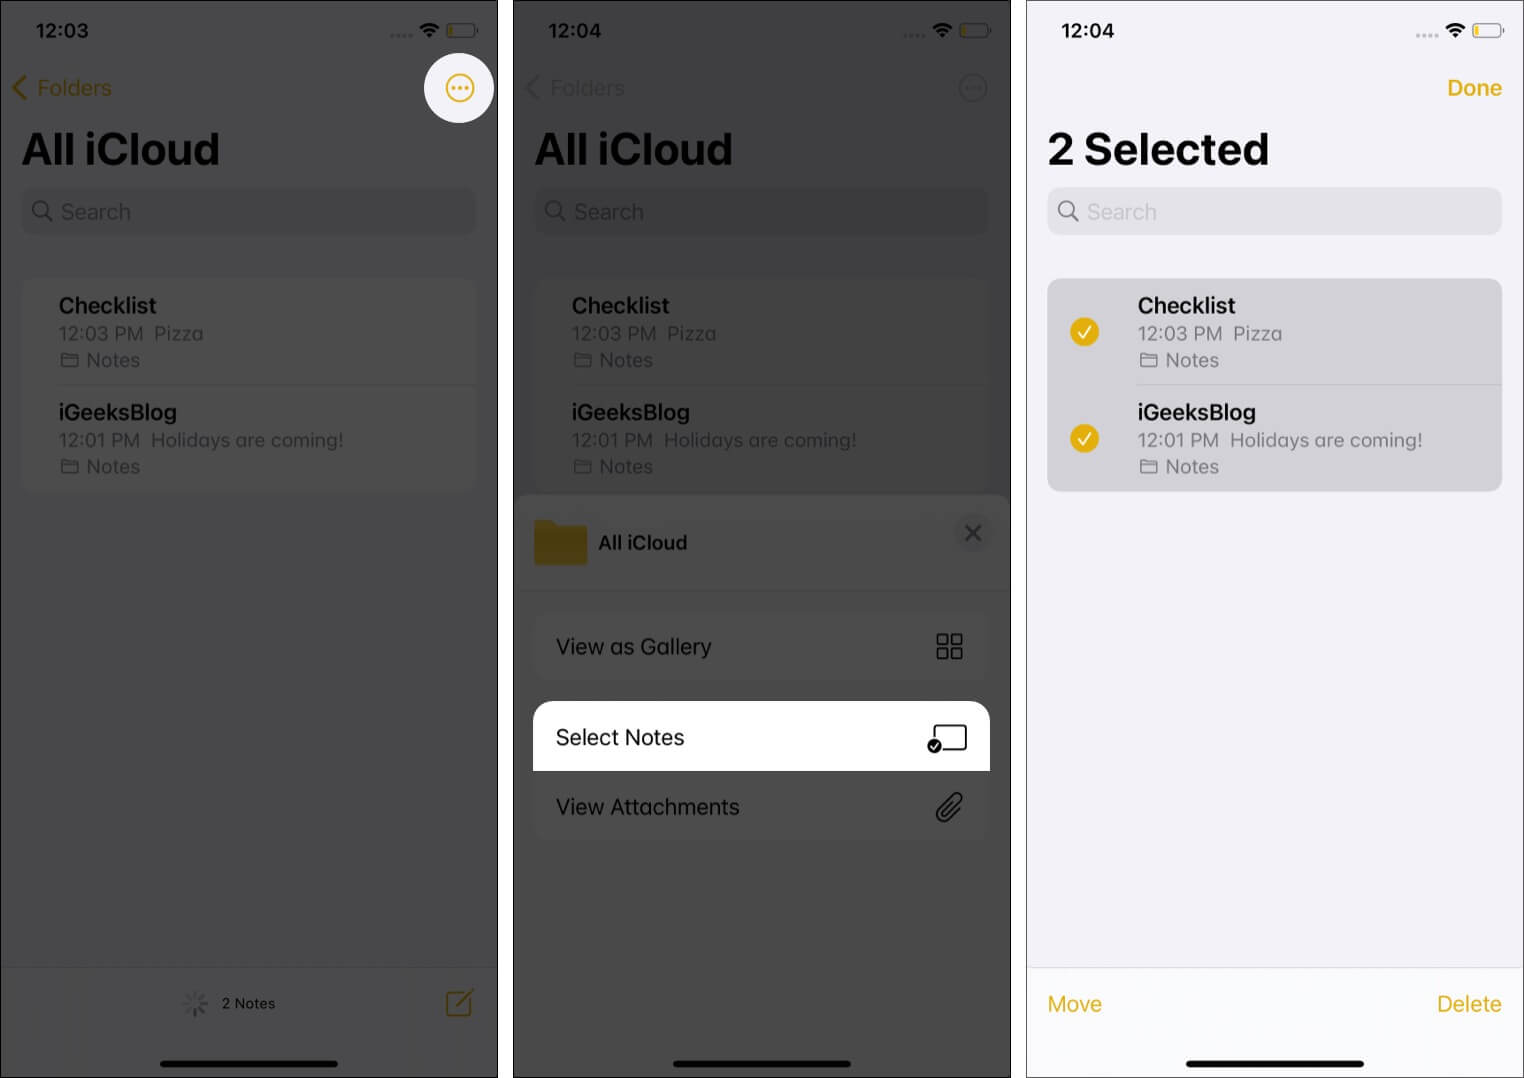
Tip: You may also do this from inside the Notes app by opening a notes folder and tapping the three dots icon.

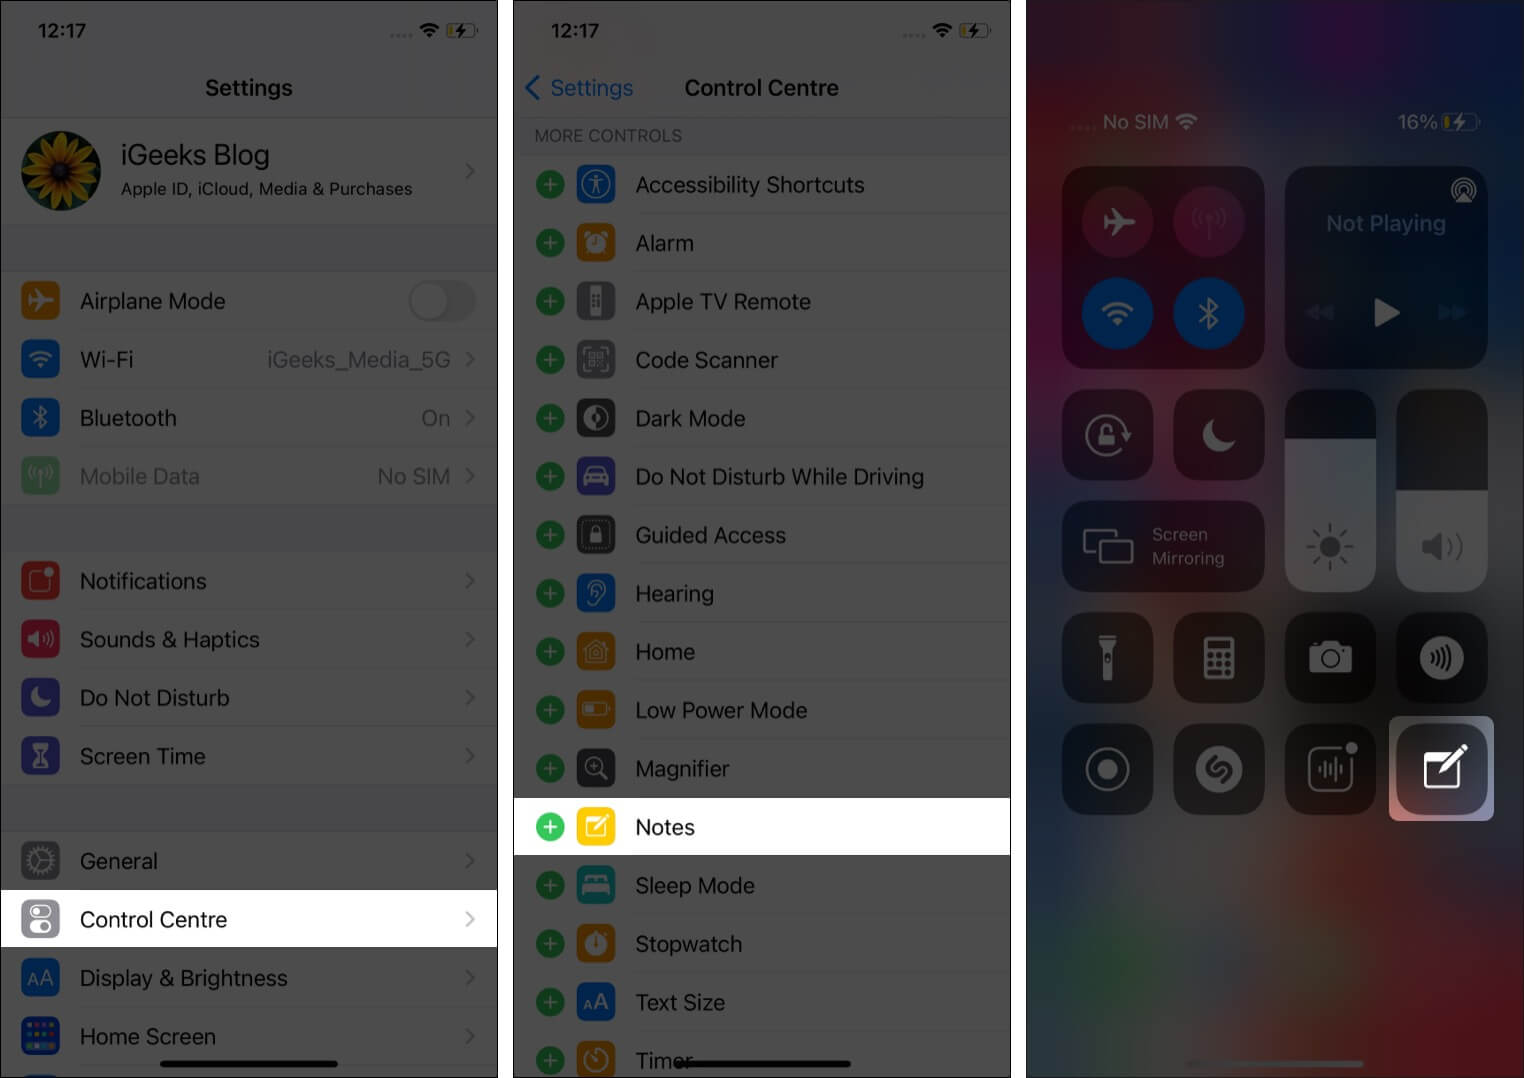
22. Add notes shortcut to Control Center

  1. Open the Settings app and tap Control Center.
  2. Tap the green plus icon before Notes.
  3. Now, you will see the Notes app compose icon in the iPhone Control Center. Tap it to begin a new note instantly.Add notes shortcut to Control Center

23. Add notes to lockscreen

Have to jot something quickly without unlocking the iPhone? You can add the compose note icon to Control Center (explained above) and then choose to create a new note or resume adding to the last viewed one for a particular time. You can learn how to do this here.

With iOS 14, you can now have the Notes app widgets on your iPhone Home Screen. This makes it instant to get inside your notes or view the initials.

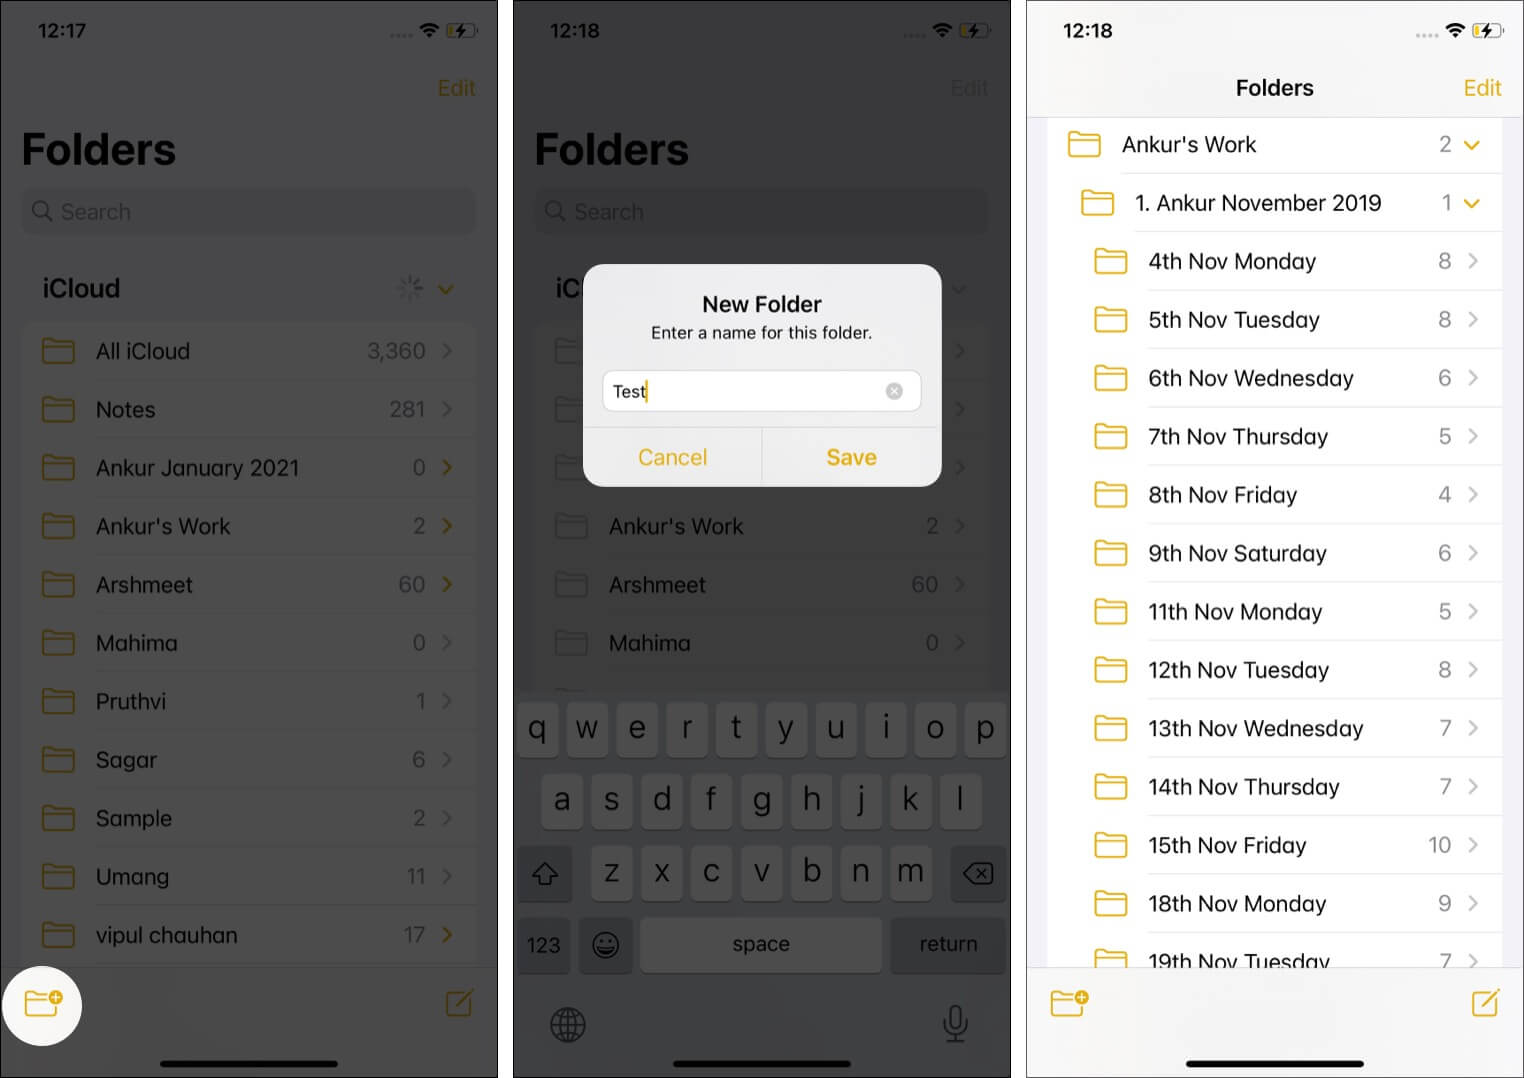
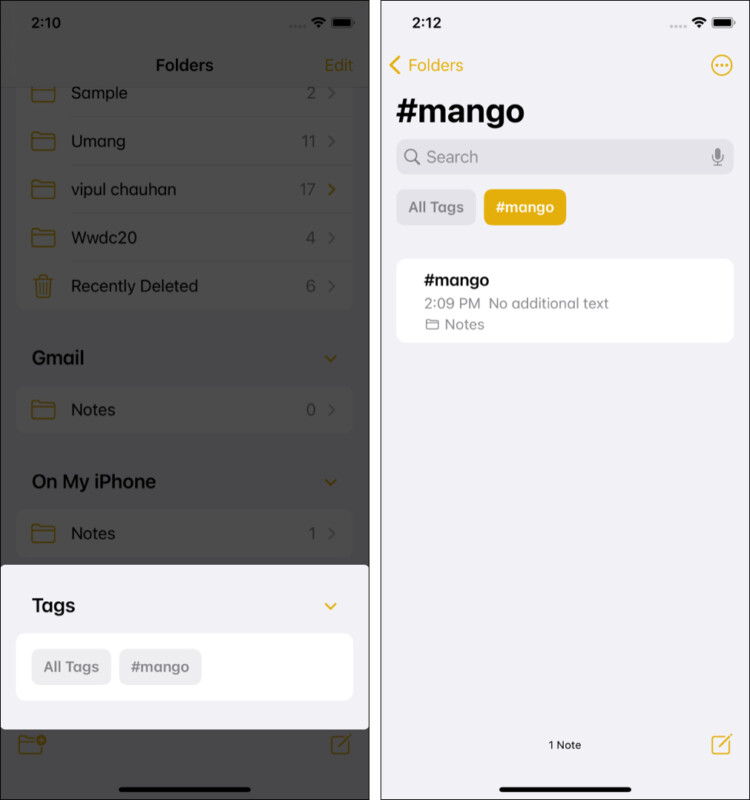
25. Create folders and sub-folders to organize notes

  1. Open the Notes app and make sure you are on the ‘Folders’ screen.
  2. Tap the new folder icon at the bottom left. Choose a location, if asked.
  3. Enter the desired name and tap Save.
  4. Tap Edit or swipe right to left to move or delete the folder.
  5. Pro Tip: To create a subfolder, make two folders, and drag one over the other. (see the image on the right below)Create folders and sub-folders to organize notes

26. Add people to a note or notes folder for collaborative work

It is effortless to add your friends and family to collaborate and work together in Apple Notes. You can learn all about it here.

With iOS 15 Activity View, you can see what other members have added to the shared note in your absence. It gives you a summary of the new changes since you last viewed your shared note. Plus, you also see each collaborator’s day-to-day activity. To see details like which collaborator made the changes, the edit time & date, swipe right on the note.

Now, mentioning people is quick and offers a better collaborative experience. In iOS 15 Notes app, type the person’s name prefixed by the @ sign. For example, @Donald.

Tip: You can also learn how to hide alerts from shared notes.

27. Sync notes to iCloud, Google, etc.

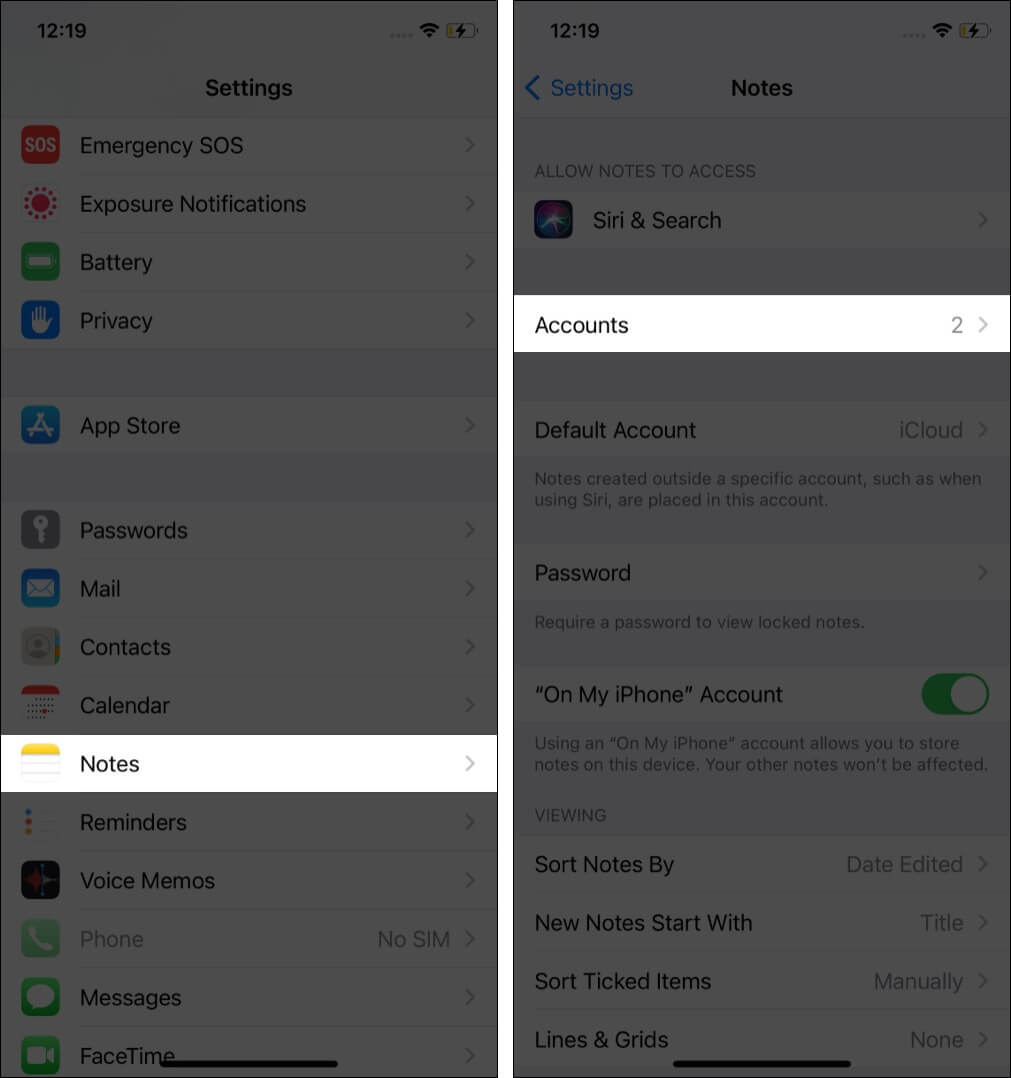
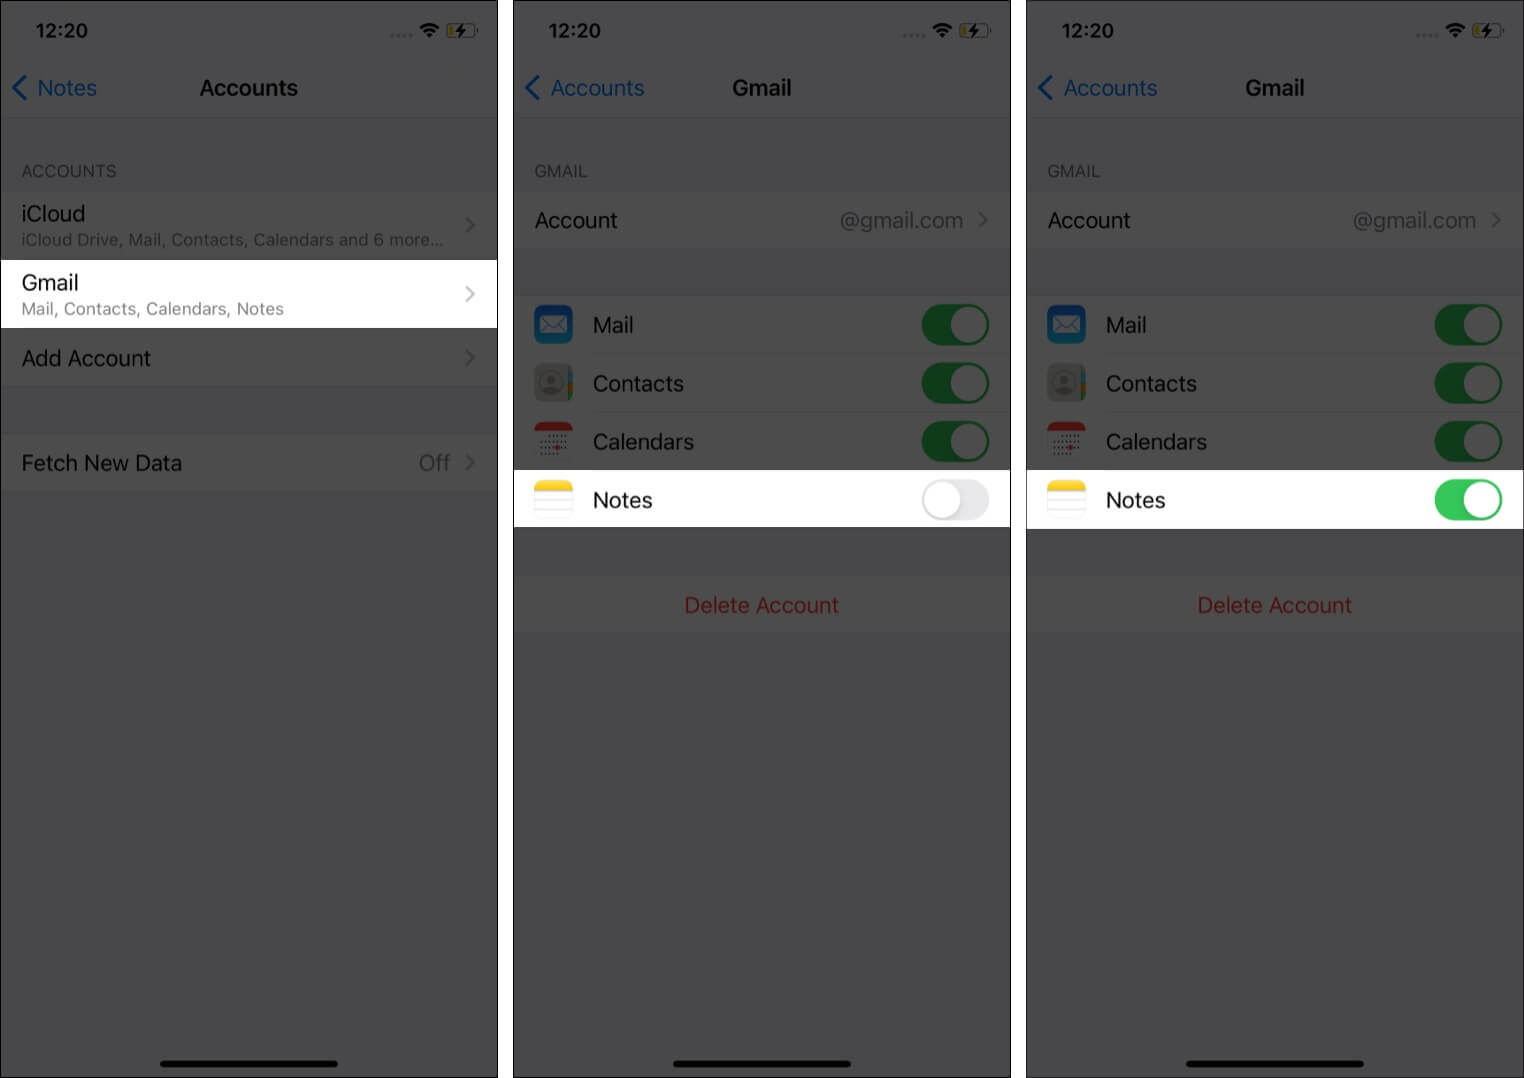
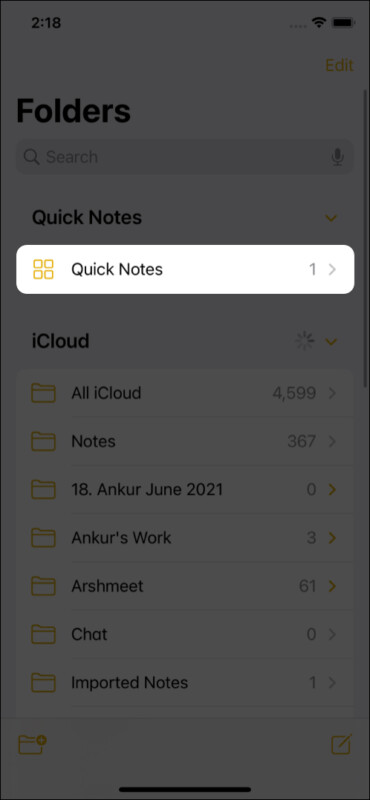
You can choose to sync your notes to iCloud (default), Google, other services, have them offline on the device, or even have multiple accounts! For this:

  1. Go to Settings, scroll down, and tap Notes → Accounts.Open Setting app tap Notes then tap Accounts
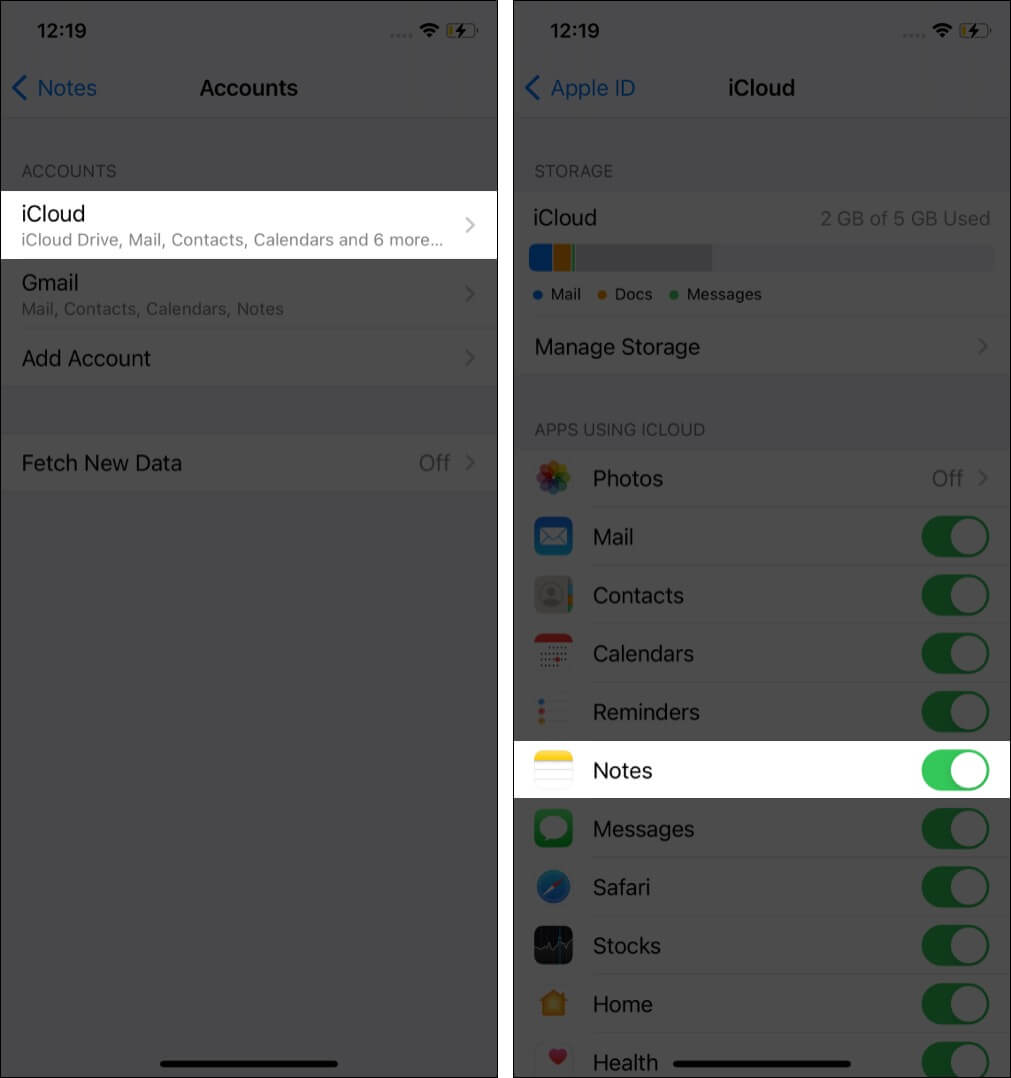
  2. Tap iCloud → ensure the toggle for Notes is enabled.Tap iCloud and ensure toggle for Notes is On
  3. Go back and tap Gmail (if you have added). Now you may enable the toggle for Notes.Tap Gmail and enable Notes
  4. Go back to the previous screen, and enable “On My iPhone’ Account. Notes created inside this will stay only on this device and won’t sync with the cloud.

Note: I only use iCloud. But few of my colleagues use both Gmail and iCloud. According to your convenience, you can use whatever you like. Additionally, you can also change the default notes location (like iCloud, Gmail, locally on the device, etc.).

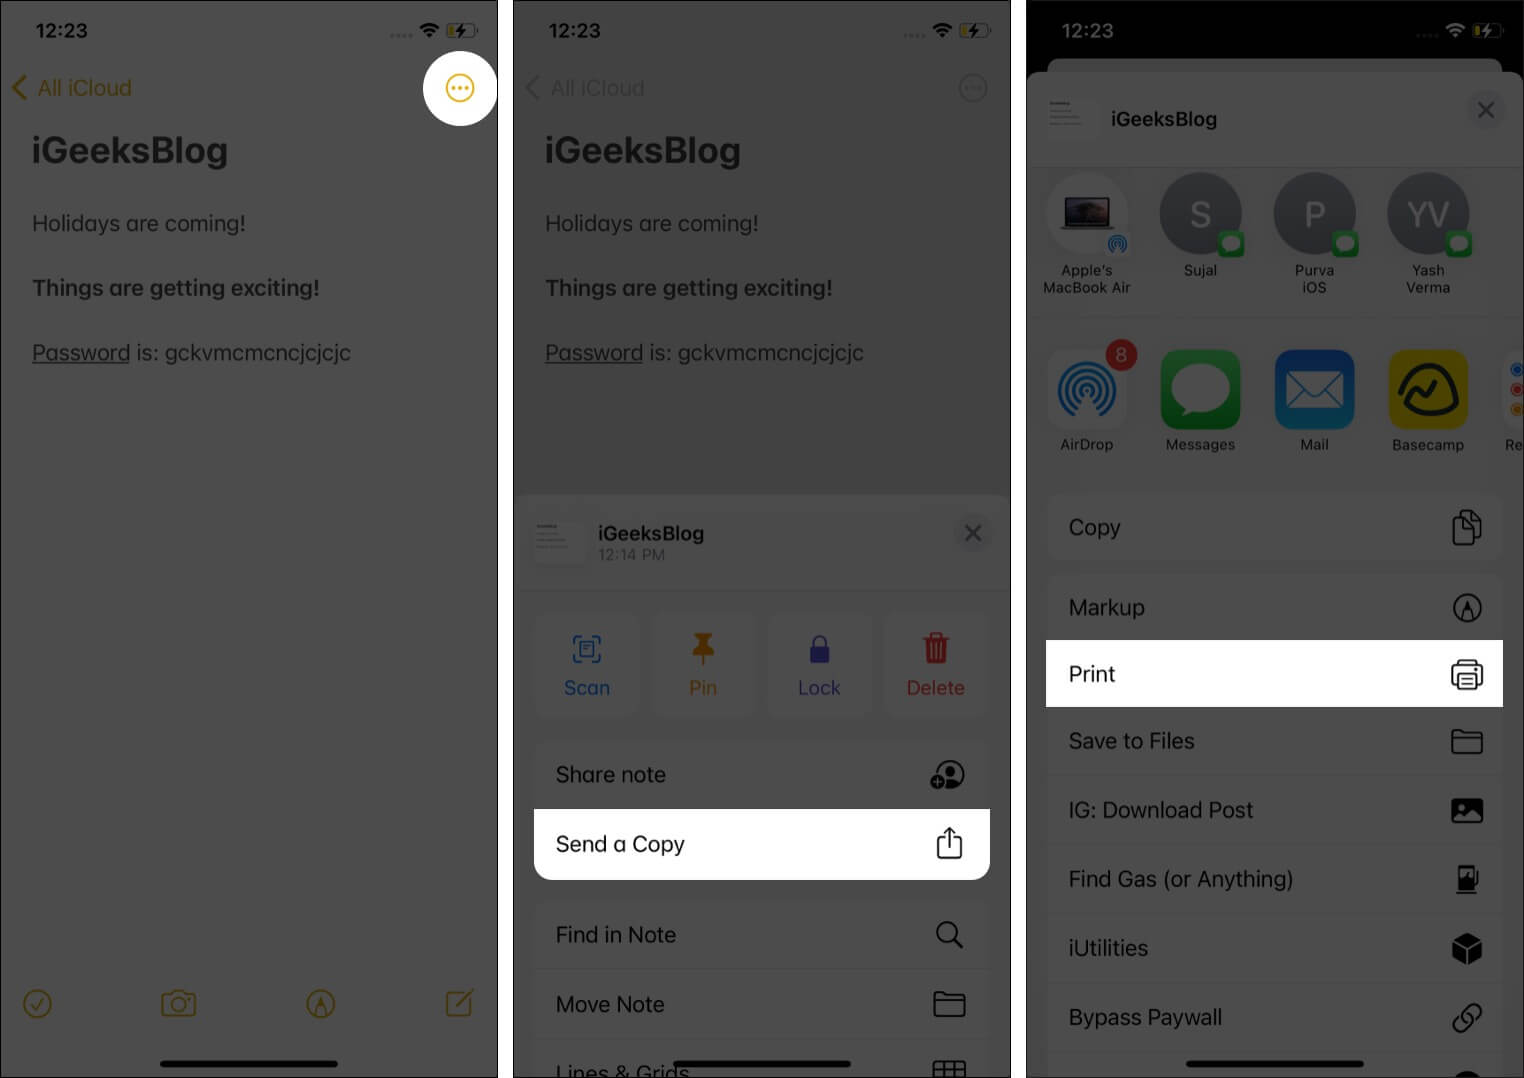
28. Save a note as a PDF on the iPhone or iPad

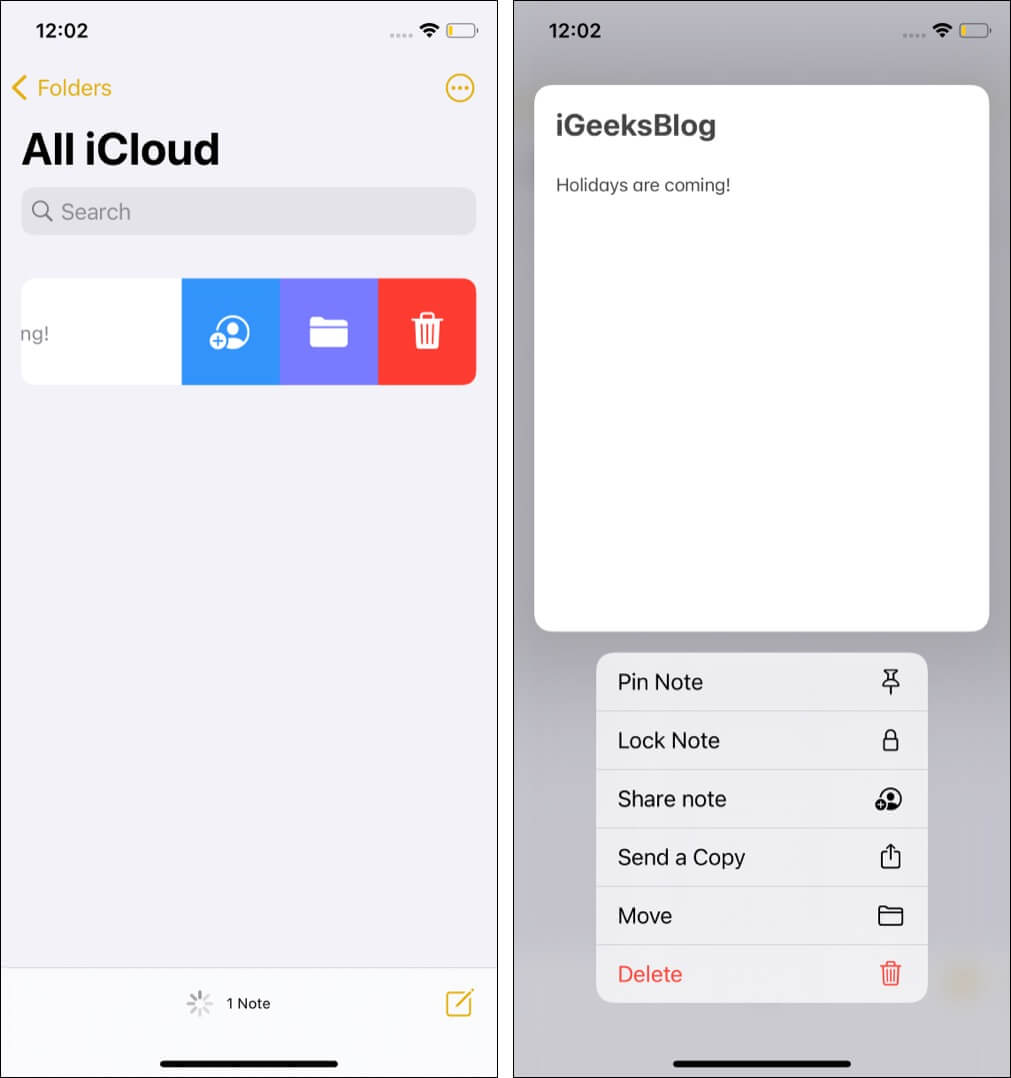
  1. Open a note inside the Notes app and tap the three dots icon.
  2. Tap Send a Copy.
  3. Tap Print.Tap on three dots icon and choose Send a Copy then Print
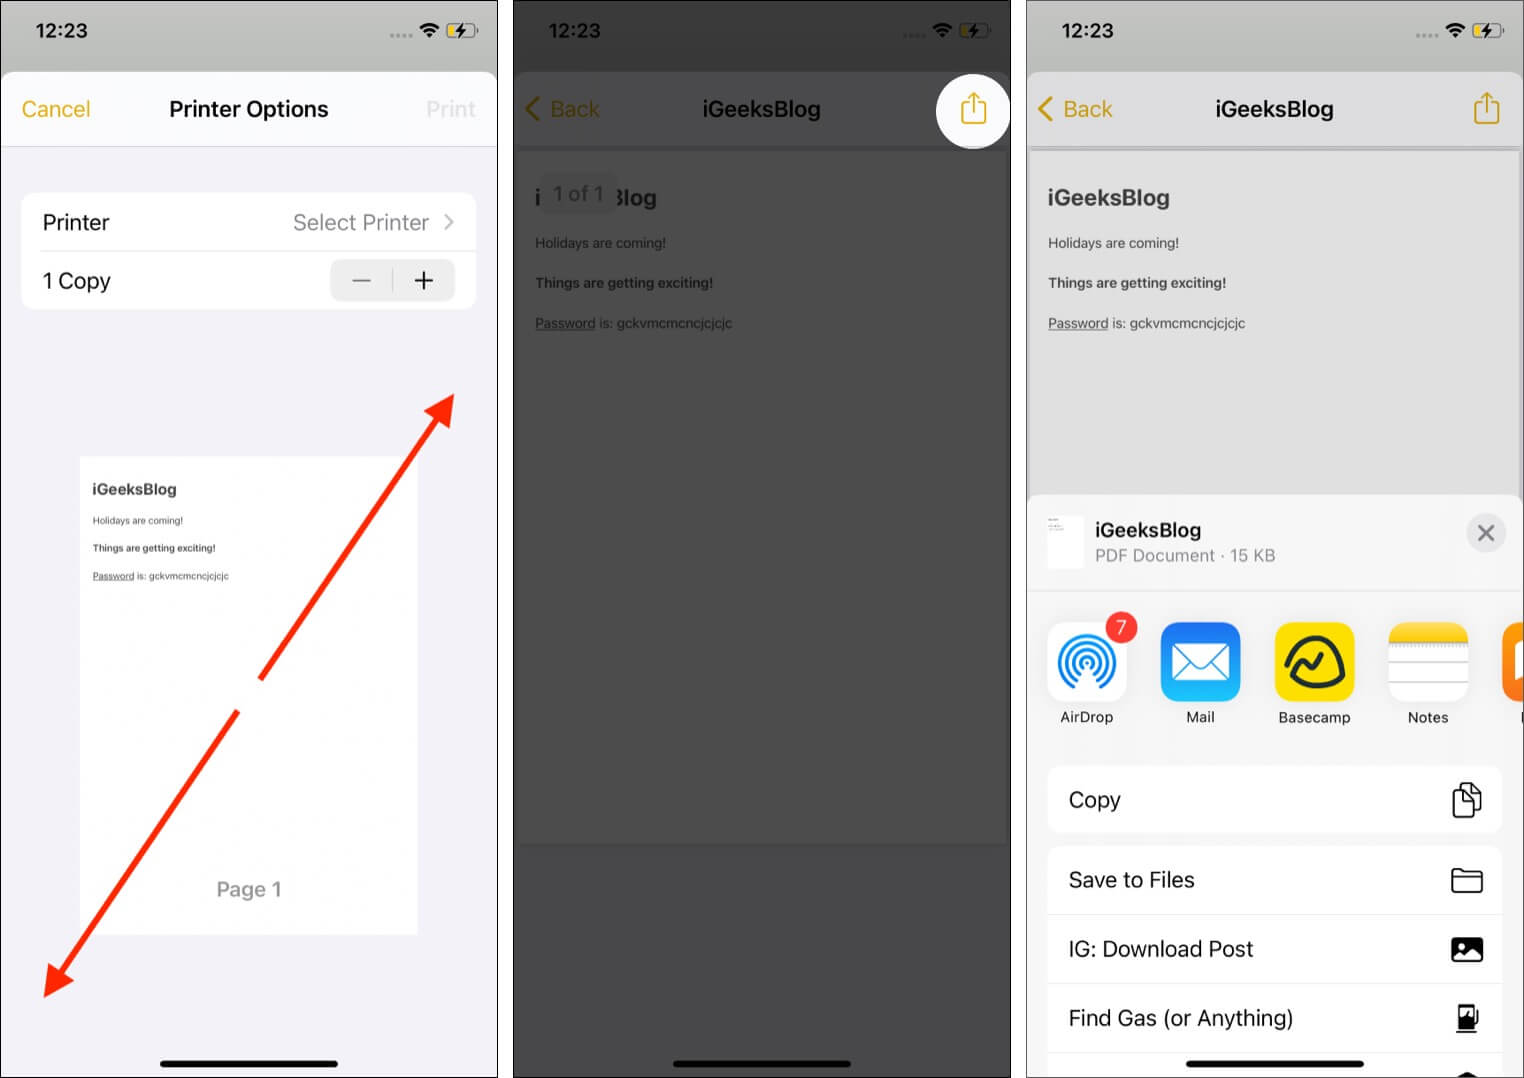
  4. Place two fingers on the Page 1 thumbnail and pinch out.
  5. Tap the share icon.
  6. Now, you can add it to Books, Save to Files, AirDrop, etc. The note will be saved or sent a s a PDF file.Pinch out thumbnail and tap Share Icon to save or send note as PDF

Note: Inside a note, if you tap the three dots icon and tap Save to Files, a text note will be saved as a .txt file, and a sketch/drawing will be saved as a .png image file. If the note has both (text and sketch), they will be saved separately in the Files app as .txt and .png files.

Other Apple Notes app tips

Ready to take notes like a pro!

I believe the tips here helped you master note-taking on the iPhone and iPad. Next, it would be equally exciting to learn about some related blog,

Finally, if you have any additional tips that you would like to share (and include in this list), please share them in the comments section below!

Categories: IT Info