コンピューターのモニターは、画面が途切れる。場合によっては、外部モニターはWindows10では検出されません。
多くのユーザーが、Windows 10でノートパソコンの画面がちらつくと報告しています。これにより、コンピューターでのアクティビティ、特にゲームの実行が困難になります。
ユーザーは、モニターやノートブックを非難して交換し、画面がちらつくことがよくあります。ただし、ハードウェア部品が誤動作することはめったにありません。代わりに、ソフトウェアコンポーネントに注意を向ける必要があります。

画面のちらつきの原因(Windows 10)?
Windows 10でデスクトップまたはラップトップの画面が点滅し始めると、通常、ディスプレイドライバーまたは互換性のないソフトウェアアプリケーションに問題があります。タスクマネージャーを調べて、タスクバーかどうかを確認することで、簡単なテストを実行できます。ちらつきます。
タスクマネージャーのちらつきを確認する
- Ctrl + Shift + Esc を押してタスクマネージャー
- タスクマネージャを含む画面全体が点滅する場合は、ディスプレイドライバを確認する必要があります
- それ以外の場合、タスクマネージャー以外のモニターがちらつく場合は、コンピューターにインストールされている互換性のないアプリを確認する必要があります
を起動します
問題が何であれ、以下の簡単な手順に従うことで、モニターを再び正常に動作させることができます。
ノートパソコンの画面の点滅/ちらつきを修正する方法
表示の問題のトラブルシューティングを開始する前に、システムの復元ポイントを作成します。このようにして、変更をシームレスに元に戻し、Windows 10をロールバックして、このリストからさまざまなソリューションを適用できます。
1。 Windows10をセーフモードで起動します
コンピューターをまったく使用できない場合は、必ず Windows 10をセーフモードで起動して、表示の問題を引き起こしている可能性のあるすべてのサービス、プロセス、およびドライバーを終了します。必要な作業は次のとおりです。
- コンピューターをシャットダウンします
- PCの電源を入れ、起動シーケンスを3回中断して高度なスタートアップモードを起動
- 複数のオプションがあるブルースクリーンが表示されたら、トラブルシューティング
- 詳細オプション> 起動設定

- [再起動
- F4 を押して、Windowsをセーフモードで起動します
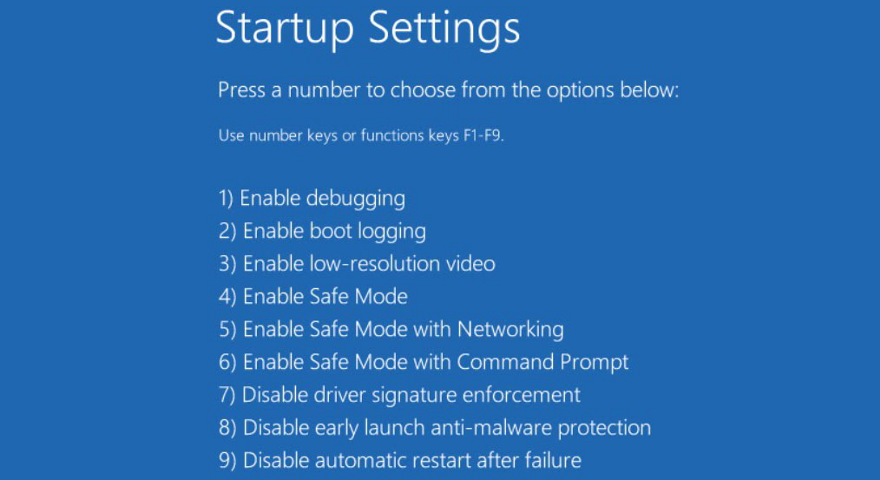
を選択します
]をクリックします
2。クリーンブートを実行する
セーフモードが機能しない場合は、 Windows 10でクリーンブートを実行して、ノートパソコンの画面の点滅の問題を引き起こしている可能性のある高度なシステム設定を診断して修正します。それを実現する方法は次のとおりです。
- Win キーを押し、システム構成を検索して、このプログラムを開きます

- サービスタブに切り替えます
- すべてのMicrosoftサービスを非表示にするを無効にし、[すべて無効にする

- アプリを終了します
- Ctrl + Shift + Esc を押してタスクマネージャー
- スタートアップセクションに移動します
- 有効ステータスのすべてのアプリケーションについて、アプリケーションを選択し、無効

- コンピュータをクリーンブート状態で再起動します
- 画面のちらつきの問題を今すぐ確認してください

を起動します
3。ディスプレイアダプタを再インストールします
グラフィックアダプタがコンピュータに正しくインストールされていない可能性があります。その場合、サードパーティのソフトウェアプログラムをインストールしなくても、デバイスマネージャからすばやく再インストールできます。
ただし、このプランを機能させるには、追加のディスプレイアダプターが必要です。それを実現する方法は次のとおりです。
- 開始ボタンを右クリックし、デバイスマネージャー
![Windows 10は、デバイスマネージャーにアクセスする方法を示しています[スタート]の右クリックメニューから](https://br.atsit.in/ja/wp-content/uploads/2021/05/windows-10e381a7e794bbe99da2e3818ce381a1e38289e381a4e3818fefbc9fe3838ee383bce38388e38391e382bde382b3e383b3e381aee794bbe99da2e3818ce782b9-2.png)
- ディスプレイアダプタグループを展開します
- グラフィックアダプターに黄色の感嘆符が付いている場合は、それを右クリックして、デバイスのアンインストール

- モニターが真っ暗になっても心配しないでください。 Windowsは不足しているアダプタを自動的に再インストールするため、コンピュータを再起動します
4。グラフィックドライバを更新する
Windows 10でノートパソコンの画面がちらついたり点滅したりする可能性が高いシナリオには、古いグラフィックスドライバーが含まれます。この場合、ドライバーを最新バージョンに更新する必要があります。
- Win キー+ R を押し、 devmgmt.msc と入力し、 Enter を押してを開きますデバイスマネージャー
- グラフィックアダプタを選択して右クリックし、ドライバの更新

- ドライバーを自動的に検索する
- オンライン検索で何も返されない場合は、 WindowsUpdateで更新されたドライバーを検索する

- 画面の指示に進みます
- コンピュータを再起動して結果を確認します
を選択します
残念ながら、MicrosoftはWindowsUpdateを使用して新しいドライバーを見つけられないことがよくあります。その場合は、ドライバーの製造元のWebサイトにアクセスして新しいバージョンを見つけてダウンロードし、PCにインストールすることができます。
ただし、誤って間違ったドライバを取得し、表示の問題が増える可能性があるため、リスクが伴います。より安全な解決策は、ドライバー更新ツール<を使用することです。/a>。ドライバを検出し、新しいバージョンを自動的にインストールします。さらに、ディスプレイアダプターだけでなく、すべてのドライバーをチェックするために使用できます。
5。グラフィックドライバをロールバックします
互換性のないディスプレイドライバーをインストールした場合は、Windows 10の画面のちらつきの問題を修正するために、すぐに削除する必要があります。ただし、このソリューションを機能させるには、PCに以前のグラフィックスドライバーバージョンが必要です。簡単に確認する方法は次のとおりです。
- 開始ボタンを右クリックして、デバイスマネージャー
- グラフィックデバイスを選択し、そのエントリを右クリックして、[プロパティ
- ドライバータブを選択します
- ロールバックドライバをクリックして、ステップバイステップの手順に進みます。このボタンがグレー表示されている場合、ハードディスクに以前のドライバーがないため、ロールバックを行うことはできません

に移動します
]を選択します

6。プログラム互換性トラブルシューターの実行
タスクマネージャが完全に静止しているにもかかわらずノートパソコンの画面が点滅し続ける場合は、コンピュータで実行されている互換性のあるアプリケーションに問題がある可能性があります。たとえば、Windows 10を公式にサポートしていない古いプログラムがある場合、それらはあなたに苦労を与えているかもしれません。
古くて時代遅れのアプリを特定するのは難しい場合があります。ただし、プログラム互換性トラブルシューターを利用して支援を受けることができます。これはWindows10に組み込まれているシンプルなツールで、古いアプリとの互換性の問題を見つけて修正します。有利に使用する方法は次のとおりです。
- 開始ボタンを右クリックして設定
![Windows 10は、[スタート]右クリックメニューから設定にアクセスする方法を示しています](https://cloud.addictivetips.com/wp-content/uploads/2021/03/Windows-10-Start-right-click-menu.png)
- 左側のトラブルシューティングを選択します
- 追加のトラブルシューティング

- 他の問題の検索と修正で、プログラム互換性のトラブルシューティング

- [トラブルシューティングを実行する]をクリックします
- ウィザードには、インストールされているすべてのプログラムのリストが表示されます。古いものを選択し、[次へ]をクリックして、手順に従ってください。複数のアプリでこれを数回行う必要がある場合があります
- トラブルシューティングが機能した後、画面がまだちらつくかどうかを確認します
7。プログラムを更新する
Windowsアプリケーションを最新バージョンに更新しておくことが重要です。そうしないと、表示の問題により画面がちらつき始める可能性があります。 Microsoft Storeアプリに関しては、非常に簡単です。
Microsoftストアアプリを更新する方法:
- スタートボタンをクリックし、 Microsoft Store を検索し、 Enter を押してこのアプリを開きます

- 右上隅からその他メニューを開きます
- ダウンロードと更新

- 右上隅にある[更新を取得
]をクリックします
Microsoft Store以外の場所から取得したアプリケーションの場合は、一度に1つずつ手動で更新する必要があります。または、 CCleaner (ソフトウェアアップデートコンポーネントがあります)、 SUMo 、または IObitソフトウェアアップデータ。
8。古いアプリケーションをアンインストールする
古いWindowsの互換モードでプログラムを実行してもうまくいかない場合は、コンピュータからプログラムを削除する必要があります。方法は次のとおりです。
- 開始ボタンを右クリックして、アプリと機能
- リストでアプリケーションを見つけて選択し、[アンインストール
- [アンインストール]をもう一度クリックして確認します
- 削除手順に従ってください
- ノートパソコンの画面がまだ点滅している場合は、互換性のないプログラムをさらにアンインストールしてください
を選択します
]をクリックします
9。プログラムを再インストールする
新しいアプリケーションに関しては、Windows 10で画面のちらつきを引き起こす可能性のある問題を修正するために、それらを再インストールすることをお勧めします。前のソリューションのアンインストール手順に進み、各プログラムをダウンロードしてインストールします。その公式ウェブサイトから。これは、Windows10でノートパソコンの画面が点滅するのを修正する簡単な方法です。
10。システムアップデートを確認する
Windows 10は、最新の機能、改善、修正プログラム、およびセキュリティパッチを利用できるように、システムアップデートに24時間アクセスできる必要があります。オペレーティングシステムが更新を自動的にチェックしない場合、タスクを手動で展開する方法は次のとおりです。
- Windows キーを押し、更新を確認と入力して、 Enter

- [更新を確認する]をクリックして、

- 保留中の更新がある場合は、ダウンロード <をクリックします。 span class="post-image aligncenter">

- Windowsが更新を実行するまでしばらく待ちます。特に、これを長期間行っていない場合、または最初に再インストールした後は、時間がかかる場合があります。コンピュータが数回再起動する場合があります
オペレーティングシステムがエラーを返し、更新を拒否した場合は、 WindowsUpdateのトラブルシューティング。
11。ハードウェアとデバイスのトラブルシューティングを実行する
ディスプレイアダプタに問題がある場合は、内部トラブルシューティングを実行して一般的な問題を解決できます。 設定> 追加のトラブルシューティングにあります。ただし、ハードウェアとデバイスのトラブルシューティングがコンピューターにありません。実行アプリから起動できます。方法は次のとおりです。
- 開始ボタンを右クリックし、実行
-
msdt.exe-id DeviceDiagnosticと入力し、 Enterキーを押します
- [次へ]をクリックし、所定の指示に従います

- トラブルシューティング担当者が解決策を見つけた場合は、[この修正を適用する

- コンピュータを再起動して、画面のちらつきを確認します
をクリックします

12。 CHKDSKを実行する
CHKDSK(Check Disk)は、Windowsに組み込まれているトラブルシューティングユーティリティで、ハードドライブのエラーをスキャンし、不良セクタを修正するために使用できます。画面のちらつきの問題がHDDの破損によって引き起こされた場合は、CHKDSKが対処方法です。必要な作業は次のとおりです。
- Save all ongoing projects and terminate all applications
- Press Win key + R, type cmd, and press Ctrl + Shift + Enter to launch Command Prompt with administrator rights

- Click Yes if prompted by UAC (User Account Control)
- If Windows is installed on the default C: drive, run
chkdsk c:/f. Else, make sure to replacec:with the correct drive letter
- Type y and hit Enter when asked to confirm scheduling the tool at the next system boot
- Exit Command Prompt and restart your PC
- CHKDSK will check and fix disk errors before Windows boot
- Once it’s over and Windows starts, check if your screen still flickers
13. Check your monitor cables
If you have a Windows 10 desktop, shift attention to the cable that connects your monitor to your computer unit. It doesn’t matter if it’s HDMI, VGA, or something else. Unplug the cable from both ends and carefully connect it again.
And, if you have at least one more identical port, try using it, just in case the original port is malfunctioning. If it doesn’t work, you might have to replace the cable.
14. Clean your hardware
Too much dust accumulated in your hardware components can be damaging to your computer. For example, if the graphics card is dusty, it could cause your screen to flicker on Windows 10.
However, you should be able to resolve this problem by taking your computer unit or laptop apart, in order to carefully dust off all components. Pay special attention to the GPU card and cooler while doing so.
The complexity of this task depends on your computer’s make and model. But don’t dive into it without consulting your manufacturer’s website or at least a YouTube tutorial.
15. Remove and reseat your graphics card
Removing and reseating your GPU card means taking it out of its socket and then putting it back in. It’s a simple way to give your graphics adapter a jolt and fix laptop flashing problems on Windows 10 computers.
Just be careful when plugging the graphics card back in. Do it firmly but without applying force. Then, start your operating system to see if the monitor problem was resolved.
16. Change your monitor refresh rate
Monitor overlocking helps improve the refresh rate to have a smoother experience on your computer, especially when it comes to playing fast-paced games like shooters or FPS. However, if the refresh rate settings are incorrect, you can end up with screen flickering on Windows 10.
To fix this problem, you just have to decrease your monitor’s refresh rate to a setting that’s comfortable for you and which doesn’t cause any display problems. Here’s how you can make it happen:
- Right-click an empty space on the desktop and go to Display settings

- Click Advanced display settings

- If you have two or more monitors, make sure to pick the primary display from the list
- Open the Refresh rate menu and select a value

- Inspect the new settings to decide if you want to Keep changes or Revert to the previous refresh rate, depending on whether or not your screen keeps flickering

17. Uninstall system updates
Some Windows updates cause computer problems and should be immediately removed. This could also be the reason why your laptop screen keeps flashing. Here’s what you need to do:
- Click the Start button, search for Control Panel, and open this app
- Select Programs and Features

- Click View installed updates on the left side

- Press the Installed On column to sort the updates by date of installation (newest first)

- Double-click the first update in the list and select Uninstall

- Click Yes to confirm its removal
- Restart your computer and check for screen flickering problems now
18. Run a malware scan
If your computer was recently under attack, it’s possible that a malware agent has infiltrated your operating system and disabled essential files that Windows 10 needs to work properly. It’s rare, but it’s possible that your graphics drivers are affected, too.
So it’s a good idea to regularly run a malware scan and keep your computer’s security in check. Unless you have a third-party Internet security solution installed, here’s how you can use Windows Defender:
- Press the Win key, search for Windows Security, and open this app

- Go to Virus & threat protection

- Click Scan options

- Select Quick scan and click Scan now
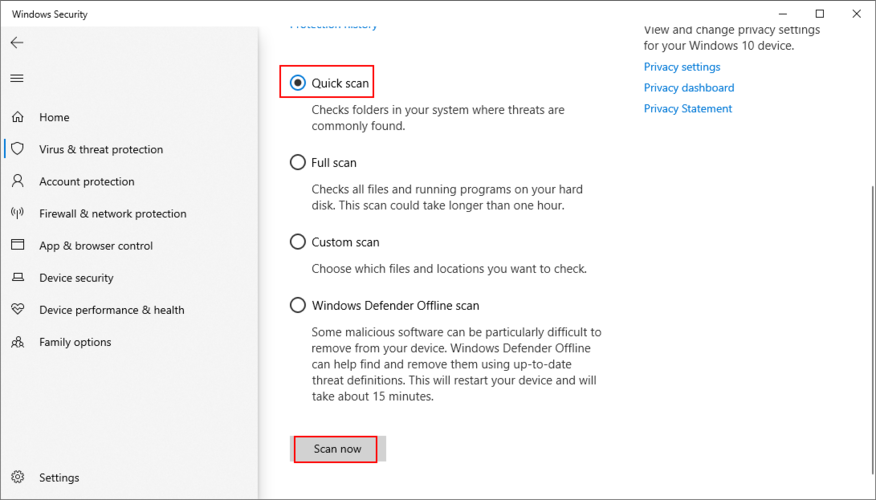
- Don’t use your computer while Windows is looking for malware. If it doesn’t find anything, select Windows Defender Offline scan and click Scan now

- Proceed with the given instructions to remove any infected files
- Restart your PC and inspect results
19. Disable the Windows Desktop Manager service
Windows Desktop Manager (dwm.exe) is a process in charge of Windows effects, such as live taskbar thumbnails and transparent windows. It’s enabled by default on Windows 10.
However, many users claim that Windows Desktop Manager causes screen flickering on their Windows 10 computers, and terminating its process resolved the problem. Here’s what you need to do.
How to stop the dwm.exe service:
- Right-click the Windows 10 taskbar and select Task Manager (or press Ctrl + Shift + Esc)

- Select the Processes tab
- Scroll down to the the Windows processes group
- Find and select Desktop Window Manager Session Manager
- Click End task

- Exit Task Manager
If the Windows Desktop Manager process gets restarted automatically, then you have to disable this option using the Services tool.
How to disable the dwm.exe autostart:
- Click the Start button, search for Services, and open this app
- Find and double-click Desktop Window Manager Session Manager to view its properties
- Set Startup type to Disabled
- If the Service status says Running, click the Stop button
- Click Apply to common changes
- You should also find and disable the Problem Reports and Solution Control Panel service
- Check for screen flickering issues now
20. Use System Restore
You can roll back Windows 10 to a restore point that was created before your computer’s screen started to act strange and flicker. It’s a simple way to erase all modifications at the software level. However, it also means that your programs and games installed after the checkpoint will disappear from your PC, so you have to set them up again.
How to roll back Windows 10:
- Make sure to sign in to Windows 10 with administrator rights
- Search for Control Panel and open this tool
- Go to Recovery

- Click Open System Restore

- If there are multiple checkpoints available, click Show more restore points to get a better view. Plus, you can click Scan for affected programs to discover what applications you will have to reinstall
- Select a restore point, click Next, and follow the steps

- After your computer reboots, check for screen flickering issues
21. Reset Windows 10
Regrettably, System Restore sometimes fails to work. If you have exhausted all your options up until this point and still can’t get rid of laptop screen flashing, it’s time to perform a factory reset on Windows 10. Only your applications will be gone, so your personal files will remain intact.
How to reset Windows 10:
- Click the Start button, search for Settings, and open this app
- Go to Update & Security

- Select Recovery and click Get started

- When prompted with two options, pick Keep my files

- Proceed with the on-screen instructions until your computer is reset
Screen flashing can be avoided on Windows 10
To recap, screen flickering issues on Windows 10 are usually caused by display problems. You can narrow down the search by inspecting Task Manager to see if it’s also flashing.
For instance, you should start Windows 10 in Safe Mode or run a clean boot, reinstall your display adapter, update or roll back your graphics driver, run Program Compatibility Troubleshooter, update, uninstall or reinstall programs, check for system updates, as well as run the Hardware and Devices troubleshooter.
It’s also a good idea to scan your hard drive for errors with the help of CHKDSK. Furthermore, you should inspect your monitor cables, clean your hardware, remove and reseat your graphics card, lower your monitor refresh rate, uninstall system updates, perform a malware scan, or disable the Windows Desktop Manager service.
If all fails, you can try to roll back Windows 10 to a previous restore point or perform a factory reset. But you might also have to consider replacing your monitor.
Which solution solved the screen flashing problem on your computer? Tell us all about it in our comments section below.