私たちのほとんどは、新しいコンピュータを入手するスリルと、オペレーティングシステムを電光石火の速度で起動した最初の数秒で、すべてがどれほど速いかに驚かされることを知っています。と思われる。起動を終えたら、設定をカスタマイズし、新しいプログラムをインストールし、ドライバーをセットアップし、最も技術に精通している場合は、クロック周波数の設定などのハードウェア設定をいじることで、PCを本当に自分のものにし始めます。ファンの速度を調整します。
残念ながら、すべての人の生活の中で(PCに関連して)物事が遅くなり始める時期があります。最初は喜んで滑らせた小さなフレームドロップ、数週間後に少しスタッターが続きます。これらすべてが最終的に、PCが起動してからログイン画面まで2〜3秒もかからないことに最終的に気づきます。 、もちろん、お気に入りをほぼ瞬時に起動します。
コンピューターの動作が遅い?
おそらく何時間も費やしているデバイスが、クリーンアップ、分解、缶で吹き飛ばして維持しようとしても、速度が低下し始めているのを見るのは本当に悲痛です。必要に応じてエアダスターをデフラグするか、チューンアップユーティリティを実行します。正直なところ、ほとんどの電子機器には寿命があります。本当に運が良ければ、パフォーマンスが低下し始める前に、平均よりも長持ちする特定の部品に出くわす可能性があります。
ただし、コンピュータにはそのような要素がいくつか含まれていることを考えると、1つの要素が落下するだけでシステム全体に影響を及ぼし、システムの速度が低下したり、途切れたりすることがあることは容易に理解できます。通常、この現象は古い、古いシステムでより頻繁に発生しますが、処理の程度や処理の程度によっては、新しいシステムでも発生する可能性があります。すべてを最高の状態に保つためにできることをすべて行っているかどうか。
少し(もっと)直感に反するように聞こえるかもしれませんが、頻繁なシステム更新は、コンピュータの全体的なパフォーマンスに大きな損害をもたらす可能性があります。私たちは皆、自分自身の向上に努めています。開発者は、パフォーマンスの面で天井を粉砕し、新しい高さに到達することも目指しています。そのため、パフォーマンスを向上させるために頻繁に更新を受け取るオペレーティングシステムが、ハードウェアを時間の経過とともにほこり。
コンピュータが非常に遅いのはなぜですか?

これらすべてが非常に馴染み深いと思われる場合は、マイナーであろうと無視するのが非常に難しいシステムであろうと、システムの速度低下に苦しんでいる可能性があります。それが起こったとき、最も明白な答えは、ほとんどの人が同意しているように見えるように、より良いシステムにアップグレードすることです。ただし、システムが少し錆びたからといって、インストールされているオペレーティングシステムに関係なく、古いコンピューターにはまだ寿命がある可能性があるため、できるだけ早く廃棄してより良いものと交換する必要があるわけではありません。その上で、それがWindows 10、Windows 8、Windows 7、またはさらに古いものであるかどうかにかかわらず。
実際、ほとんどのユーザーは、財布に手を伸ばしてアップグレードされたコンポーネントやまったく新しいコンピューターを購入することなく、PCに新しい命を吹き込む方法を見つけることを好みます。 なぜ私のコンピュータがこんなに遅いのかと自問したことがあるなら、読み続けてください。このガイドでは、最寄りのPCショップに電話して新しいユニットを注文することなく、システムを修正するための一連の潜在的な方法を紹介します。
コンピューターを高速化する方法(Windowsの究極のガイド)
何よりもまず、 PCの速度低下の原因を特定する必要があります。コンピュータまたはラップトップが少しずつあきらめることにした理由を見つけたら、それを回避して現在の状況を改善し、PCが安定した環境で動作していることを確認してから、終了して彼をあきらめることができます。 (特に、広範なガイドのすべての提案をまだ試したことがない場合は、これに反対することをお勧めします)。
そのことを念頭に置いて、PCを高速化(最近購入した場合)したり、古いコンピューターやラップトップを高速化して、数年使用してから使用したりする場合に、どのような方法を試すことができるか見てみましょう。スクラップに。試してみることができる修正に加えて、コンピュータの(できれば一時的な)劣化の原因となった可能性のあるいくつかの潜在的な原因も含まれるため、コンピュータの速度低下をよりよく理解し、それに応じて行動することができます。再び起こります。
コンピュータを高速化するための17の作業方法
1。未使用またはほとんど使用されないアプリをアンインストールする

好奇心からPCを探索し、タスクマネージャーを使用して頑固なアプリを閉じるだけではない場合は、コンピューターが提供するために依存する3つの重要なリソースがあることをすでにご存知かもしれません。スムーズで高速なエクスペリエンス: RAM、CPU、およびストレージ。
ストレージの問題は、不要なファイルを別のストレージメディア(CD、DVD、USBスティック、外付けHDD/SSDなど)に転送するだけで簡単に修正できますが、RAMとCPUの問題は、多くの場合、次のようなプロセスの影響を受けません。現在実行中です。
PCでいつでも実行されるものは、アプリ、バックグラウンドプロセス、サービスなど、さまざまな形式である可能性があることをすでにご存知かもしれません。よくある誤解は、コンピューターでフォアグラウンドアプリを実行しないことで、RAM消費量を最小値に保つことができるというものですが、十分に注意しないと、バックグラウンドプロセスとサービスをより大きくすることができます。 RAMはアクティブな(フォアグラウンド)アプリよりも占有されます。
PCで現在実行されているプロセスは、フォアグラウンドでアクティブであり、それと対話できるか、バックグラウンドで実行されているか、サービスとして実行されているかに関係なく、CPUに影響を与えます 、メモリ(RAM)、ディスク(ストレージ)、およびネットワーク(帯域幅)リソース。バックグラウンドプロセスは通常、PC上のアプリよりも少ない消費しますが、アプリが多い場合は、十分に注意しないとリソースを大量に消費する可能性もあります。
自分でリソース消費量を確認する
ただし、私たちの言葉を信じないでください。 Ctrl + Shift + Esc キーボードショートカットを使用して、Windowsタスクマネージャーを呼び出し、自分の目で確かめてください。たとえば、パソコンでChromeを起動して実行している場合、Chromeはおそらく最大のRAM消費者の1つであることに気付くでしょう。
Chromeだけでなく、PCで実行されている他のすべてのプロセスが、RAM、CPU、ディスク、ネットワークリソースに負担をかけることを想像してみてください。これにより、システムの速度が低下するだけでなく、システムの安定性も低下します。箱を開けたばかりで、ほとんど何もインストールされていないもの。
そのため、コントロールパネルを起動し、プログラムと機能に移動して、インストールしたアプリのリストを確認することをお勧めしますコンピューター。めったに使用しない、またはまったく使用しないものを見つけた場合は、遠慮なく削除してください。
多くのアプリは、フォアグラウンドの対応するものと一緒にサービスとバックグラウンドプロセスをインストールするため、アプリを起動することがめったにない場合でも、アプリが保持するバックグラウンドプロセスまたはサービスを通じて、RAMまたはCPUのごく一部を消費する可能性があります。開いて、万が一起動した場合。
技術に少し精通している場合は、Windowsタスクマネージャーを使用して、PCでバックグラウンドプロセスが実行されているアプリを確認し、必要に応じてその情報に基づいてアプリを削除できます。
サードパーティのアプリを使用してプログラムを削除する
使用しなくなったプログラムがコンピューターにたくさんインストールされていますか、それともコンピューターから手動でアンインストールするのが好きではありませんか?そうすれば、この負担を肩から取り除くことができるサードパーティのアプリがあることを知って喜ぶでしょう。
Windowsの組み込みプログラムマネージャーを使用してPCからアプリをアンインストールすると、実行可能ファイル、DLL、構成ファイルなど、プログラムの痕跡がいくつか残ることがよくあります。これらはすべて、コンピューターのストレージスペースを不必要に占有する原因になります。
ほとんどの場合、現在実行中のコンピュータからプログラムを強制アンインストールしようとすると発生します。これを行うと、実行可能ファイル、DLL、および実行可能ファイルの実行に必要な構成ファイルがPC上で取り残されたままになり、プログラムを完全に削除したと思っていても、プログラムのプロセスがバックグラウンドで実行されていることに気付く場合があります。コンピューターから。
このプロセスはCPUとメモリをあまり消費しない可能性がありますが、そのようなプログラムが数個以上残っていると、目立つようになります。
サードパーティ専用のアンインストーラソフトウェアソリューションは、アプリの削除に関するさまざまな操作を実行するのに役立ちます。これには、一度に複数のアプリを削除する(Windowsでは現在不可能)、孤立したレジストリエントリの削除、クリーンアップなどが含まれますが、これらに限定されません。削除しようとしているプログラムのすべてのトレースにより、上記のような状況が発生するのを防ぎます。
それほど明るくない面では、これらのプログラムのほとんどは、特に無料のプログラムに向かっている場合は、正確に効果的ではありません。これは、PCにセキュリティやプライバシーのリスクをもたらす可能性さえあります。ただし、最高の無料ソフトウェアのリストを作成しました。 Windows用のアンインストーラーを使用できます。実際には、効果的で安全に使用できます。
2。スタートアッププロセスを削除する
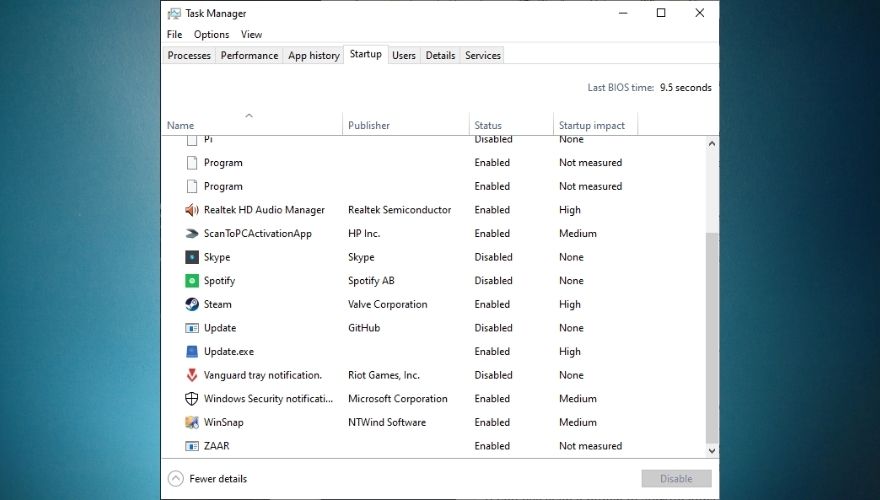
PCの起動が以前よりも遅いことに気付いた場合は、多数のアプリをインストールして、システムの起動時にそれらのアプリの実行を許可した可能性があります。起動プロセスは膨大なリソース管理者であり、コンピュータの起動に必要な時間が大幅に増加する可能性があります。
起動時に、コンピュータはオペレーティングシステムが意図したとおりに実行するために必要な多くのプロセスをロードする必要があるため、できるだけ早く、できれば気付かないうちにジョブを実行するために必要なあらゆるリソースが必要です。減速。これが重要です。起動時に他のアプリの実行を許可すると、これらのアプリは、オペレーティングシステムがスムーズに動作し続け、起動シーケンスをタイムリーに完了するために必要なリソースを占有する可能性があります。
>多数のスタートアップアプリを使用している場合でも、コンピューターはサードパーティのアプリとシステムプロセスの間でリソースを再配布し、アプリであろうとなかろうと、すべてが確実に行われるようにします。システムプロセスは、正しく実行される可能性があります。
その結果、アプリは CPU と RAM を相互に共有する必要があるため、アプリの読み込みが遅くなり、システムプロセスの起動に時間がかかります。コンピューターから、動きが遅く、遅く、途切れ途切れのエクスペリエンスを取得します。
代わりにタスクスケジューラを使用してください
したがって、コンピューターをもう一度高速にしたい場合は、PCにインストールしたすべてのスタートアップアプリとプロセスを削除するようにしてください。それらを完全にアンインストールする必要はありません。起動して起動設定を探し、起動時に実行または起動時に起動に似たものを無効にしてみてください。すべてを削除できない、または削除したくない場合は、できるだけ多く削除してください。それでも大きな違いがあります。
最後にもう1つ、これはすでにご存知でしょうが、Windows 10、Windows 8.1、Windows 8、さらにはWindows 7を実行している場合は、コンピューターにタスクスケジューラがあります。起動時にPC上のすべてのアプリを無計画に実行させるのではなく、それを避けて、それを使用して複数のアプリを同時に起動してみてください。起動時にアプリをスケジュールしないように注意し(正方形に戻ります)、代わりに後で(たとえば、5分後)時間を選択します。
3。トレイプロセスを閉じる
知らないうちにPCにインストールできる別の種類の卑劣なソフトウェアは、システムトレイでサイレント実行されるアプリケーションで構成されています。時間、日付、通知、入力言語インジケーターの横にある小さな領域を拡張できます。その領域(トレイ)に表示されているものがいくつかあるだけではない場合、それがコンピュータの速度が低下する可能性がある理由です。
上記で注意深く説明したように、PCで実行されているアプリの数が多いということは、より多くのリソースが使用されることを意味します。実際にリソースを使用しようとしているときにのみ速度低下に気付くためです(そして、それらの多くは利用できません)、まあ、あなたはおそらく数学を行うことができます。したがって、明らかにすべきことは、それらをできるだけ多く近くに配置し、改善があるかどうかを確認することです。
これまでは触れませんでしたが、ガイドのすべての手順を実行した後、改善の兆候がないか確認する必要があります。そうすれば、あなたが正しいことをしているなら、あなたはすぐにそれを知るでしょう。実際に正しい方向に進んでいることをさらに確認したい場合は、タスクマネージャーを起動して、 CPU 、メモリ、ディスク、およびメイン画面の右側のセクションにあるネットワークの列見出し。表示されない場合は、タスクマネージャの左下にある[詳細]ボタンをクリックしてください。
一部のトレイプロセスを閉じることができません
さて、羊に話を戻しましょう。特定のアプリを閉じた後、メモリまたはCPUのパーセンテージ値が大幅に低下することに気付いた場合、それはその正確なアプリがコンピュータが動作している理由であったことを示すかなり確実な指標ですすべてが遅く、必死にあなたが介入する必要がありました。 [メモリ]、[CPU]、[ディスク]、または[ネットワーク]列をクリックすると、特定のリソースをどれだけ消費するかによって、PC上のプロセスを並べ替えることができます。一度クリックすると、最初に上位の消費者が表示され、もう一度クリックすると、リストが逆になり、下位の消費者が最初に表示されます。
Windowsには、デフォルトでいくつかのトレイアイコンも配置されていることに注意してください。これは、それほど不便ではありません。これらは、閉じることができないハードウェアを安全に取り外してメディアを取り出す(正確にはアプリではないため)、 Windowsセキュリティ(デフォルトでは終了できません)です。 、およびドライバー固有のアイコン(オーディオおよびビデオドライバーのコントロールパネルなど)。それらはそのままにして、ブラウザエージェント(個人的にはあまり気にせず、常に閉じていることを確認します)、オフィスエージェント、その他のアプリなど、インストールしたサードパーティのアプリに焦点を当てる必要があります。
4。雑然としたものを取り除きます
前述したように、ストレージメディア(HDD、SSD)はコンピューター上で大きな役割を果たします。 HDD や SSD を、重要なもの(IDカード、ペン、紙など)が必要になるたびに手が届くキャビネットや引き出しとして想像してみてください。クレジットカード、MP3プレーヤーなど)。このシナリオでは、何かをフェッチする必要があるたびに、これらのストレージメディア(HDD、SSD)に到達するオペレーティングシステムの役割を果たします。
うまくいけば、オペレーティングシステムとPCからデータをすばやくフェッチしたいのであれば、HDDとSSDをすっきりと整理し、整理整頓する必要がある理由が理解できます。溢れ出る引き出しの周りを小さな紙やその他の小さな物体を探すのは非常に難しいので、ジャンクファイルを積み上げてHDDやSSDをこのひどい体験に通すのはなぜかということに同意できるでしょう。 ?
技術に精通したユーザーの間では、およそ 90パーセントいっぱいのHDDの速度が低下し始めるのは経験則です。そのため、ファイルを削除して、このレベル未満に保つことをお勧めします。そしてあなたが必要としないプログラム。これは、オペレーティングシステムを同じHDDに保持している場合に特に当てはまります。これは、WindowsがHDDとともに必然的に遅くなるためです。
SSDを使用している場合、データでいっぱいになるとSSDの速度が徐々に遅くなるため、状況はさらに複雑になります。ただし、SSDに多くのものを保存する以外に方法がない場合は、SSDを全容量の 75%未満に保つことをお勧めします。結局のところ、SSDは通常、アプリやプロセスを超高速でロードするために使用され、ばかげた量のデータを保存するためには使用されません。
混乱は、すぐには明らかではないコンピュータの他の部分にも組み込まれる可能性があることを常に覚えておいてください。 Shift + Del を使用してファイルやフォルダを削除しない場合(このショートカットは、ごみ箱に送信せずにそれらを削除します)、ごみ箱を毎回確認することをお勧めします特に定期的に行わない場合は、時々空にします。多くのジャンクファイルがごみ箱に蓄積される可能性があり、それが気付かないうちにパフォーマンスに影響を及ぼし始める可能性があります。
5。ハードドライブを最適化する
極端な対策のように聞こえるかもしれませんが、ハードドライブを長期間最高の状態に保ち、さまざまなドキュメントを保存するだけでなく、アプリやゲームをハングアップせずに実行したい場合は、ハードドライブのデフラグが不可欠です。アップ、フリーズ、またはランダムなクラッシュ。このデフラグプロセスの必要性は、時間の経過とともにハードドライブが断片化するという事実から生じます。これにより、HDDにアクセスする前に、HDD上のコンテンツを複数の場所で検索する必要があるため、オペレーティングシステムの速度が低下します。
デフラグは、実際には断片化された部分を取り出して元に戻すことで、オペレーティングシステムがより迅速かつ簡単にそれらにアクセスできるようにします。その結果、コンピュータの読み込みが速くなり、ハードドライブに保存されているファイルが複数の部分に分割されて、あちこちに散らばっているのではなく、1つの部分になっていることがわかります。
Windows 10、8、および7は、スキャンとデフラグ操作を毎週かそこらで自動的に実行することで、ハードドライブを処理できます。ただし、ハードドライブの状態と、ハードドライブが到達した断片化の割合(該当する場合)を確認して、すべてが最高の状態であることを確認しても問題はありません。何か異常に気付いた場合は、自分で簡単に最適化操作を実行できます。必要な作業は次のとおりです。
- キーボードの Win キーを押します
- タイプデフラグ
- 結果のリストからドライブの最適化と最適化を選択します

- ハードドライブのいずれかが 0%以上の断片化になっていないかどうかを確認します
- 最適化する必要のあるハードドライブを選択します
- 分析ボタンをクリックします
- 分析が完了したら、[最適化]ボタンをクリックします
- プロセスが終了するのを待ちます(デフラグの実行中はPCをそのままにしておくことをお勧めします)
- 上記の手順を繰り返して、最適化が必要なすべてのハードドライブをカバーします
上記の小さなガイドではHDDについてのみ言及していることに注意してください。これは、SSDはHDDとは動作が異なるため、デフラグを必要としないためです。上記のドライブの最適化と最適化ダイアログでSSDを選択すると、[分析]ボタンがグレー表示されますが、これはバグではありません。 SSDは、そもそも断片化することができないため、最適化する必要はありません。
SSDの[分析]ボタンがグレー表示されている場合でも、最適化ボタンをクリックできることに注意してください。 SSDをデフラグすることはありませんが、TRIMコマンドを実行します。このコマンドは、PCが役に立たないと見なしたデータをワイプするために使用されます。
すでに述べたように、Windows 10、8、および7オペレーティングシステムは、HDDで毎週分析を実行し、一部のHDDで必要な場合は、必要に応じて最適化操作を実行します。 OSの場合でも、最適化操作が実行される頻度を「毎週」から「毎日」または「毎月」に変更できることに注意してください。 「毎週」に保持することをお勧めします。
スケジュールされたハードドライブの最適化の実行が3回連続して失敗した場合に、タスクの優先度を上げるオプションを切り替えることもできます。さらに、ドライブの最適化と最適化プログラムを使用すると、定期的に最適化するドライブを選択したり、システムで検出された新しいドライブをプログラムが自動的に最適化するオプションを切り替えたりすることができます。 p>
上記の手順はWindows10およびWindows8オペレーティングシステムに適用されることに注意してください。 Windows 7デスクトップコンピューターまたはラップトップを使用している場合は、検索機能を使用してディスクデフラグプログラムを見つけ、[現在のステータス]セクションからシステム上のHDDを選択できます。
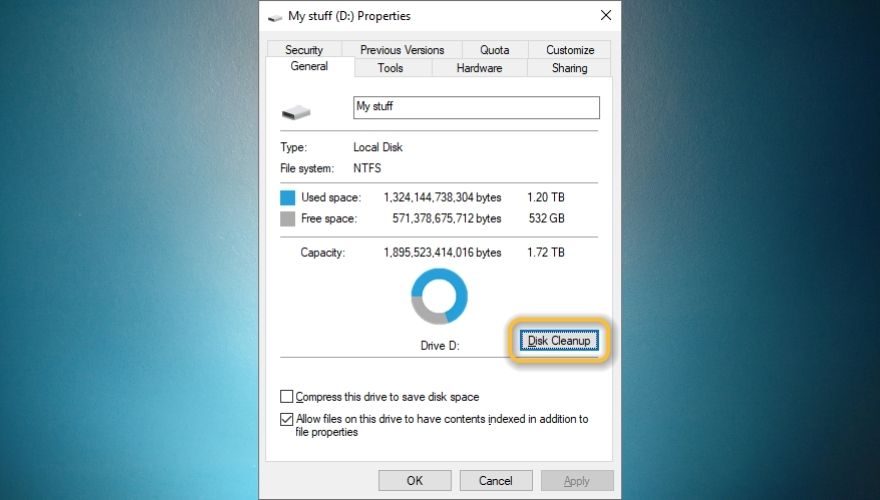
6。ディスククリーンアップを実行する
ディスクのクリーンアップは、ストレージデバイスのすべてを適切に整理するために最も重要です。多くのアプリはキャッシュされたデータを使用します。これらのデータは一時的ではありますが、どこかに保存する必要があり、そのストレージはHDDまたはSSDにあります。残念ながら、キャッシュされたデータ、ダウンロードされたインストールファイル、エラーログ、最適化ファイルなどの一時ファイルは、魔法のようにごみ箱に入れられないため、このクリーンアップは自分で実行する必要があります。
Windows 10PCであまり労力をかけずにディスククリーンアップを実行する方法は次のとおりです。
- キーボードの Win キーを押します
- PC と入力し、結果リストでこのPC アイコンをクリックします
- 任意のパーティションを右クリック
- コンボメニューからプロパティを選択します
- ディスククリーンアップボタンをクリックします
- システムファイルのクリーンアップボタンをクリックします
- 適切なセクションで削除するファイルを確認します
- [OK] ボタンをクリックします
- 選択したファイルを完全に削除することを確認します
- もう一度 OK ボタンをクリックします
- システムのすべての内部パーティションについて上記の手順を繰り返します(外部ストレージメディアを選択しないように注意してください)
Windows 8.1、8、および7の場合、パーティションにアクセスするために別のルートを見つける必要がある場合があることに注意してください(たとえば、デスクトップまたはスタートの「マイコンピュータ」アイコン メニュー)。さらに、一部の機能が異なるか、完全に欠落していることに気付くかもしれませんが、ディスククリーンアップの部分自体は非常に直感的であるため、おそらくそれ以上の支援を必要とせずに操作できます。
Windowsの組み込み機能を掘り下げて手を汚すのが好きではない場合は、自分に代わって処理できるサードパーティのソフトウェアソリューションがあることを知って喜ぶかもしれません。そこにさえないかもしれないツールを探し回るのに時間を無駄にする必要はありません。
サードパーティのディスククリーンアップツールを使用する
ただし、これらのアプリのほとんどはプレミアムソフトウェアソリューションであるため、それらを最大限に活用するには、サブスクリプションプランまたはライセンスを購入する必要があります。それらのほとんどすべてに機能デモがあり、プログラムが自分に適しているかどうかを最終的に判断する前に、アプリの機能をテストドライブで使用して利用できますが、ほとんどの場合、これらのデモのうち、非常に限られています。
最も一般的なデモタイプの1つは、システムをスキャンしてシステムの多くの問題を検出するだけで、ライセンスやサブスクリプションプランを購入する前にシステムを修正するのに役立つという点ではまったく何もしません。 。
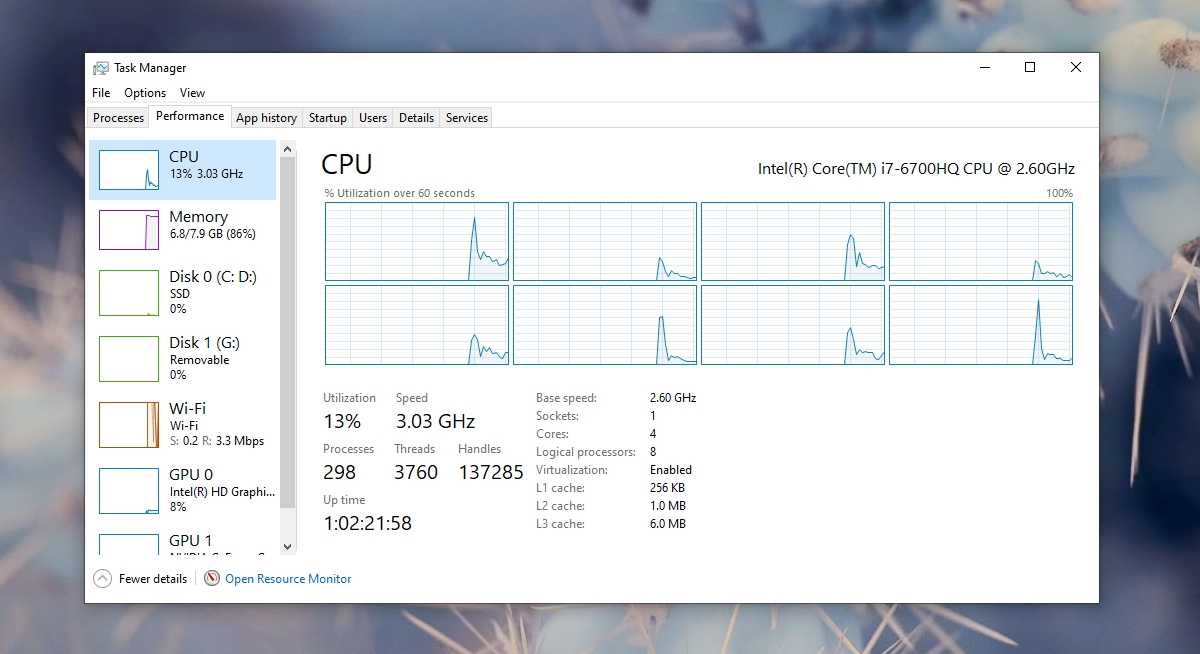
7。リソースホガーを手動で閉じます
一部のプログラム、プロセス、およびゲームは、CPUであるかどうかに関係なく、使用可能なリソースの多くを消費する可能性があることをすでに確立しています(PCの操作に少なくとも少し経験がある場合は、これをすでに知っている必要があります)。 、RAM、ストレージスペース、または帯域幅について説明しています。ただし、実行中のPCのパフォーマンスにのみ影響するため、ランタイムウィンドウの外でフリーズ、クラッシュ、スタッターが発生することはありません。
Ctrl + Shift + Esc を押してタスクマネージャーを表示し、下部にある[詳細]ボタンをクリックして詳細ビューを有効にしてください-メインウィンドウの左側。 6つの列があり、それぞれがコンピュータで実行されているプログラム、プロセス、およびサービスに関する情報を、名前、ステータス、CPU、メモリ、ディスク、ネットワークの順に示していることに注意してください。
プログラム、プロセス、およびサービスを、それらが占有しているリソースの数で並べ替える場合は、関心のあるもの(CPU、RAM、ディスク使用量)に応じて、4つのリソースタブのいずれかをクリックするだけです。 、または帯域幅。上で説明したように、1回クリックすると、最も高いコンシューマーがリストの一番上に表示され、もう一度クリックすると、リストが逆になり、その特定のリソースの消費量が最も少ないプログラム、プロセス、およびサービスが表示されます。
If your computer is incredibly slow, for instance, you can launch the Task Manager and click the RAM column to display the app that’s currently eating up most of your memory. Now if you notice that it’s hogging a lot more than it should, you can try to close it and check if there’s any improvement. The same principle applies to CPU usage: if you notice that the percentage is just too high, try closing the app, process, or service and see if your PC is any faster.
There’s another scenario where an app doesn’t show as being a huge RAM or CPU consumer but renders your PC unusable by making it extremely slow, stuttery, or even prone to crashes. Most of the time, these apps will show as non-responsive (Not Responding) in the Task Manager, so you can try and terminate them, even though they technically don’t consume a lot of resources.
If closing the processes that were taking up a lot of your system’s resources seems to have done the trick, then you could consider removing the app from your computer altogether, updating it to the latest version, or checking if it’s been misconfigured. It’s worth noting that some apps have certain configuration options that, once enabled, turn them into massive resource leeches.
8. Check your power & sleep settings
The fact that your power and sleep settings can have a negative impact on the performance of your computer is a less-known fact, but it does make sense, come to think of it. High processing power requires more resources, and one of the most overlooked resources in your computer is electricity. Therefore, it should make perfect sense that a more powerful computer should consume more electricity, which it does.
Fortunately, Windows comes with a bunch of power plans that you can apply depending on your current setup and preferences. For instance, you can set your computer to preserve more power at the expense of performance, or you can go full-throttle on performance, while also increasing the amount of electricity required. The most used alternative is a balanced power scheme that doesn’t give you full performance, but it doesn’t take a lot of energy, either.
Now if you’re on a desktop computer, the only reason why you’d want to adjust these power schemes is if you want more performance from your PC or keep your power bill at a minimum. However, for laptop users, things are a bit more delicate, as they also have to consider battery life when using their computers. Most laptop users are fans of the Balanced power scheme, which ensures normal PC performance and balanced battery life.
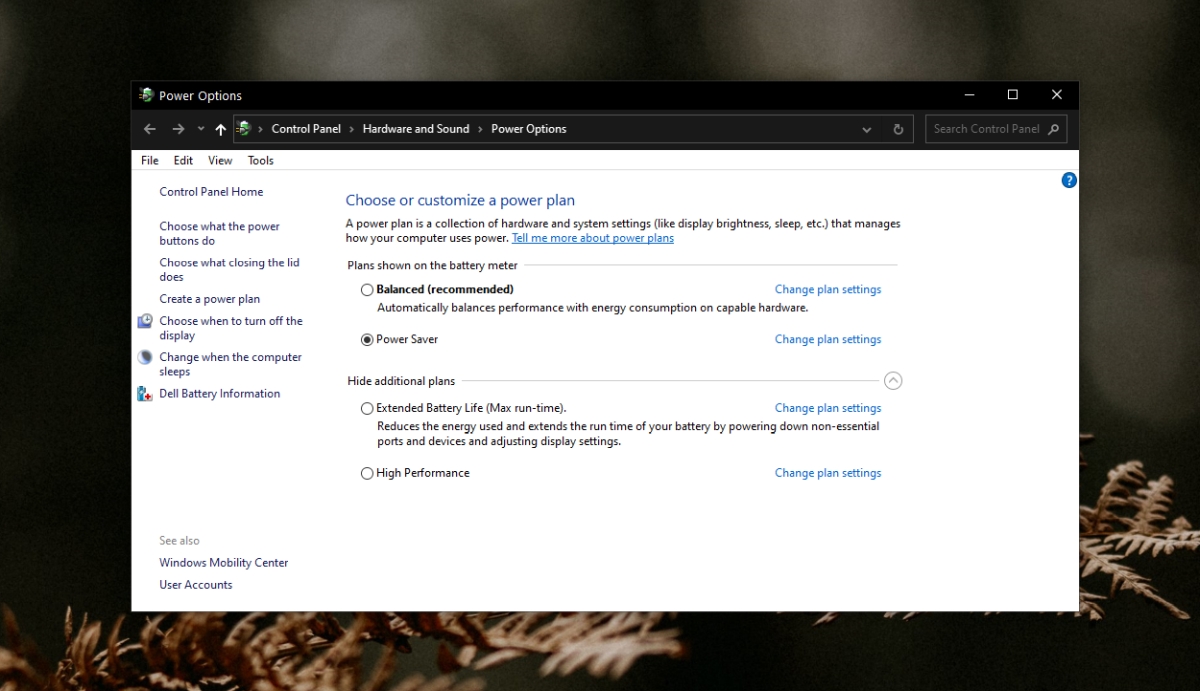
However, there are exceptional cases where you just need that extra oomph, so you switch to the performance-oriented power plan that drains your battery in a matter of hours (if you’re lucky and have a good battery), or you need more juice and you enable the battery-saving feature. Now if you remember what we mentioned just above, switching to a battery-saving plan will have a huge impact on your PC’s performance.
Therefore, if you notice that your computer acts incredibly slow for no apparent reason, you should check and see what power plan you’re currently using. This goes especially for laptop users since they’re more prone to interacting with power-saving options, but you should check it even if you’re a desktop PC user. It’s not uncommon to accidentally change power settings regardless of device type.
On laptops, a solid indicator that you’re using a power-saving plan is the reduced luminosity (brightness) of your screen. By default, the power saving plan will reduce luminosity to the absolute minimum, so it should be a bit harder to see stuff on your screen during daylight if that happens. Additionally, you’ll notice your laptop and its screen going to sleep way faster than it used to since it needs to conserve energy.
Long story short, if you decide to save some battery on your laptop you shouldn’t act all surprised when your entire system seems to be slowing down to a point where it’s barely usable.
9. Adjust visual effects
Newer versions of the Windows operating system have been not only more performance-oriented than their older counterparts but also made to look nicer. Windows developers have been implementing various animations, new polished graphics, menus, buttons, and icons to improve the user experience by providing users with not only a fast operating system but a sleek-looking one too.
However, all of this extra bling had to take its toll on your system somehow, as you probably know from computer games; increasing your graphic quality settings and setting a high resolution could affect your system’s performance and make the game feel more sluggish, albeit breathtaking in terms of eye candy. The same principle applies to Windows, but on a much smaller scale.
If you’re a lover of fancy animations, polished fonts, smooth buttons, window margins, and generally anything that looks out of the ordinary on your operating system, you probably have all these appearance-related enhancements enabled. For cutting-edge systems, this shouldn’t be a problem, since they’re specifically built to handle pressure from a wide variety of sources.
However, if your laptop or computer has been through more than two generations of operating systems without any significant hardware upgrade to help them match the requirements of new, modern Windows versions, there might be a problem there. For that reason, we recommend that you turn off as many visual enhancements as you can and check if there’s any notable improvement on how fast your computer is after doing so. Don’t know where to look for these settings? Check out the following mini-guide:
- Press the Win key on your keyboard
- Type Control
- Select Control Panel from the list of results
- Go to System and Security
- Open the System window
- Scroll down until you reach Advanced system settings and click it
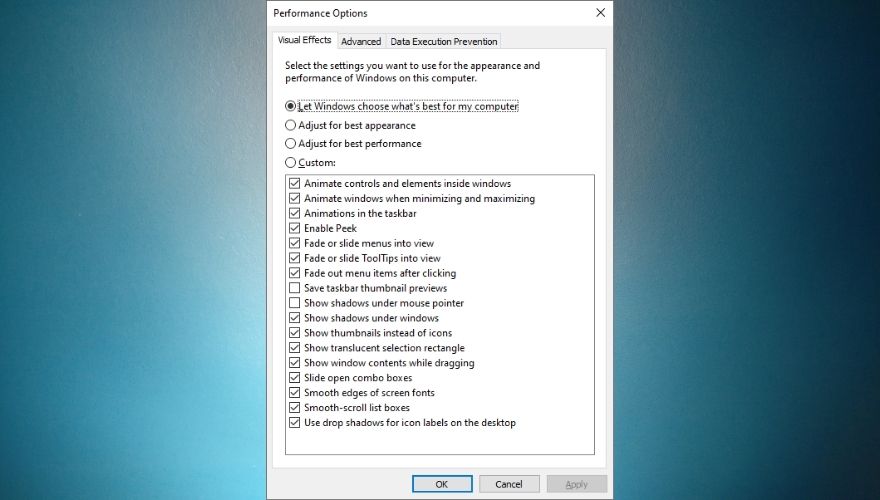
- Click the Settings button in the Performance section
- Click the Adjust for best performance radio button
- Confirm your action by clicking the OK button
- Restart your PC and check if there’s any major improvement
It’s worth mentioning that clicking the ‘Adjust for best performance‘ button will disable absolutely every visual effect in that list. If you don’t want your Windows experience to be devoid of every type of eye candy, you could give it a whirl and create your own scheme of visual effects by clicking the Custom radio button and start toggling features on or off from the list. Once you’re satisfied with your selection, click the OK button and restart your PC.
While you’re here, you should know that the Advanced tab of the Performance Options window enables you to change the paging file size for your drives manually (if you don’t trust that Windows’ automatic paging management is good enough), and switch between program-and background-service-oriented performance by clicking the corresponding radio button depending on your preference.
By default, Windows is automatically adjusted for the best performance of programs, but you can also set it to ‘Background Services’ if you feel it may benefit you more.
If you’re a Windows 7 user, you can find the same settings by searching for the Performance Information and Tools section, selecting the Adjust visual effects option, and navigate to the Visual effects tab to start customizing your settings or choosing a different scheme.
10. Disable unnecessary Windows Features
Windows features might seem like something that has to do more with your operating system’s infrastructure than with any active components that you got running, such as apps or services, and you’d be half right. However, most of these features rely on services and background processes to run flawlessly on your system, and as we’ve already established before, the more you load your PC, the slower it will get as time goes by.
For that reason, a wise thing to do would be to take a look at your system’s features and perform a swift cleanup if needed. Microsoft wishes to cater to the needs of a varied clientele through their most important product (i.e. the Windows operating system), so the product gets delivered with a bunch of tools and features readily available (already enabled) by default.
Don’t get us wrong, that’s not inherently bad, as you may need most of these tools at one point or another, but loading services that you “might someday need” and end up not using them ever can be harmful to your PC in the long run, much like leaving the light on or the water slightly running can be to your monthly budget. On the bright side, just because Microsoft decided to enable certain features it doesn’t mean that you WILL need them or that turning them off could cause irreparable damage to your computer, so you may want to turn some of them off.
This goes specifically if you notice that your system is not as fresh and fast as it used to, and trust us when you’ve reached this point, every little thing counts. You disable this, you uninstall that, you do a little bit of defragmenting, and before you know it your PC starts picking up its pace, doesn’t freeze as often as it used to, and crashes start to feel like a thing of the past.
However, if you landed here, chances are you’re not exactly a pro when it comes to computers, and you might not know exactly how to reach the list of Windows features, let alone disable or enable them to your heart’s content. Not to worry, though, we’ll walk you through the steps so that you can give your old PC the performance boost it so much needs. Here’s what you have to do to disable Windows Features:
- Press the Win key on your keyboard
- Type control
- Select the Control Panel icon in the Start menu
- Click the Programs and Features section in the Control Panel
- Locate and click the Turn Windows features on or off at the left side of the main window
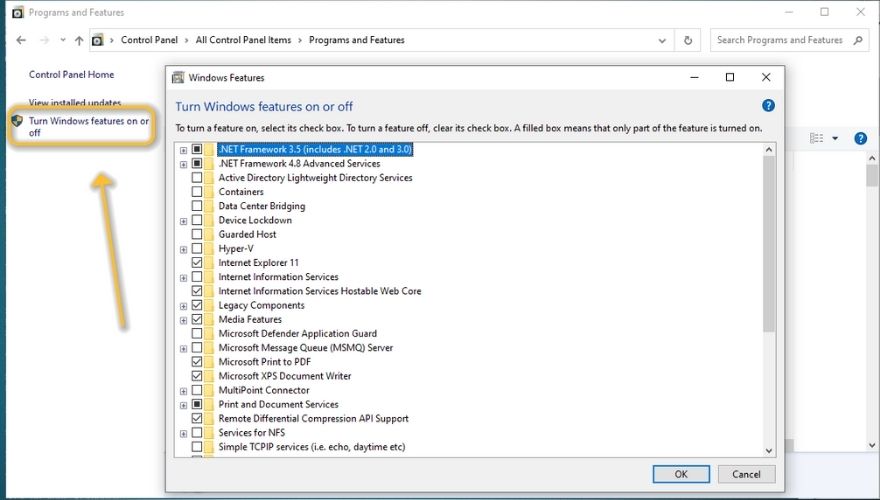
- From the newly-opened window toggle any unnecessary features off and click the OK button once you’re done
- Restart your computer
Note that you may want to refrain from haphazardly disabling everything in your wake, especially if you’re a PC novice and have no idea what each of the features depicted in that list helps you achieve on your PC. If you’re not sure about any specific feature and what role it plays on your computer, you may want to steer away from it and keep yourself from disabling it, as doing so may render some parts of your PC partially unusable.
Although the safest way to go with this would be looking up each feature, see what it does and what disabling it could mean for your system, we’ve also included some of the features that you could disable safely, along with what that feature does, and what disabling it could mean for your computer and/or operating system. Note that these features apply specifically to Windows 10, so if you’re using an older version of Windows some of these items may not apply to you.
- Internet Explorer 11
- You can safely disable Internet Explorer 11 from your Windows 10 PC considering the fact that Microsoft replaced it recently with Microsoft Edge. Internet Explorer still continues to remain available on Windows 10 PCs and there’s no immediate plan to remove it. Furthermore, Microsoft stopped sending Internet Explorer 11 updates through Windows Update, and you’d have to download and install them manually from Microsoft’s website, which is all the more reason to remove it without thinking about it twice.
- Internet Information Services (IIS)
- Recently, IIS started being enabled by default on new Windows 10 installations or during upgrades from older versions of these operating systems. Although it sounds like a big deal, you probably won’t need IIS up and running, so you might as well disable it. This doesn’t apply if you’re running a web server on your PC, in which case you shouldn’t disable IIS. If you do decide to disable it, you could also expand the IIS folder and disable FTP Server, Web Management Tools, and World Wide Web Services, if they’re enabled.
- Internet Information Services Hostable Web Core
- This goes in the same category as the IIS we mentioned and explained just above. If you’re not running any web server of any kind on your computer and don’t intend to do so anytime soon, you can safely disable the Internet Information Services Hostable Web Core if it’s enabled.
- Legacy Components and DirectPlay
- Legacy Components is a feature that enables you to add support for a wide variety of old components on Windows. One example of such a component is DirectPlay, which is a feature that was a part of DirectX a long time ago and is no longer used. If your system can still be considered somewhat new, go ahead and disable both Legacy Components and DirectPlay from the Windows Features screen.
- Media Features – Media Player
- A while ago, Media Features used to have more than just one feature under it, but now it’s just Media Player, Windows’ built-in solution for playing media files on your PC. If you have any experience with Windows PCs, you probably know that Media Player isn’t exactly versatile, as it depends on numerous codecs in order to let you enjoy your favorite video and audio files. If you’re already using a third-party multimedia player, such as VLC or Gom Player, go ahead and disable this feature.
- Microsoft Print to PDF
- This is Microsoft’s virtual printer that lets you export any printable document to a PDF on your computer instead of actually printing it. Personally, I find this feature useful on various occasions, so I keep it enabled all the time. However, if you’re using Microsoft Office or any other third-party tool that can convert documents to PDFs there’s no point in keeping this feature enabled as well, so it’s really your call.
- Microsoft XPS Document Writer
- XPS is a file format that was created by Microsoft as a response to Adobe’s PDF, in order to replace it and provide users with more flexibility over documents created locally without requiring third-party software solutions. If you never heard of XPS and don’t plan to use it anytime soon, our suggestion is to disable this feature.
- Print and Document Services – Internet Printing Client
- If you use a local printer to print documents from your computer instead of using one that’s available and shared on your network (LAN), you can safely disable this feature, as it has little to no use to you. However, if you’re used to sending documents over to a network printer, make sure you keep it enabled.
- Print and Document Services – Windows Fax and Scan
- If you have a fax machine or a scanner connected to your computer, make sure you don’t disable this feature. It’s enabled by default, so just leave it be if you need it. However, if you don’t use fax machines or scanners that are connected to your computer, then you can safely disable it without looking back. Note that certain versions of Windows may lack this feature altogether, so don’t bother looking for it if you can’t find it on your first try.
- Remote Differential Compression API Support
- If you’re not using remote access apps (even those that are built-in and readily available on your PC) or Windows Server, you can disable this feature, as it was introduced in Windows Server 2003 R2 to help users enhance their server management experience.
- Windows PowerShell 2.0
- If you’re a PowerShell user, you probably know that PowerShell 2.0 has been outdated for quite a while now, so there’s absolutely no reason to keep this feature enabled. At the time being, the latest version of PowerShell is 5.1.19041.906, so you can safely disable PowerShell 2.0 support from your PC.
- Windows Process Activation
- On newer versions of Windows, this should be already disabled by default, along with everything within it (.NET Environment, Configuration APIs, and Process Model), so you can guess for yourself exactly how useful this feature is for regular Windows users. If you’re running any home server or plan to do so in the near future you shouldn’t disable this feature, but if you’re just a regular home Windows user, you can get rid of it without even blinking.
- Work Folders Client
- Through this feature, you can connect to any linked device on your network, including other computers, and work on them (in work folders). If you’re simply using your Windows PC alone on your network and don’t need to connect to other devices on your network that you can work on, just disable it.
Note that all the features that you’ve disabled can be easily re-activated by simply following the same steps before our list of features and checking the boxes that you want to re-enable. We’ve personally tested disabling these features before putting them in our guide, so everything should be alright with your PC as long as you follow our guidelines.
However, if you notice any stability or functionality issues that occur after disabling some or all of those features, feel free to re-enable them. Here’s a trick: you can only enable half of them each time so that you know which half contains the troublesome feature, and work your way through them using this technique. It’s faster and can save you a lot of time, especially if you have to restart your PC after enabling or disabling some of the features.
11. Run a malware checkup
Maybe you won’t believe us, but malware can beat your computer down to a pulp and make it virtually unusable to you (at least compared to what it used to work like when you first purchased it). Therefore, it goes without saying that you should pay great attention to stuff that you let reach onto your PC and seep within its virtual entrails.
However, you can never be too careful, seeing as cyber threats and their perpetrators get more dangerous and creative by the day, so if prevention is not a viable option, the next best thing is the treatment.
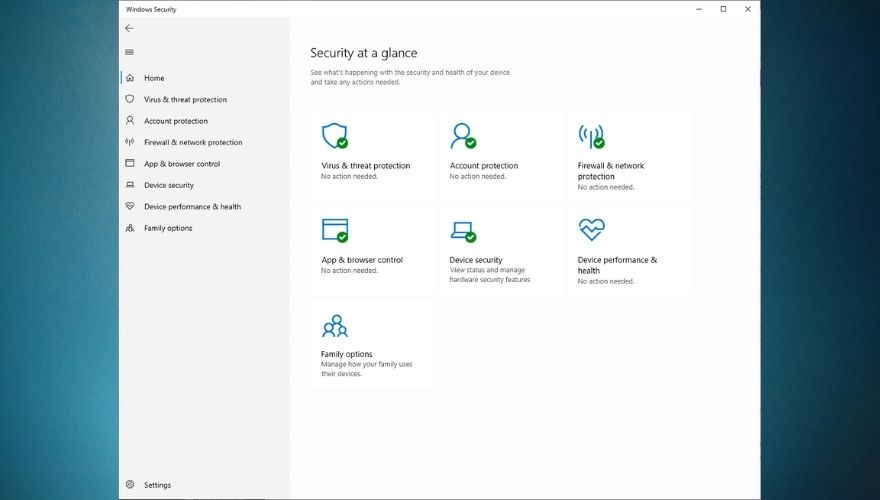
In case you didn’t know, Windows includes a quite powerful anti-malware solution that you can use to scan for malicious files and code on your computer and remove it. Just like any other anti-malware software solution, Windows Security can’t possibly detect newly-created code, so there is a possibility that at some point your PC could get infected even if you’ve scheduled 12 quick scans per day and 7 full system scans per week.
In this case, you should be prepared by backing up everything important externally as frequently as you can, considering that ransomware seems to be the current trend.
However, if you’re not a fan of Windows Security, you can feel free to install any other anti-malware utility you find fit. As a rule of thumb, you should keep in mind that free antivirus and anti-malware solutions are generally not more powerful than Windows’ built-in solution and could make your system go slower, so if you’re really serious about cybersecurity, you’ll need to pay top dollar for the best tools available.
Note that malware can be found in many forms, so you shouldn’t target EXE files on your PC exclusively when performing your scans. In fact, some of the most dangerous forms of malware inject themselves into system processes and DLL files, so you should perform full system scans as often as possible.
However, keep in mind that a full system scan will slow down most computers by a significant deal, so avoid using them during those times or set scans at hours when you’re not using them and schedule your PC to turn off afterward.
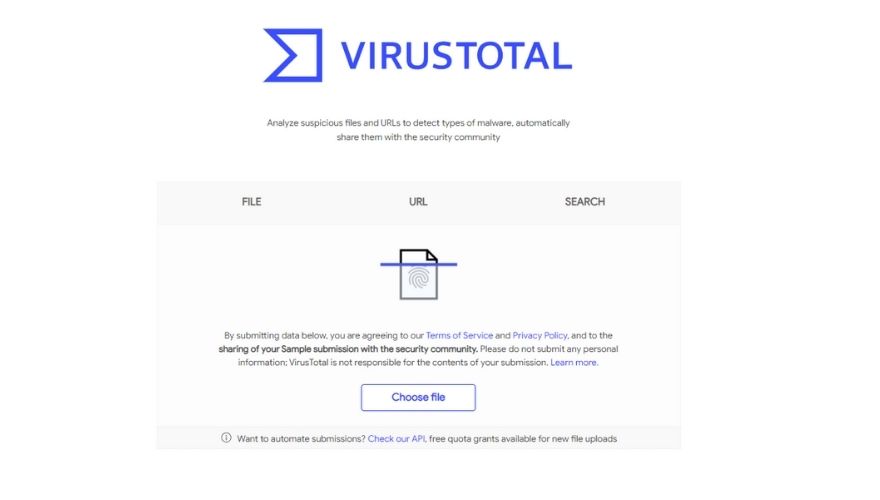
One last thing regarding malware checkups: sometimes Windows might detect false positives, so you should try doing some additional research on your files before sending them to quarantine or removing them from your PC altogether.
One quick way of doing that is submitting the potentially dangerous file to an online virus scanning service such as VirusTotal and analyzing the results. Always remember to clean up quarantined files by either removing them from your PC altogether or restoring them to their initial location if appliable. Make sure not to allow/restore files that are really infected.
12. Use Windows’ security utility
If you’ve installed several security tools on your computer, especially if they’re free, limited ones, you should know that Windows’ built-in antivirus and anti-ransomware protection works absolutely great, it’s built-in (which gives it an extraordinary edge over third-party products), and doesn’t use up a lot of your system resources.
Antivirus tools are more often than not huge resource mongers, and it’s no surprise, considering that they constantly perform background checks, have real-time scanners that are ready to capture anything going wrong on your system, most of them are scheduled to run on startup, and almost all of them can’t be closed (for obvious security concerns), not even using Windows Task Manager.
For that reason, we suggest you stick to as few malware detection tools as you can, especially if you’re trigger-happy, and install every free tool that promises to keep your system clean of threats without first uninstalling some of those that you were previously using.
As a rule of thumb, you should have no more than one antivirus, one anti-malware/adware, and one firewall running at the same time on your system if you want to avoid slowdowns and keep your PC running smoothly and fast for a long time.
13. Update your drivers
Compared to older versions of this operating system, Windows 10 does an incredibly good job at fetching drivers from the Internet and installing them on your PC merely moments after you finish deploying this OS. In fact, most of this magic happens in the background so you don’t even realize what’s happening until after everything has already been installed and configured.
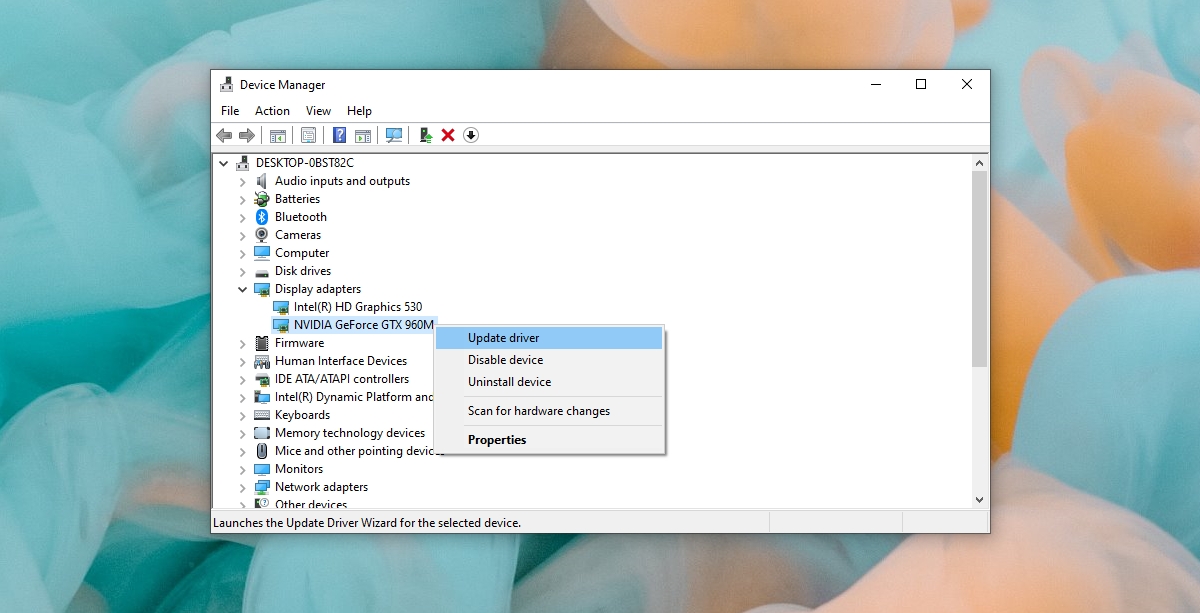
However, sometimes even Windows 10 can make mistakes, and you might end up with an outdated set of drivers on your system, which may cause certain performance issues, such as slowdowns, freezes, stutters, and even crashes if you’re really unfortunate. I can’t even remember how many times I’ve faced a BSOD because of a driver mismatch, so you might want to check the manufacturer’s official website for the latest drivers.
Fortunately, most manufacturers released checkup tools that you can install on your system and use them to detect if you’re running the latest drivers for your hardware components, whether it’s the GPU, network adapter, or CPU we’re talking about. After deploying the latest versions of the drivers you need, make sure to restart your PC and check if there’s any improvement.
If you don’t like getting your hands dirty and spending a lot of time online searching for the correct versions of the drivers you need to install, you’ll probably be glad to learn that there are various third-party software solutions that could take care of these things for you. Unfortunately, most of these tools are premium, so you’ll need to pay a fee in order to use them.
You could find some working demos of these utilities, but almost all of them merely detect what drivers you’re missing and don’t allow you to download or install them directly through their interface.
14. Turn Cortana off
Cortana could save you from a lot of headaches if you’re into virtual assistants and controlling stuff with your voice on your computer. However, if you rarely or never used it before, there’s absolutely no need to keep it active on your PC, as it will only slow it down by a great deal, not to mention that several hackers have figured various ways to exploits its vulnerabilities and gain access to your system through it.
For those two ultra-important reasons alone you may want to consider disabling Cortana on your Windows 10 PC. For obvious reasons (Cortana is only available on Windows 10 systems), if you’re using Windows 8 or Windows 7 (or even older systems), you can skip this step.
There’s some bad news, though: in the beginning, Cortana was relatively easy to remove, but now you have to get your hands a bit dirty by going through your system registry, which can be a bit scary for novices. Don’t worry, though, we’ve got your back and will teach you exactly what to do in order to remove Cortana from your Windows 10 PC:
- Press the Win key on your keyboard
- Type Edit group
- Select Edit Group Policy
- Go to Computer Configuration
- Open the Administrative Templates folder
- Head to Windows Components
- Open the Search folder
- Double-click Allow Cortana
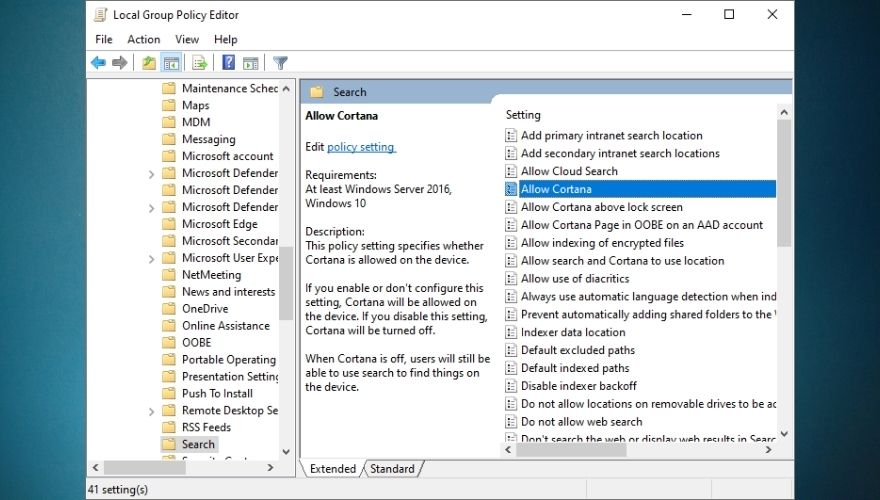
- Click the Disabled radio button on the left side of the window
- Click the OK button to confirm your action
- Close the Local Group Policy Editor window
- Restart your computer
After you restart your PC you should notice that Cortana is not available any longer and instead of the Ask me anything textbox that is specific to Cortana you should see a Search Windows one. It’s worth mentioning that the instructions above will only work on Windows 10 Pro. If you’re using Windows 10 Home, you need to do a modification to your Windows registry.
15. Use tune-up utilities
Maybe the name of tune-up utilities doesn’t speak volumes to you, but if you’re planning to breathe new life into your old computer, they’re an absolute must, as they can perform a huge array of functions without having any previous experience using similar tools or having a degree in operating computers. Usually, you just install these utilities on your computer, allow them to perform a quick scan, and let them take care of everything.
Not too long ago these tools were very popular and as a consequence of their popularity (of the legit ones), a lot of knockoff copies started flooding the market. Now that’s not to say that clones and forks of popular programs are inherently bad, but as far as tune-up utilities go, most of their knockoff copies are entirely useless, and could even make your computer go slower, not to mention the fact that almost all of them come packed with additional software, which is an excellent entry point for malware on your PC.
Therefore, if you’ve decided to go this path and let a third-party tune-up utility do all the heavy lifting and breathe new life into your computer, you need to make sure that the tool you’re using is actually legit and not some clone that will only steal data, grab your money by making you pay for a subscription plan or a license, plant malware, or open backdoors on your PC.
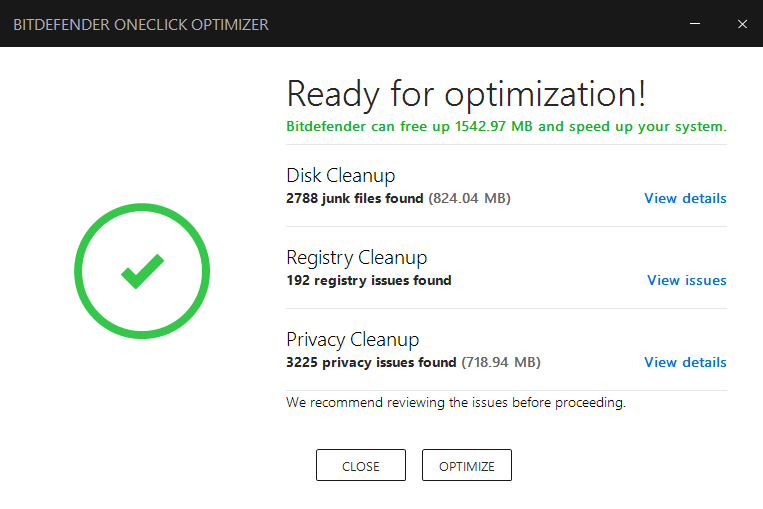
More often than not, PC optimization tools will have a working demo that you can download and install on your computer and take the features of the program on a test drive and see exactly how effective it is. However, there’s a catch: most of these tools will only perform a quick scan on your PC, one that goes so fast it’s actually hard to believe it took so little time to complete.
This scan will most likely find a LOT of things that are not alright with your PC and claim that they can fix it in a couple of clicks, but here’s the catch: you must pay for a subscription plan or buy a license in order to do that. So even if you believe you pulled a winning ticket with these programs, most of them are actually trying to trick you into buying a license and will do almost nothing to restore your PC to its former glory.
We get the appeal of free software; nobody wants to pay for stuff that they could get for free, and that’s one of the biggest reasons why so many get scammed or end up with a malware-ridden computer. Given that nowadays it’s hard to distinguish between tools that actually work and ones that are only there to make a quick buck out of your naivete, we took the liberty of creating a list of free PC optimization tools that are actually safe.
Note that despite the fact that you can use these tools without paying a dime, they are somewhat limited in functionality, so you’ll only be able to perform a series of operations while using their free versions. However, if you feel like one of the apps on our list is exactly what you’ve been looking for, you can unblock their full versions by either buying a subscription plan or purchasing a license.
16. Perform a clean Windows install
It’s not a terrible idea to perform a clean Windows install on your computer every now and then, especially if you’re using your PC on a daily basis, and bombard it with various apps, updates, browser extensions, and the such. In time, these things can lead to a total system slowdown, stutters, hang-ups, freezes, and even failures (crashes, BSODs, you name it).
If you’re the type who performs regular system maintenance, uses uninstallers to get rid of leftover data, doesn’t run a huge amount of apps simultaneously, updates drivers frequently, and generally runs a tidy ship, then a clean OS install may be redundant. However, if you’re somewhat negligent when it comes to keeping things nice and tidy on your PC, you should definitely go for it, especially if you’ve noticed that your system started slowing down for no apparent reason.
Novice computer users might not grasp exactly everything regarding how an operating system works and may not know exactly where to start if a clean Windows installation is in order. Although performing a clean operating system installation could feel somewhat intimidating for a novice, there are numerous detailed guides online on how to do that with minimum risks. Check out our extensive guide on how you can install Windows 10 using a UEFI bootable USB.
Windows 10 also offers you what would be the equivalent of performing a factory reset and restoring your PC. However, a lot of users complained that attempting to do so only leads to an error that informs them that there was a problem during the PC reset operation and that no changes were made, so Microsoft still has to go to some lengths to iron these imperfections.
However, if you’re among the lucky ones and resetting your PC works on your end, you could try and do that instead of performing a clean install. We also have a guide on how you can perform a factory reset on your Windows 10 PC without significant efforts, so feel free to use it at your leisure if you’re worried that you’ll get stuck.
Note that resetting your PC, the drive on which you installed the operating system (usually the C drive) will be cleaned up, and as a result, all of your user settings and applications will be removed. Therefore, it goes without saying that if you have anything worth saving on the drive where you have Windows installed, you should back it up before you start the reset process. If you forget to do so, you could still use data recovery tools in an attempt to restore lost data, but there’s no guarantee doing so will work.
17. Upgrade your hardware
If you’ve tried everything or at least almost everything in our guide and your computer is still acting stubborn and refuses to speed up even just a bit, there’s a good chance that you need to perform a hardware upgrade. In time, operating systems can get ahead of the hardware they’re installed on, and that’s perfectly natural considering that we’re always striving to reach new heights regarding performance.
As a result, your hardware may not be able to keep up with your operating system, the programs you installed, drivers, and updates, so it starts to feel sluggish, freeze, or even crash occasionally. If that happens, you should start looking up components for your system or considering upgrading to a new system altogether if you lack the patience of searching for individual parts for your PC.
Although quite popular, SSDs are still quite overlooked when it comes to performing system upgrades. Most users focus on RAM, coolers, PS (power sources), and CPUs, but upgrading your SSD is equally important for speed, especially if you have a low-storage unit or lack one altogether.
If you only have an HDD on your system, consider replacing it with an SSD, or better yet, install an SSD alongside it and deploy your operating system on the SSD. As a rule of thumb, you should know that SSDs are way better at loading stuff (apps, operating systems), while HDDs are better for storing documents (cheaper units for the same storage space).
If you make the switch from an HDD to an SSD, you’ll notice a significant improvement in OS booting time, performing updates, copying or moving files, deleting files, as well as launching various apps that you may have installed on the same drive (the SSD). Thus, if your system is acting all slow and you’re not using an SSD, now is the best time to get one and migrate everything OS-related on it.
However, RAM and CPUs aren’t to ignore, either. If you notice that your operating system or various programs you’ve installed on your computer quickly eat up your RAM or CPU no matter how great you are at resource management and try to keep a tidy workspace, it’s definitely time for an upgrade. More RAM means you have more spare memory to use, which subsequently means that you’ll be able to run more apps simultaneously without your PC getting slow or unresponsive.
A better, faster CPU translates into more computing power, so if you notice that your PC takes an awfully long time to perform even basic, menial tasks, upgrading your CPU may be exactly what you need to make things better.
Some of the most important details you’ll have to look after when you’re buying a CPU are the number of cores it sports, the number of threads it has, its clock frequency, whether or not it supports turbo (boosting) technology that increases the frequency when needed, and whether or not it supports overclocking (sometimes you’ll need it).
If you’re using a laptop and low battery life makes you constantly switch to a power-saving plan, you should use your laptop plugged into a power source (an outlet) and make the switch to a performance-oriented power plan. Another alternative would be purchasing a brand new battery, desirably an extended one, that could eliminate the need to constantly saving power by throttling your laptop’s performance.
How to make my PC faster
All things considered, if your computer is not exactly what it used to be in terms of speed and seems to be slacking off lately even when it comes to basic, day-to-day tasks, you should consider stepping in and trying some of the suggested fixes we’ve included in our comprehensive guide. We recommend you to try as many fixes as you can, seeing as your PC is a piece of complex, well-oiled machinery that depends on a huge array of components in order to function properly, so the reason for your system’s slowdown could be basically anything.
CONCLUSION
The suggested fixes we’ve included in our guide were designed to cover as much ground as possible, so try to avoid skipping any one of our suggestions. As we’ve explained in the last part of our guide, if everything else fails, you should start considering upgrading your hardware, either by buying better components separately and use them to replace the existing ones on your old/slow system, or purchase a new, pre-configured system altogether. Just to be safe, if you buy a new system, make sure its specs are better than the ones on your existing computer.