Windowsのパワーユーザーの場合、PCでさまざまな操作を実行する方法が複数のアプローチであり、特殊なGUIアプリがよくあることをご存知でしょう。コマンドラインにコマンドを手動で入力するよりも制限があります(そして、正直言って満足度は低くなります)。目の前にテキストの壁が広がっているのを見ると、まさにその満足感があります。結果がエラーでなければ、それはさらに価値のあるものになります。

Windows PCでは、これを実現する方法はCMDまたはPowerShellの2つだけです。 CMDはPowerShellよりも少し人気がありますが、対応するものを使用すると、CMDを介して実行できる操作を含め、はるかに多くの操作を実行できるため、それほど強力ではありません。 PowerShellは、古いCMDの機能とスクリプトおよびコマンドレットの機能を組み合わせており、PowerShellを使用して実行できる操作に関して多くの可能性を提供していると言えます。
ただし、PowerShellを使用して実行できる操作の数は、CMD(PowerShellは言うまでもなく)を聞いたことがないユーザーは言うまでもなく、経験豊富なユーザーにとっても非常に恐ろしいものになる可能性があります。ただし、心配する必要はありません。PowerShellを使用して実行でき、長期的には覚えることができる簡単なトリックをいくつか紹介します。この「クラッシュコース」は、PowerShellの包括的なマニュアルとしては機能しませんが、いくつかの指針を示し、一連のコマンドを説明することで、PowerShellを回避する方法を見つけるのに役立つことを願っています。準備ができたら、始めましょう。
<!-目次->
PowerShellとは何ですか?
上記で簡単に説明したように、PowerShellは、さまざまな操作に使用できる強力なツールです。それ以上に、PowerShellは、コマンドラインシェル(CMDなど)、スクリプト言語、構成管理フレームワークなど、その内部にあるいくつかの強力なツールで構成されるタスク自動化ソリューションです。
>テキストのみを受け入れて返すことができる他のシェルとは対照的に、PowerShellは、含まれている優れた機能のおかげで、.NETオブジェクトを受け入れて返すこともできます。 PowerShellの最も重要なシェル関連機能のいくつかは次のとおりです。
- コマンド予測とタブ補完
- パラメータとコマンドエイリアスのサポート
- 包括的なコマンドライン履歴
- パイプラインを介してコマンドをチェーンする機能
- Unixベースのシステムのマニュアルページに似たコンソール内ヘルプシステム
ただし、前述したように、PowerShellは単なるシェルではないため、これは氷山の一角に過ぎません。システム管理操作を自動化するための強力なスクリプト言語として使用できますが、さまざまな環境でソリューションを構築、分析、テスト、および展開する場合にも使用できます。
PowerShellが.NETCLR(.NET共通言語ランタイム)に基づいていることを考えると、PowerShellが動作するすべての入力と出力が.NETオブジェクトである理由を簡単に理解できます。さらに、PowerShellがテキスト出力から情報を抽出できるようにするために、テキスト出力を解析する必要はまったくありません。 PowerShellのスクリプト機能には、次のものがあります。
- クリーンで簡単な出力を保証する包括的なフォーマットシステム
- 広範な型システムを介して動的型を作成する
- クラス、関数、モジュール、スクリプトを使用してPowerShellの機能を拡張できます
- XML、JSON、CSVなどのさまざまなデータ形式のネイティブサポート
コードを使用してエンタープライズインフラストラクチャを管理および構成することに関心がある場合は、PowerShellがDesired State Configuration(DSC)管理フレームワークを通じてこの可能性も提供していることを知っていただければ幸いです。 PowerShellのDSCを使用して簡単に実行できる操作の中で、次のことを思い出してください。
- プッシュモデルまたはプルモデルのいずれかを使用して、さまざまな構成スキームを展開します
- 環境内で繰り返し可能な展開に使用できるカスタムスクリプトと宣言型構成を設計します
- さまざまな構成スキームを適用する
- 構成のドリフトに関するレポート
PowerShellには、Perlにいくぶん似ている独自のプログラミング言語が付属する独自のコマンドラインがあります。 PowerShellは当初、ユーザーがコンピューター上のオブジェクトを管理できるように開発されましたが、ご想像のとおり、長い道のりを歩み、現在ではより広範囲で複雑なジョブに使用されています。
たとえば、PowerShellの広範な作業環境を利用して、さまざまなシステム管理操作を実行するだけでなく、それらを自動化することもできるため、面倒で反復的なタスクを時々行う必要がありません。また、以下を含むがこれらに限定されない1つのプログラム(PowerShellなど)から多数のリソースにアクセスできることにも言及することが非常に重要です。
- Windows Management Instrumentation
- .NET Framework API
- コマンドプロンプト
- Windowsコンポーネントオブジェクトモデル
- PowerShellコマンド
現在、PowerShellの最も一般的な目的の1つは、エンドユーザーがシステム管理タスクを自動化できるようにすることです。これにより、エンドユーザーが一連の退屈で反復的な操作に従事するのを防ぐことができます。繰り返しの行動から人的要因を排除することで、効率が向上し、さまざまな理由による人的エラーが減少することが証明されているため、誰にとってもメリットがあります。
PowerShellを使用して、単純なコマンドまたはより複雑なコマンドを発行できますが、このプログラムは、PowerShellによって自動的に実行されるそれらのコマンドに基づいてスクリプトを作成するのにも役立ちます。さらに、コマンドレットと呼ばれる、カスタマイズして後で発行できるコマンドが非常にたくさんあります。
PowerShellはクロスプラットフォームでオープンソースであることに言及する価値があります。つまり、WineやBoot Campなどのトリックや互換性強化ツールに頼ることなく、MacやLinuxなどの他のシステムでもネイティブに使用できます。
基本的なPowerShellコマンドのリスト
PowerShellは少し威圧感を感じるかもしれません。特に、PowerShellはコンピューター上の単なる別のコマンドプロンプトではなく、実際にはCMD機能だけでなく、特定のプログラミング言語やさまざまなスクリプトも含まれていることがわかりました。システム管理操作を自動化するために使用します。
ただし、PowerShellとそれが提供するすべての機能を習得することを決意している場合は、PowerShellの最も基本的な機能から始めることを強くお勧めします。そうすれば、誤って間違った機能を使用したことに気づき、その間に実行したすべての作業が遠い記憶のように見え始めたときに、数か月の進捗状況をロールバックする必要がなくなります。
>そのため、PowerShellセッション内で安全に使用できる基本的なコマンドのリストを用意して、この強力なプログラムの機能をテストし、どれが正確に何を実行するかを確認します。以下のリストには、コマンド名、それらのエイリアス、および各コマンドの機能の簡単な説明が含まれています。
コマンド名またはそのエイリアスのいずれかを使用でき、結果はまったく同じになることに注意してください。エイリアスの使用を好む理由は、エイリアスの入力がはるかに高速であり、エイリアスを正しく覚えて対応するコマンド名に関連付けることができれば、仕事をすばやく終わらせたい場合に意味があります。
| ac | |
| asnp | |
| clc | |
| cls | |
| cli | |
| Clear-ItemProperty | clp |
| clv | |
| cnsn | |
| cvpa | |
| cp | |
| cpi | |
| Copy-ItemProperty | cpp |
| dbp | |
| dnsn | |
| ebp | |
| etsn | |
| exsn | |
| epcsv | |
| epsn | |
| ForEach-Object | % |
| ForEach-Object | |
| fc | |
| fl | |
| ft | |
| fw | |
| Get-ChildItem | dir |
| Get-ChildItem | gci |
| Get-ChildItem | ls |
| gcm | |
| Get-Content | |
| gc | |
| h | |
| gi | |
| Get-ItemProperty | gp |
| gjb | |
| gl | |
| pwd | |
| gm | |
| gmo | |
| gps | |
| ps | |
| Get-PSBreakpoint | gbp |
| Get-PSCallStack | gcs |
| Get-PSDrive | gdr |
| Get-PSSession | gsn |
| Get-PSSnapIn | gsnp |
| gsv | |
| Get-Unique | gu |
| gv | |
| Get-WmiObject | gwmi |
| ipcsv | |
| ipmo | |
| ipsn | |
| icm | |
| iex | |
| ihy | |
| r | |
| ii | |
| irm | |
| iwr | |
| iwmi | |
| オブジェクトの数値プロパティ、および文字列オブジェクトの単語、 行、文字を決定します |
|
| mkdir | md |
| mi | |
| mv | |
| mp | |
| ni | |
| nmo | |
| New-PSDrive | ndr |
| New-PSSession | nsn |
| New-PSSessionConfigurationFile | npssc |
| nv | |
| Out-GridView | ogv |
| lp | |
| powershell_ise.exe | |
| rcjb | |
| rcsn | |
| del | |
| rd | |
| ri | del 、 Erase 、 rd |
| rm | del 、 Erase 、 rd 、 ri |
| rmdir | |
| rp | |
| rjb | |
| rmo | |
| rbp | |
| rdr | |
| rsn | |
| rsnp | |
| rv | |
| rwmi | |
| rni | |
| rnp | |
| rvpa | パス内のワイルドカード文字を解決し、 パスの内容を表示します |
| rujb | |
| Select-Object | |
| sc | |
| si | |
| cd | 現在の作業場所を指定した場所に設定できます( アクティブな場所を変更します) |
| chdir | |
| sbp | コマンド、変数、または行にブレークポイントを設定できます |
| 変数の値を設定したり、 要求された名前の変数が存在しない場合は変数を生成したりできます |
|
| shcm | |
| sajb | |
| sasv | |
| ? | |
膨大な量の基本的な PowerShellコマンドに脅迫されないようにしてください。基本と呼んでいますが、覚える必要はまったくありません。実際、これが上記の表を作成した正確な理由です。これにより、上記のすべてのコマンドを覚えておく必要がなく、作業を続行できます。
簡単な復習として使用したり、ブラウザの検索機能を使用して、特定のコマンド、そのエイリアス、および混乱した場合の機能を見つけることもできます。この情報は上記の表にすでに含まれていますが、PowerShellでの作業中に混乱した場合は、 help コマンドを使用すると、このプログラムとその使用方法に関するいくつかの役立つ詳細が表示されます。より効率的にコマンドを実行できます。
特定のコマンドの詳細が必要な場合は、 help コマンドを別のコマンドまたはエイリアスとペアにすることもできます。たとえば、これは、 help Add-Computer と入力したときにPowerShellが表示するものです:
ただし、上記の表にある他のコマンドまたはそのエイリアスでヘルプを使用することはできます。 Make sure you understand that the same command can have multiple aliases, which means that you can achieve the same result by using various aliases. Although this may sound confusing, it actually gives you plenty of flexibility in case you can’t remember one command alias, but you remember another one that can help you achieve the same goal.
Using PowerShell
Naturally, the first thing you’d want to do is locate PowerShell and launch it. One sure way to launch PowerShell from just about anywhere you are on your PC is to hold down the Shift button on your keyboard, right-click any empty spot on your screen (not a menu, icon, button, or similar object), and select Open PowerShell window here from the context menu.
In addition to giving you quick access to the PowerShell console anywhere on your PC, doing so will automatically switch the default working directory for PowerShell to the one you’re currently located at. If you’re on a Windows 10 PC, you can also launch PowerShell by pressing the Win key on your keyboard, typing PowerShell in the Start menu, and selecting PowerShell when it becomes visible in the list of results.
On older versions of Windows, you’ll need to manually locate the PowerShell executable, which you can either find in the Accessories or System folders in your Start menu. Furthermore, seeing how older systems (such as Windows 7) don’t provide you with PowerShell by default, you’ll also have to install it on your computer, along with all of its dependencies.
Notice how launching PowerShell from the Start menu will set your active working directory to C:\Users\[your username here]. By comparison, using the Shift + Right-click method we’ve presented above will set PowerShell’s active directory to the one you’re currently at when you spawn the console. For instance, if you use Shift + right-click and open PowerShell from your desktop, you’ll notice that the active directory will be C:\Users\[your username here]\Desktop. For obvious reasons, the [your username here] part will be different depending on your username.
Although you can keep PowerShell for home usage just fine, it’s better if you could make use of all that it has to offer. Incidentally, these features make PowerShell awesome for corporate usage, where you need to perform a large number of operations in a short time, and most likely on a huge number of devices.
Thus, instead of running each command manually on every single machine, you could simply create an automation script in PowerShell and receive the information you need automatically, without having to physically interact with the devices in case or even be near them. Just as CMD, PowerShell can be used through command lines. However, unlike its more rudimentary counterpart (i.e. the CMD), PowerShell also lets you summon scripts and cmdlets, which makes it more powerful, but also more complicated to use.
How to use cmdlets
We’ve used the term cmdlets quite a few times in our guide, so you’re probably left wondering whatever they mean. Well, to start at the beginning, it’s worth reminding you that CMD works with commands. A cmdlet, which is pronounced command-let, is also a command, but unlike traditional CMD commands, cmdlets are specific to PowerShell and let you perform single specific operations, such as copying files, moving items from one place to another, changing the active directory, or see the contents of an item.
Simply put, cmdlets are single function commands that you can type directly in PowerShell’s command line. If you have any prior experience with the CMD, you’ll find PowerShell somewhat intuitive to work with. One interesting thing about PowerShell is that it shares plenty of commands with CMD. Therefore, using CD with PowerShell will still change your active directory, DIR will still display the contents of the current folder, and CP will still let you copy an item from one place to another.
It’s quite worth mentioning that PowerShell is not case sensitive, unlike many other shells, which return errors if you miss using the correct case when typing your commands in them. Thus, copy-item will work just as well as Copy-Item, and if you remember neither one of them you can also use Copy, CP, and CPI (but also copy, COPY, cp, or cpi).
Most PowerShell cmdlets are written in C# and are specially built to perform operations that will return a.NET object as their result. At the time being, you could find more than a couple of hundred cmdlets you can use in PowerShell, which, let’s be fair, gives you more than just a little elbow room as far as performing operations goes.
Although it will be difficult to remember all the cmdlets you may have to work with (remember that you can use the table above), there are a few that you’ll use more frequently, which will make them incredibly easy to remember. Not to mention the fact that some of them are intuitive enough that their name actually gives away their purpose (e.g. copy is used to copy items, move can be used to move files, compare helps you compare sets of objects, etc).
However, if you’re not exactly in the mood to bookmark this article to use it later, you could also type in the Get-Command cmdlet in PowerShell, or gcm, if you want to keep things short. Doing so will display a full list of commands that are available to you, and you can use that list to plan ahead on whatever it is you’re trying to do.
Unlocking custom cmdlets
On the downside, Microsoft doesn’t just give you full access to the whole array of cmdlets that you can use in PowerShell by default, so you’ll have to jump through a bunch of extra hoops to unlock this feature and use it at your leisure. The good news is that the unlocking process doesn’t take long, and then there’s the fact that it can also be done through the PowerShell, which will make great practice for you. Without any further ado, let’s see how you can unlock custom cmdlets privileges in PowerShell.
- Log in to an Administrator account (it won’t work without Admin rights)
- Launch PowerShell with Administrator rights (Run as administrator)
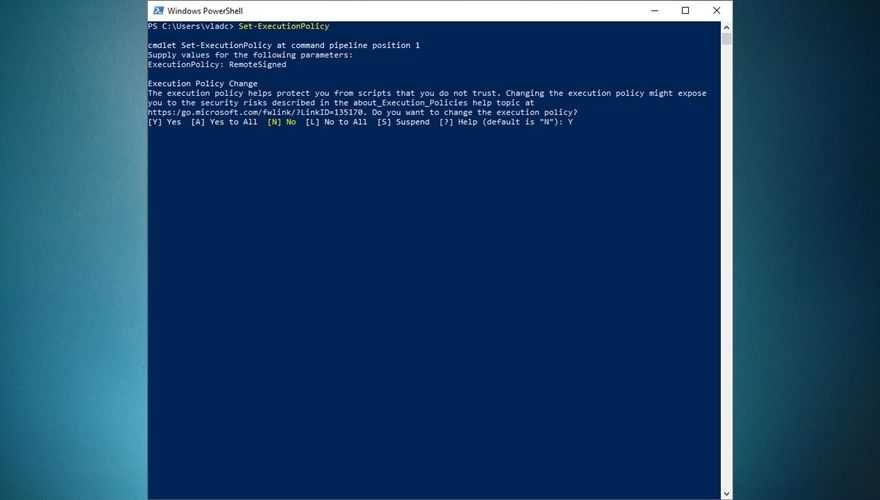
- Type the following command in PowerShell and press Enter:
Set-ExecutionPolicy
- If done right, PowerShell will prompt you with a dialog, asking you for the new ExecutionPolicy value
- Type
RemoteSignedin the PowerShell command prompt and press Enter - PowerShell will give you a heads up on the risks of modifying the value of the ExecutionPolicy
- Type Y and press the Enter key
- If you need to turn custom cmdlets off, just follow steps 1-4, and when PowerShell asks you to type the value, type
Restrictedand confirm your choice as you did at step 7
If you want to streamline the whole process and not waste time typing everything down in PowerShell’s command prompt, you’ll be glad to learn that there’s an even simpler way to achieve the same result. Launch PowerShell with Administrator rights as you did at step one, and instead of typing each command and waiting for the prompt, you’re gonna pipeline everything up until the confirmation by typing this:
Set-ExecutionPolicy-ExecutionPolicy RemoteSigned
Naturally, you will still need to confirm your choice by typing Y and hitting Enter on your keyboard, but you just skipped a step and performed a series of operations at the same time. This is exactly why advanced PowerShell users create automation scripts to perform various management operations automatically: to save time and hassle. If you want, you can use the same command above to disable custom cmdlets on your system, but you’ll have to replace RemoteSigned with Restricted and also confirm your choice at the end.
You can also use AllSigned and Unrestricted to grant yourself even more privileges when it comes to running potentially unsafe scripts on your Windows PowerShell. The AllSigned option will let you run all scripts that were created by trusted publishers, whereas the Unrestricted option will enable PowerShell to run any script, regardless of its provenience and trustworthiness. Naturally, the Unrestricted option is also the most dangerous, so try to avoid it as best as you can, if possible, especially if you are a PC novice.
See? PowerShell is already starting to look a lot more accessible than it did just a few minutes back.
How to create and use scripts in PowerShell
As we’ve mentioned before and we’re positively sure you remember, you can use PowerShell to run automation scripts. However, you can’t just yell at PowerShell “Hey you, create this script for me!” and expect it to magically work, so you’ll have to put in some elbow grease and get it done yourself. However inconvenient this may sound right now, trust us, you’ll be thankful in the long run, considering all the work you won’t need to do anymore.
Although most of us rely on specialized software such as IDEs to create scripts or programs in a specific programming language, truth be told you can use any text editor as long as it can save files to the right extension. And even if it can’t, you can just navigate to the file you created and modify its extension manually by renaming it, but let’s get back to our sheep.
If you’re interested in creating a script that can work in PowerShell, you’ll be thrilled to learn that this script you’ve probably heard a lot of, is merely a text document with an extension that makes it compatible with PowerShell, PS1. Therefore, it’s easy to see why creating these scripts can be actually handled from within virtually any text editor, as long as you save it with the right (PS1) extension.
Write-host"Please enter your name:"
$Name=read-host
"Hello $Name! Visit AddictiveTips.com for more awesome tutorials and guides!"
Now for the actual creation part:
- Launch Notepad (or any other text editor for that matter)
- Copy the code above (the script you’ll be creating and running)
- Paste it into your new Notepad document
- Use CTRL + S to save the document
- Type
script.ps1as the file name - Save the file somewhere accessible
- Open a PowerShell instance with administrator rights (very important)
- Make sure you’ve enabled custom scripts on your system (check sections above)
- Navigate to the location where you saved the script
- Type the full path of the script to run it
- For instance, if your script is in a Scripts folder on your C drive, your command will be
C:\Scripts\script.ps1 - Alternatively, you could simply navigate to the location of your script and use this command to run it:
.\script.ps1
- For instance, if your script is in a Scripts folder on your C drive, your command will be
If you can’t run the script and PowerShell returns an error, make sure you’ve enabled PowerShell to run custom scripts on your system, and that you’re running PowerShell as an administrator. Not doing any or both things that we’ve specified in our instructions will most likely result in an error and you won’t be able to run your script.
Remember that this is merely a basic script that is somewhat similar to the classic “Hello, world!” one. It puts a spin on it by interacting with you (i.e. asking what your name is) and letting you interact with it (i.e. typing your name which will be used to print a message for you). However, PowerShell is capable of running far more complex scripts, ranging from collecting data from an array of machines to intricate data management, advanced system configuration operations, and even creating backups of SQL databases in a blink of an eye.
How can I backup SQL databases with PowerShell?
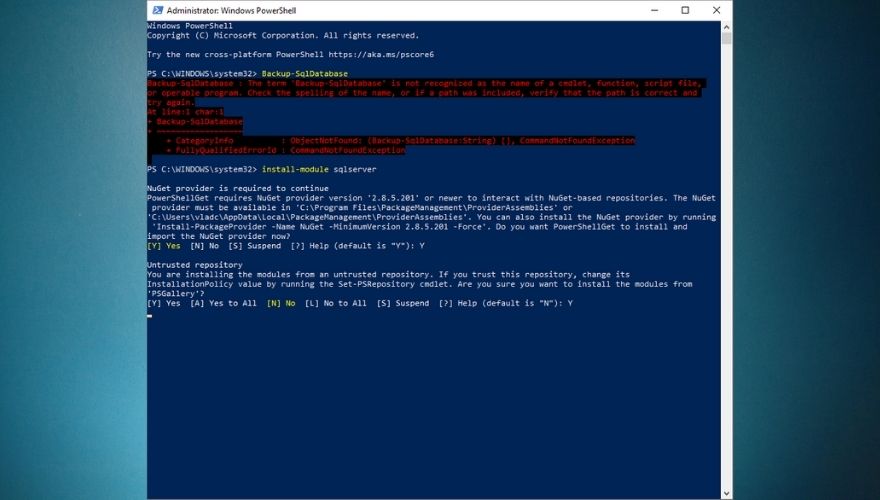
We’re glad you asked. As we’ve mentioned countless times in our guide, there are almost endless possibilities when it comes to operations that PowerShell can help you perform. One of the most popular ones is backing up an SQL database without having to go great lengths or possess extraordinary database management capabilities. All you have to do is fire up an elevated instance of PowerShell (with Administrator privileges) and use the Backup-SqlDatabase command. However, things are a bit more complicated than that, but we’ll get to that in a few.
Backing up an SQL database isn’t as easy as simply copying files from your PC to a safe location and hope they stay safe for whenever you may need them to perform data restoration operations, but on the bright side, using PowerShell can make it look like a walk in the park. Although there are several ways to achieve this, using the command we’ve mentioned above is the fastest, simplest way to backup an SQL database.
Among the capabilities of the Backup-SqlDatabase command, it’s possible to find full database backups, database file backups, as well as transaction log backups, so you got the full package within a single command-line tool. By default, using this command will perform a full database backup, so you will need to specify if you want it to follow a certain set of rules by using the BackupFile parameter.
Note that some versions of PowerShell won’t feature this command by default, so you’ll either have to import it or install it. The good news is that installing the SQL module isn’t exactly rocket science and can be accomplished even by novices. Here’s what you’ll have to do if you can’t use the Backup-SqlDatabase command in your PowerShell session:
- Launch PowerShell with administrator rights
- Type the following command:
install-module sqlserver
- When asked to confirm your actions, type Y and hit Enter on your keyboard
- Confirm the untrusted repository once more by typing Y and Enter
- Once the installation is complete, type the following command:
import-module sqlserver
- Try running the Backup-SqlDatabase command by typing it in the PowerShell command-line
- If it works, you should see that PowerShell is asking you to supply values for some parameters
- If it doesn’t work, make sure that you’ve set PowerShell’s permission to allow it to run custom scripts
1. Complete SQL database backup
Backup-SqlDatabase-ServerInstance"Computer\Instance"-Database"AddictiveTips"
The command we’ve exemplified above will generate a full database backup of a database called AddictiveTips and save it to the default backup location of the “Computer\Instance” server instance as ‘AddictiveTips.bak’.
2. Perform a location-based database backup
Set-Location"SQLSERVER:\SQL\Computer\Instance"PS SQLSERVER:\SQL\Computer\Instance> Backup-SqlDatabase-Database"AddictiveTips"
The first command above will change your location to the active directory within the server instance on which the backup will occur. Essentially, this technique works almost like the full database backup we’ve exemplified above, but in this example, you get to change the working directory in order to locate the server instance where the backup occurs.
This operation will also create a full backup of a database called AddictiveTips and export it as an ‘AddictiveTips.bak’ file in the default location of the server instance you’re connected to.
3. Perform a transaction log backup
Backup-SqlDatabase-ServerInstance"Computer\Instance"-Database"AddictiveTips"-BackupAction Log
If you only need to backup the transaction log of a specific database, PowerShell can also help you do that through a single command you can input straight in its command-line interface. The command above will generate a backup copy of the ‘AddictiveTips’ database’s transaction log and export it to the default location of the ‘Computer\Instance’ server instance as a file named ‘AddictiveTips.trn’.
4. Create an encrypted SQL database backup
$EncryptionOption=New-SqlBackupEncryptionOption-Algorithm Aes256-EncryptorType ServerCertificate-EncryptorName"BackupCert"Backup-SqlDatabase-ServerInstance"."-Database"AddictiveTips"-BackupFile"AddictiveTips.bak"-CompressionOption On-EncryptionOption $EncryptionOption
If you’re worried that your database backup may fall in the wrong hands, PowerShell can also help you create ready-encrypted backup files. Naturally, you’ll have to specify some parameters such as the encryption algorithm, the encryption type (i.e. certificate), server instance, database name, backup file, and whether or not you want the output to be compressed.
The example above will create a backup of a certain ‘AddictiveTips’ database, encrypt it with AES-256 encryption and a server certificate, compress it, and save the resulting ‘AddictiveTips.bak’ file on the server instance’s default backup location. This is quite important if you plan a migration and have no surefire way to transport all backup files without risking estranging any single one of them.
5. Perform a backup on all databases in a server instance
Get-ChildItem"SQLSERVER:\SQL\Computer\Instance\Databases"| Backup-SqlDatabase
Another tool that may come in handy is PowerShell’s ability to backup all the databases on a server instance at the same time. Regardless of their number, you just fire up PowerShell, type an adaptation of the command above, and wait for the backup process to come to an end. Note that since this will backup all the databases within the server instance, you may have to wait for a while, so be patient.
The command above will back up all the databases located on the ‘Computer\Instance’ server instance and export the resulting files to the default backup location on the same server instance. The names of the backup files will be generated automatically according to each one’s corresponding database followed by the BAK extension (i.e.
Although there are several more methods to perform SQL backup with PowerShell in various ways, we’ve only presented a few that we felt were more important. Note that the commands we used in our examples above are not likely to work on your environment in their current form, so you will have to adapt them to your current situation.
For instance, you will have to change the ‘Computer\Instance’ parameter to match your own server instance and modify the name of your database to reflect the name of your own database. Remember that you can always turn to the help command in PowerShell if you ever feel that the command you’re trying to run is confusing or doesn’t work as it should.
Must-know PowerShell commands
1。 Get-Help
We can’t stress this enough, but the Get-Help command should be the first one you ever learn, as it can seriously get you out of numerous sticky situations where you’re not exactly sure if you’re using the correct command, or exactly what you can achieve with the command that you’re trying to deploy.
Now that you’ve installed the sqlserver module on your system, you can try the Get-Help command now and see how Backup-SqlDatabase works. Just type Get-Help Backup-SqlDatabase in the command-line of PowerShell and brush up your PowerShell SQL database backup skills.
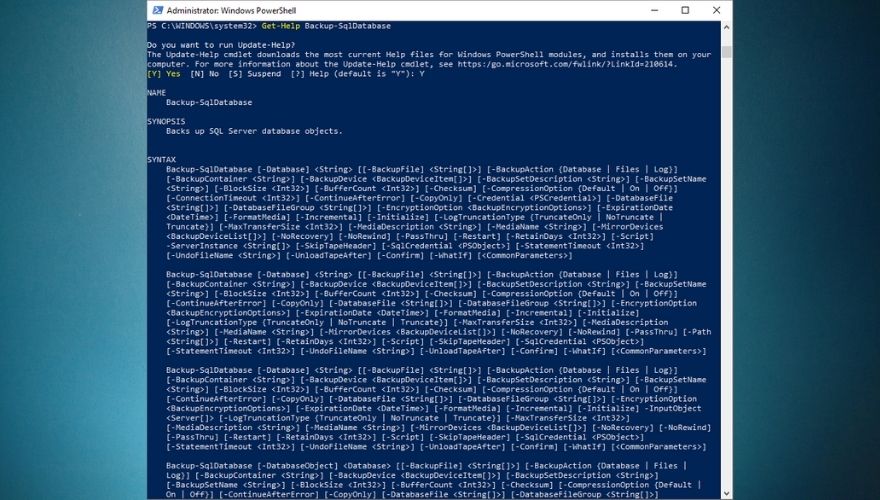
Note that if you just recently installed the sqlserver module on your system, the Help database may still be outdated, and you may need to run an update on it so that it can catch up on any new scripts. By default, PowerShell will detect that the content you’re trying to reach is available online, but you can’t access it locally, and even offer to update the database for you. In this case, all you need to do is type Y when prompted and hit the Enter key on your keyboard.
However, if PowerShell just prompts you with an error stating that there’s no help manual available for the command you’re interested in, you can update it manually by typing Update-Help and hitting the Enter key on your keyboard. After the update process comes to an end, you should be able to check available help documentation for the command you’re interested in.
2。 Get-Process
Get-Process is paramount if you want to discover more about the system you’re currently working on. To be more specific, although you might’ve guessed what this command does already by merely looking at it, Get-Process will provide you with a list of all the processes that are currently running on the system you’re working on.
By default, Get-Process will retrieve a list of every process running on the current system you’re working on, so you may need to append some extra parameters to this command if you want more specific information and narrow the list of results. Check out in the screenshots below what you get when you run the Get-Process command by itself versus how it looks if you’re more specific and format the results.
Get-Process
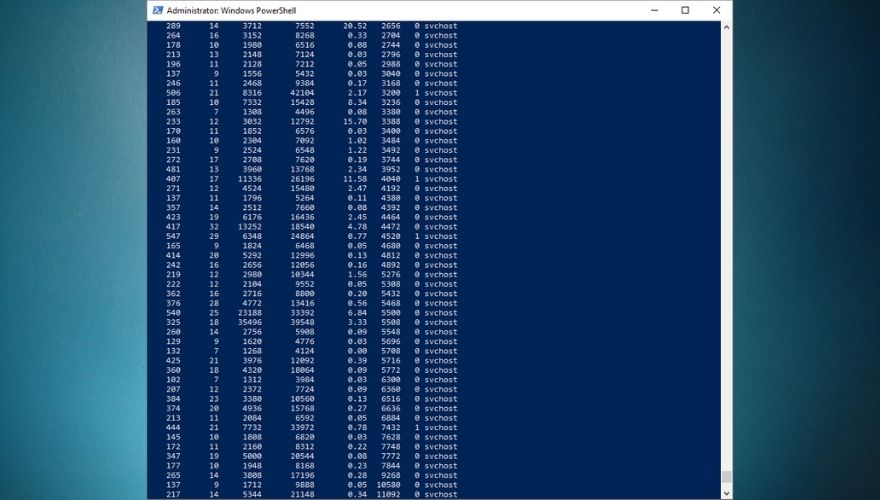
Get-Process explorer | Format-List *
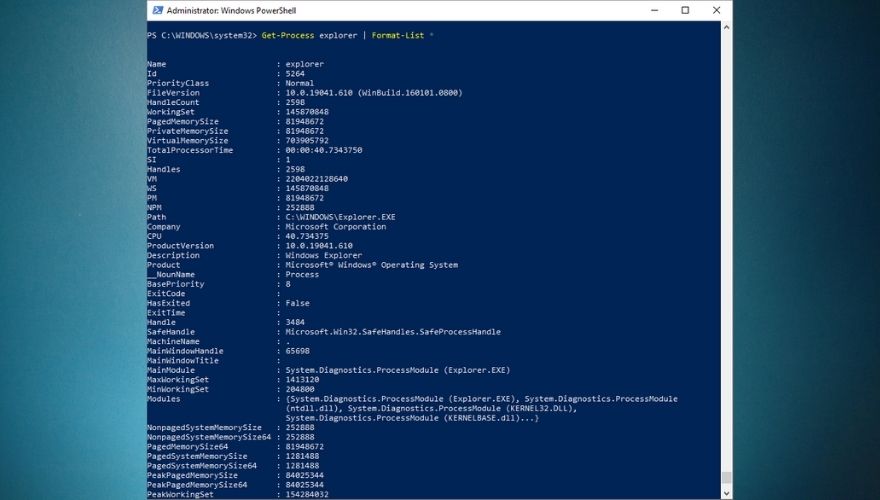
The second command can be customized to display additional details about any active process on your system. You can replace explorer with svchost or Chrome or any other active process on your system that you’re interested in. As we’ve mentioned above, using Get-Processes by itself can help you with that (i.e. finding a list of all running processes).
3。 Stop-Process
This command is pretty much self-explanatory, as you may already have figured out that it can help you stop processes that are currently running on your system. The most common reason for doing that from PowerShell and not by using the Windows Task Manager is that sometimes processes can freeze and make GUI apps barely usable.
PowerShell users can easily identify a troublesome process using the Get-Process command we’ve previously explained, then using Stop-Process to terminate it, thus unclogging the system. Running Stop-Process by itself (without any additional parameter) in your PowerShell command-line interface will prompt you to input the ID of the process you’re trying to terminate.
However, you can also terminate a process by its name (if you know it) by appending the -Name parameter to the cmdlet, like in the example below:
Stop-Process-Name"explorer"
The command above will terminate the Explorer process, which can be useful especially if it freezes or crashes on you and refuses to load properly. Note that you’ll need to use quotes when specifying the name of the process you’re trying to terminate. If a process is stubborn and refuses to terminate (usually higher clearance processes do that), you can “convince” it by appending a -Force parameter to your command. Say, for instance, that you can’t terminate your Explorer process. In this case, you can simply type the command below:
Stop-Process-Force-Name"explorer"
Furthermore, it’s worth mentioning that using the -Force parameter in your Stop-Process command won’t ask for confirmation, as opposed to running the command without this option. If you want to find out more about this cmdlet, make sure to use the Get-Help command.
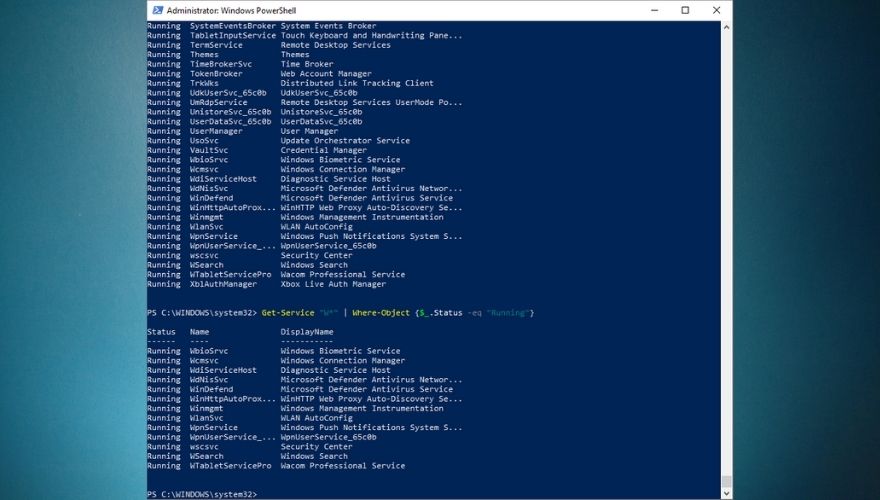
4。 Get-Service
This command is among the essential command list for a good reason: it can provide you with a list of all the services that are currently installed on the system you’re working on, regardless of whether they’re running or not. As with many other cmdlets, you can customize Get-Service to provide you with more specific information, either regarding a certain service or even displaying a list of all running (or stopped) services on your machine.
You can go ahead and type Get-Service in your PowerShell command line. Doing so should provide you with a list of all the services available on your computer, as well as their display names and statuses. If you append an additional command to the original cmdlet, you can change the output, making it display only results that you’re interested in.
Get-Service"W*"
For instance, typing the command above should return a list of all services available on your computer that start with the letter ‘W’. However, you can go even further and customize your command in order to narrow the list of results even more.
Get-Service | Where-Object {$_.Status-eq “Running”}
The command above will let you see a list of all the available services on your computer that are also running at the time you’re running the cmdlet. Appending the “W*” as we did in the previous example will display a list of all the running services on your computer that start with the letter ‘W’, and the command should look like this:
Get-Service"W*"| Where-Object {$_.Status-eq"Running"}
5。 Get-EventLog
Every responsible system administrator should know its way around working with event logs, seeing that these documents can provide you with useful knowledge about what happened on your system, at what time did it occur, and sometimes even what triggered that specific event.
Therefore, we can safely assume that PowerShell’s Get-EventLog command is not something you want to be missing from your toolbelt, especially if you plan on honing your system administration skills. If you know everything there is to know about event logs and their names, you can go ahead and type Get-EventLog directly in your PowerShell’s command line. Note that PowerShell will prompt you to input the name of the log you’re trying to view.
If you type the name of an empty event log (one with no entries), PowerShell will prompt you with an error and return you to the command-line interface. Therefore, it would be easier if you just used the command below, which will provide you with a list of Event Logs on your system, along with additional details about each one, such as the default overflow action, and the number of entries.
Get-EventLog-List
One of the most popular use cases for event logs is checking for errors, especially if they occurred silently, were shortly followed by a system crash, or lead to a BSOD, which we all know how cryptic can be. However, you will need to be more specific with the Get-EventLog cmdlet if you want to narrow down the list of results, which oftentimes can be huge.
Get-EventLog-LogName Security-EntryType Error
Typing the command above in your PowerShell’s command-line interface should provide you with a list of all the errors registered in your Security event log. Note that you can use the-List parameter to see all the log types in your system and replace Security in the command above with any other log type that you find on your list, just as long as it has more than zero entries.
If you want to learn more about using the Get-EventLog command in PowerShell, feel free to use the Get-Help command we’ve talked about in the first section of this subchapter.
6。 ConvertTo-HTML
Sometimes when you’re using PowerShell, you may stumble upon certain information that you want to extract and keep for future reference, create reports, or simply import it from a different application. One of the most frequently-used ways to extract this data from PowerShell and export it to an external file on your computer is the ConvertTo-HTML command.
Using this command will help you build comprehensive reports that can help you analyze extracted information and insights in a more effective manner by providing you with HTML tables that you can customize later by adding custom styles and color-coded data. As with many other PowerShell commands, ConvertTo-HTML doesn’t work by itself, and you’ll need to pair it up with an additional command which it will use as an input (or a source of data).
For instance, if you’re trying to print a report consisting of every service that starts with the letter ‘W’ and is currently running on your computer, you can type the command below:
Get-Service"W*"| Where-Object {$_.Status-eq"Running"} | ConvertTo-HTML
This will provide you with an HTML code of the data you fed to the ConvertTo-HTML function, which you can simply copy directly from the PowerShell’s command-line interface, paste it in your favorite text editor and save it as an HTML file, which you can use to view the result in any web browser.
You can use ConvertTo-HTML with virtually any PowerShell command, as long as the command you’re using as a data source will generate output. You can try it with other cmdlets, such as Get-Process, Get-EventLog, or Get-Help. Note that aside from HTML conversions, the ConvertTo cmdlet can also be used to generate JSON, CSV, and XML files. You just have to replace HTML in the command syntax with the format you’re interested in.
7。 Export-CSV
If you’re working with various objects that you feel may fit way better in a table, you can use PowerShell to convert the items you’re currently handling into a series of CSV (comma-separated value) strings and export the strings to a file in one swift motion through the Export-CSV cmdlet.
As with ConvertTo-HTML, Export-CSV needs an input that it can convert to CSV strings, as it can’t just work on its own. Thus, you will need to pair it with a command that can be used to generate data, such as the Get-Service or Get-Process ones we’ve explained earlier.
Essentially, Export-CSV does almost the same thing as the ConvertTo-HTML cmdlet we’ve discussed above, aside from one important aspect that shouldn’t be overlooked: this cmdlet actually generates a file and saves it on your computer, as opposed to the ConvertTo command, which only gives you the output and lets you create the file on your own.
Let’s assume, for instance, that you’d like to turn the list of services running on your computer into a CSV file so that you can process the file further with third-party software, or put it in a spreadsheet for further reference. All you’d have to do is type the Get-Service command followed by the Export-CSV one, and mention a location where you’d like the CSV file to be generated, like in the example below:
Get-Service | Export-CSV c:\AddictiveTips.csv
The command above will fetch a list of all the services that are available on your computer, running or not, convert them into a series of CSV strings, and save the result as a CSV file named ‘AddictiveTips’ in the root of your C drive. You can then open the file in a third-party software solution, convert it into a fully-fledged table, or just store it for future usage.
PowerShell cheatsheet – CONCLUSION
Although there’s still a lot of people advocating for CMD, truth be told PowerShell is more versatile, way more powerful, but at the same time more complicated to work with than its traditional CMD counterpart. The sheer amount of features, combined with the fact that you can create automation scripts in PowerShell and perform complicated system management operations just leaves CMD in a cone of shadow.
If you’re just starting to discover PowerShell and you’re struggling to figure out what each command does, how to pipeline several commands, or how to create and run simple PowerShell scripts on your own, our guide is a great starting point. We’ve taken our time to explain some of the most important commands you should know about in PowerShell, created a few short tutorials, and also included a list of basic PowerShell commands, their aliases, and short descriptions for each item, just to simplify your PowerShell discovery journey.
<!-。pagination-single->