Còn gì tệ hơn việc bạn sẵn sàng chơi trò chơi điện tử với bạn bè chỉ để bị làm gián đoạn bởi Thông báo Màn hình xanh chết chóc (BSOD) xâm chiếm máy tính của bạn, tắt mọi thứ và ngăn bạn làm bất cứ điều gì ngoại trừ khởi động lại.
Các lỗi BSOD khác nhau và chúng chỉ ra sự cố chính xác khiến máy tính của bạn tự tắt và ngăn lỗi phần cứng cũng như mất dữ liệu lớn. Vấn đề là các mã lỗi có thể khó giải mã nếu không có kiến thức kỹ thuật.
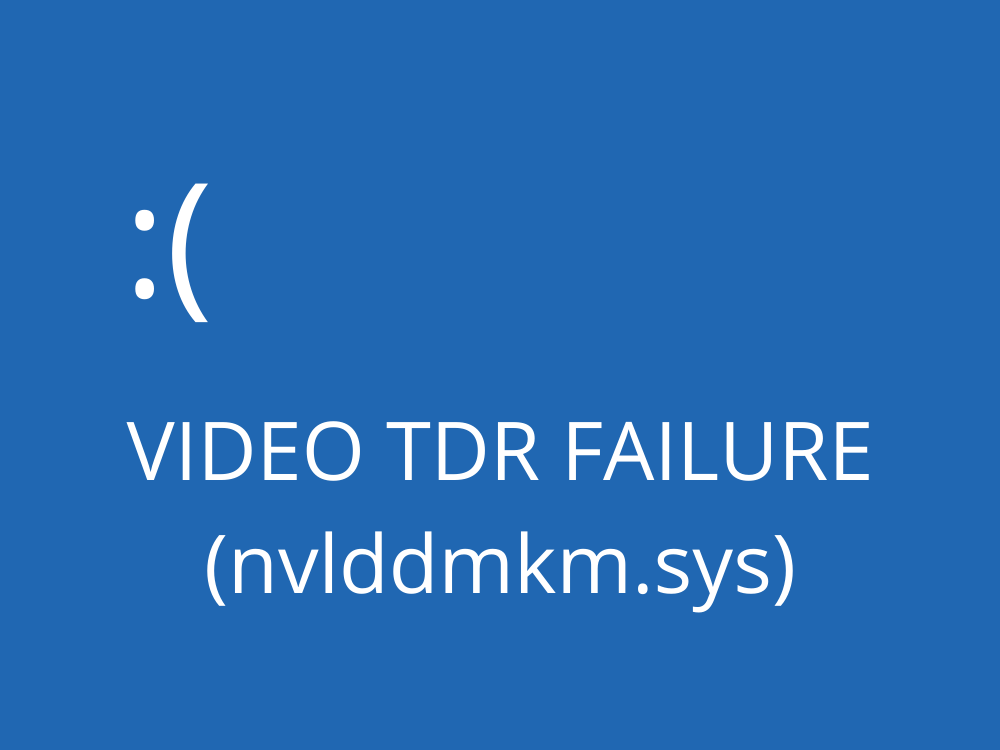
Ví dụ: VIDEO TDR FAILURE là mã dừng BSOD có thể xảy ra trên máy tính có cạc đồ họa NVIDIA. Toàn bộ màn hình của bạn chuyển sang màu xanh lam, hiển thị PC của bạn gặp sự cố và cần khởi động lại thông báo và cho biết nvlddmkm.sys là tệp có vấn đề. nvlddmkm.sys là một trình điều khiển và tên đầy đủ của nó là NVIDIA Windows Kernel Mode Driver .
VIDEO TDR FAILURE trên Windows 10-KHẮC PHỤC
Trước khi tìm ra giải pháp cho lỗi VIDEO TDR FAILURE, bạn nên tạo điểm khôi phục hệ thống . Nếu có bất kỳ điều gì xảy ra và bạn cần hoàn tác tất cả các thay đổi, bạn có thể dễ dàng khôi phục Windows 10 về một điểm kiểm tra và bắt đầu khắc phục sự cố từ đầu.
1. nvlddmkm.sys không thành công ? Khởi động Windows 10 ở Chế độ An toàn
Nếu bạn gặp khó khăn khi sử dụng máy tính của mình vì hệ thống ngay lập tức bị treo, hiển thị màn hình xanh lam và đi vào vòng lặp khởi động lại, bạn có thể khởi động Windows 10 ở Chế độ An toàn :
- Bật và tắt PC của bạn ba lần để kích hoạt chế độ khắc phục sự cố Windows 10
- Đi tới Khắc phục sự cố > Tùy chọn nâng cao > Cài đặt Khởi động

- Nhấp vào Khởi động lại và đợi một chút
- Nhấn F5 để bật Chế độ An toàn với Mạng
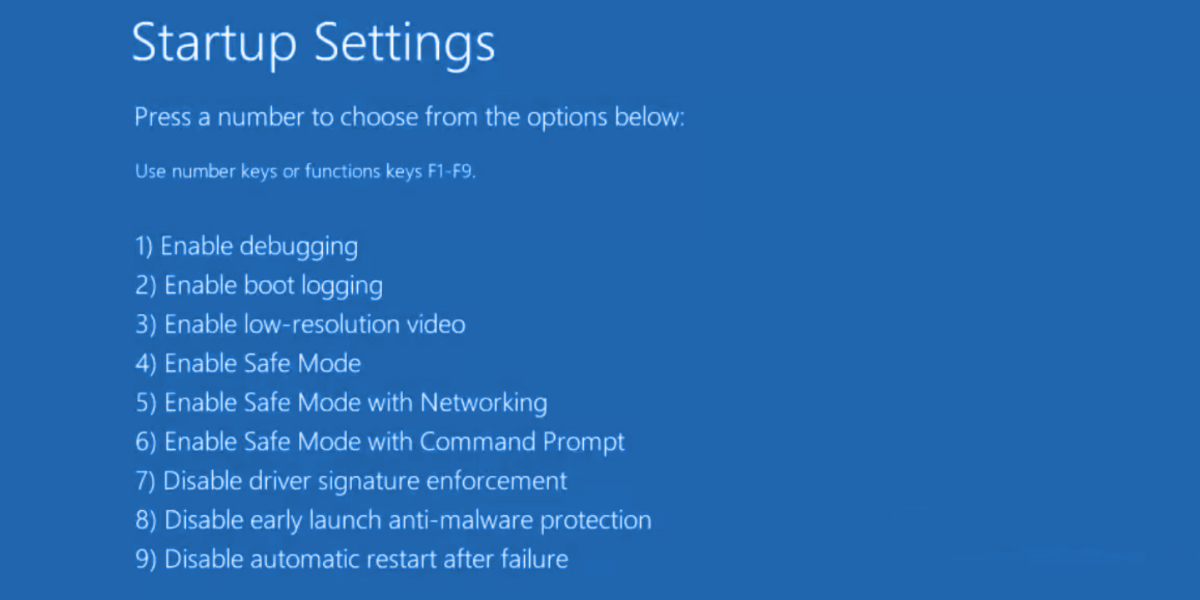
- Sau khi Windows khởi động, hãy kiểm tra xem bạn có còn gặp lỗi nvlddmkm không. Nếu bạn vẫn làm vậy, hãy làm theo các bước ở trên để truy cập tùy chọn Chế độ an toàn và chọn F4 để bật Chế độ an toàn không có tính năng mạng
2. Chạy khởi động sạch
Nếu Chế độ an toàn trở thành chìa khóa trong việc ổn định hệ điều hành của bạn và ngăn nó hiển thị lỗi BSOD, bạn có thể clean-boot Windows 10 để tắt tính năng khởi động và các dịch vụ có thể bị trục trặc và gây ra lỗi VIDEO TDR FAILURE.
- Làm theo các bước trong Giải pháp 1 để khởi động Windows 10 ở Chế độ An toàn
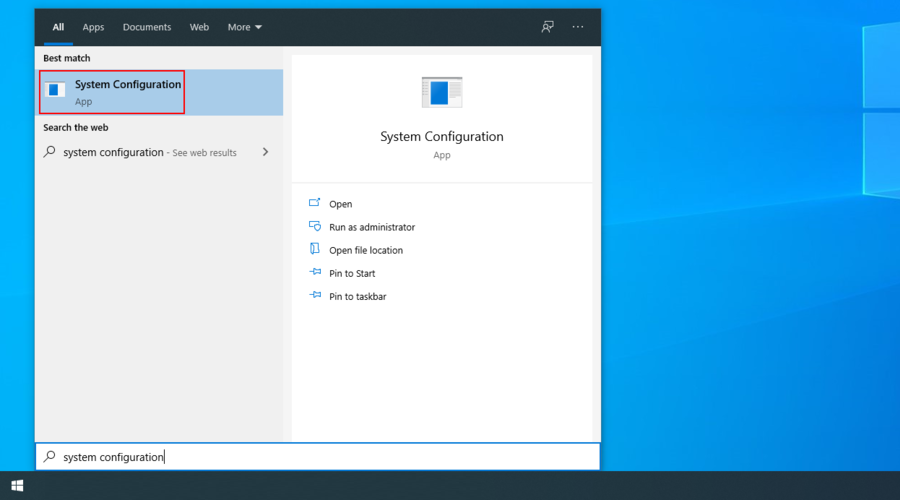
- Nhấp vào nút Bắt đầu , tìm kiếm Cấu hình hệ thống và khởi chạy ứng dụng này
- Trong tab Chung , chọn tùy chọn Khởi động có chọn lọc
- Tắt Tải dịch vụ hệ thống và Tải các mục khởi động

- Nhấp vào Áp dụng và chuyển đến phần Khởi động
- Nhấp vào Mở Trình quản lý Tác vụ
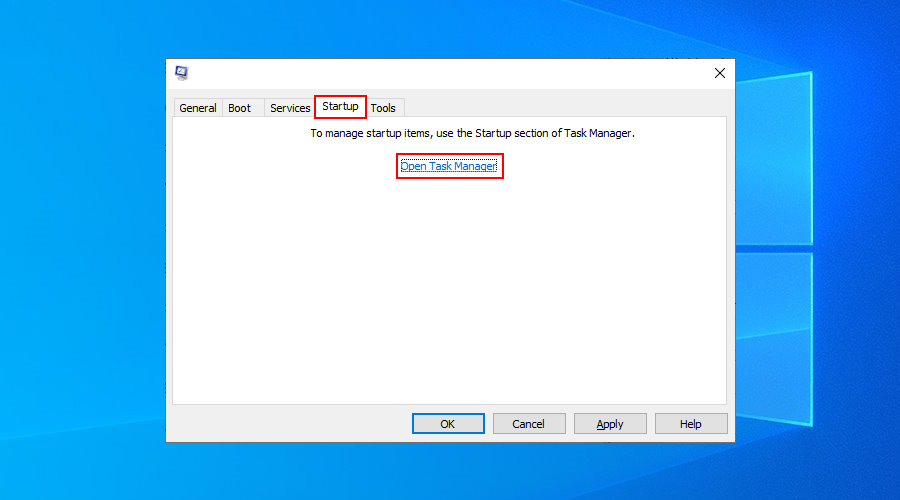
- Chọn một ứng dụng có trạng thái Đã bật và nhấp vào Tắt . Điều này xảy ra cho tất cả các ứng dụng có trạng thái Đã bật
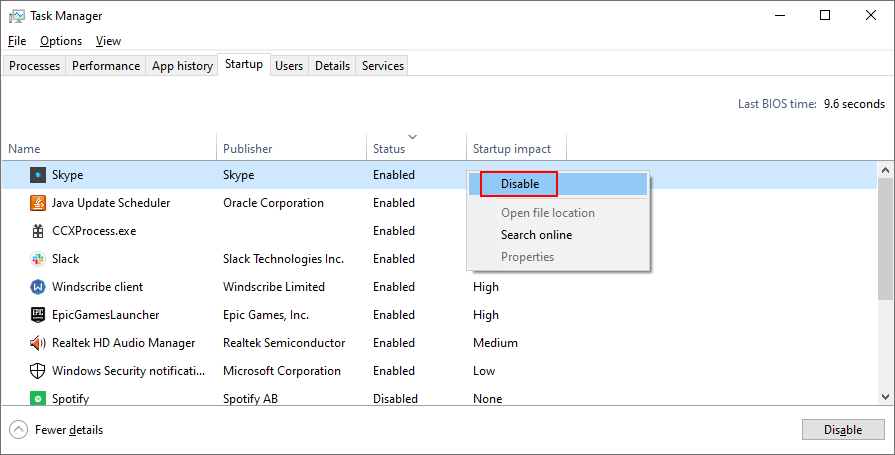
- Khởi động lại PC của bạn và kiểm tra kết quả
3. Kiểm tra các bản cập nhật hệ thống
Nếu bạn đã không sử dụng Windows Update trong một thời gian dài, bạn có thể đã bỏ lỡ các bản cập nhật quan trọng được thiết kế để sửa lỗi hệ thống. Vì đây là một thành phần hệ điều hành quan trọng nên Windows Update sẽ chạy trong nền và nhắc bạn bất cứ khi nào có bản cập nhật đang chờ xử lý. Tuy nhiên, nếu cập nhật hệ thống tự động đã bị tắt trên thiết bị của bạn, chúng sẽ được khởi chạy theo cách thủ công.
- Nhấn phím Win , nhập Kiểm tra bản cập nhật và nhấn Enter
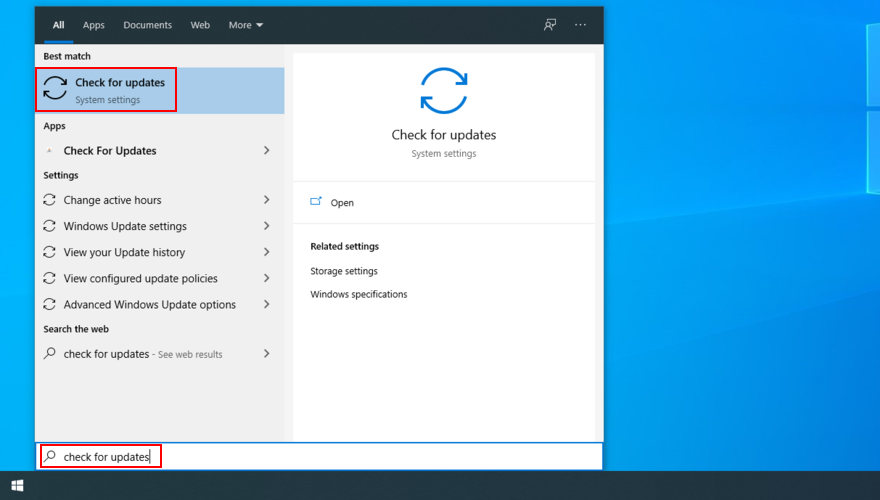
- Nhấp vào Kiểm tra bản cập nhật và đợi

- Nếu Windows tìm thấy bất kỳ thứ gì, hãy nhấp vào Tải xuống
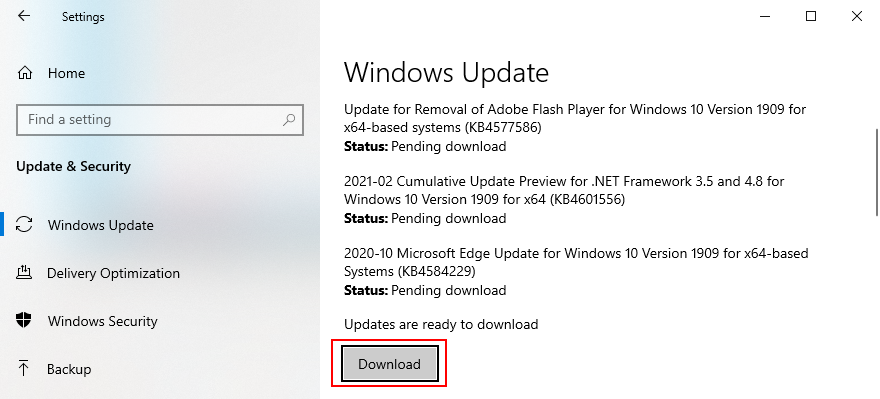
- Kiên nhẫn đợi cho đến khi các bản cập nhật hệ thống mới được tải xuống và cài đặt
- Khởi động lại máy tính của bạn
4. Tắt phần mềm ép xung
Mọi người sử dụng công cụ ép xung bộ nhớ để cải thiện trải nghiệm chơi game của họ. Tuy nhiên, nếu máy tính không đi kèm với bộ làm mát đủ mạnh để duy trì thêm nhiệt, Windows cuối cùng sẽ tự tắt và hiển thị thông báo màn hình xanh lam như VIDEO TDR FAILURE để ngăn ổ cứng bị hỏng và mất dữ liệu.
Trừ khi bạn biết chính xác mình đang làm gì, bạn nên tắt bất kỳ công cụ phần mềm ép xung nào, chẳng hạn như MSI Afterburner , CPU-Z hoặc GPU-Z và đặt lại cài đặt đồng hồ của máy tính về mặc định. Nếu bạn đã định cấu hình ép xung trong BIOS, hãy xem giải pháp tiếp theo trong danh sách này.
5. Đặt lại BIOS về mặc định
BIOS của máy tính chứa nhiều cài đặt tùy chỉnh được thiết kế để cải thiện hiệu suất hệ thống của bạn. Thật không may, kế hoạch này có thể dễ dàng phản tác dụng nếu bạn hoặc người khác có quyền truy cập vào máy tính của bạn đã thay đổi mục đích cài đặt BIOS, chẳng hạn như ép xung và bộ nhớ đệm.
Nó thậm chí có thể dẫn đến lỗi màn hình xanh như nvlddmkm.sys. Cách dễ nhất để giải quyết vấn đề này là đặt lại BIOS về mặc định .
- Bật PC của bạn
- Trước khi khởi động Windows, nhấn nhanh phím hiển thị trên màn hình để truy cập thiết lập BIOS
- Truy cập phần BIOS nâng cao
- Tìm và bật tùy chọn đặt lại dữ liệu cấu hình BIOS về mặc định
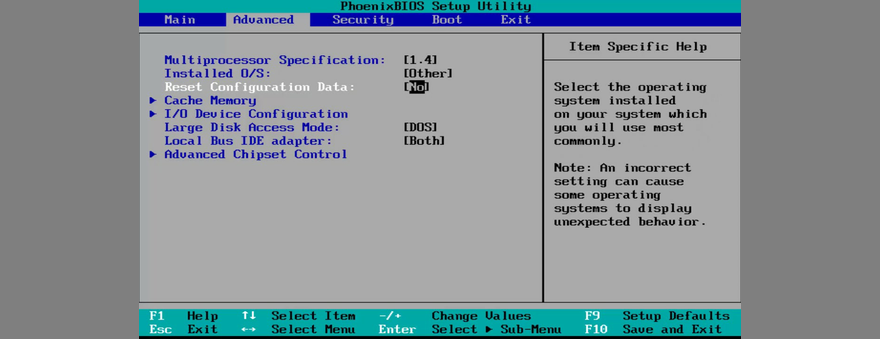
- Lưu cài đặt hiện tại và thoát
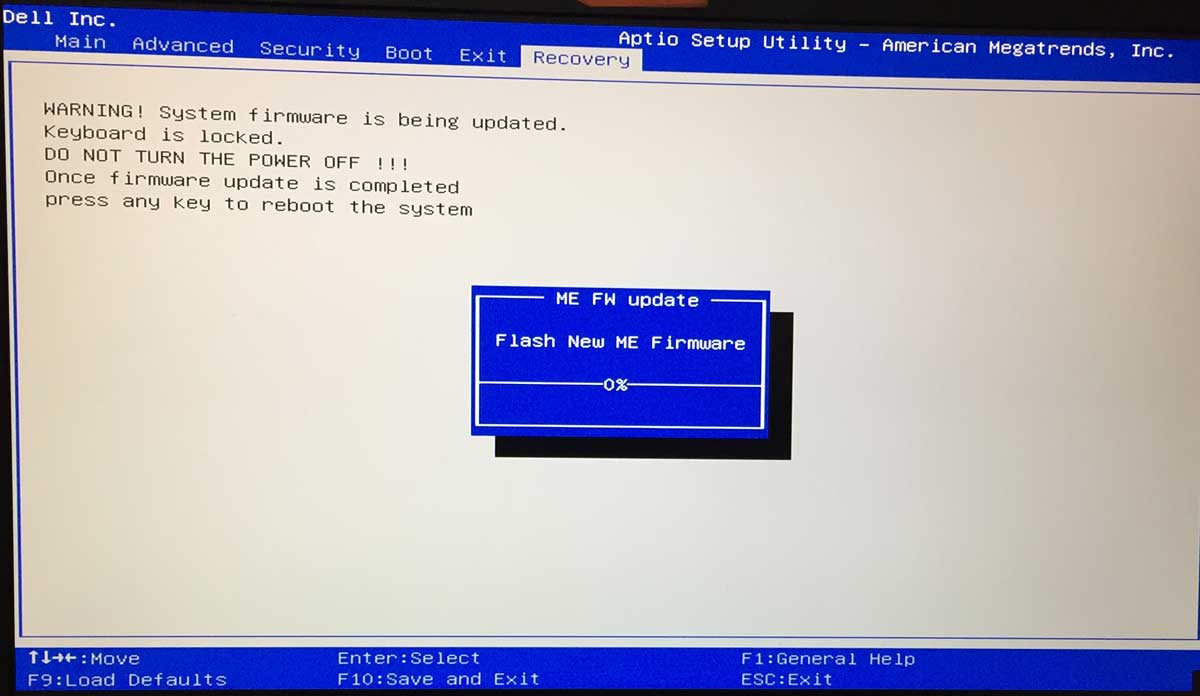
6. Cập nhật BIOS
Nếu bạn chưa cập nhật BIOS trong một thời gian dài hoặc chưa bao giờ thực hiện việc này, bạn nên cập nhật ngay. Bạn chỉ cần ổ đĩa flash USB và kết nối Internet.
- Kết nối ổ đĩa flash USB với PC của bạn
- Khởi động hệ thống của bạn và nhấn phím hiển thị trên màn hình để vào thiết lập BIOS
- Trong phần BIOS chính, bạn có thể tìm hiểu nhà sản xuất, phiên bản và ngày cài đặt BIOS
- Sử dụng thông tin này, khởi động Windows trên PC bị trục trặc hoặc sử dụng một máy tính khác có truy cập Internet, mở trình duyệt web và truy cập trang web của nhà sản xuất BIOS
- Tìm và tải xuống phiên bản BIOS mới nhất tương thích với hệ điều hành của bạn
- Giải nén tệp đã tải xuống vào ổ USB flash
- Quay lại menu BIOS, tạo bản sao lưu của phiên bản BIOS hiện tại để bảo vệ an toàn và lưu bản sao lưu vào ổ đĩa flash USB
- Chạy bản cập nhật chương trình cơ sở hệ thống và đảm bảo không tắt hoặc khởi động lại PC trong thời gian này
7. Khôi phục tệp nvlddmkm.sys
NVIDIA có một bản sao lưu của tệp nvlddmkm.sys ở đâu đó trên máy tính của bạn, vì vậy tất cả những gì bạn phải làm là tìm, sao chép và ghi đè lên tệp nvlddmkm.sys bị hỏng.
- Mở Windows Explorer bằng cách nhấn phím Win + E
- Trong thanh địa chỉ, nhập
%SystemRoot%\System32\Drivers - Tìm tệp nvlddmkm.sys và đổi tên nó thành nvlddmkm.sys.old
- Trong ngăn điều hướng Windows Explorer, nhấp vào PC này
- Nhấp vào bên trong trường Tìm kiếm PC này và tìm kiếm nvlddmkm.sy_
- Sao chép tệp nvlddmkm.sy_
- Nhấn phím Win + R , nhập cmd và nhấn Enter để mở Command Prompt
- Chạy
chdir desktop - Sau đó, chạy
expand-r nvlddmkm.sy_ nvlddmkm.sys - Thoát khỏi Command Prompt
- Đi tới màn hình của bạn và sao chép tệp nvlddmkm.sys
- Quay lại
% SystemRoot% \ System32 \ Driversvà dán tệp - Khởi động lại máy tính của bạn và kiểm tra lỗi BSOD
8. Xóa cookie hệ thống và tệp tạm thời
Windows lưu cookie và các tệp tạm thời, những tệp này sẽ được xóa thường xuyên để xóa bộ nhớ cache của hệ thống và tạo chỗ cho dữ liệu mới. Nếu điều này không xảy ra, điều này có thể dẫn đến các vấn đề về độ ổn định của hệ thống và lỗi Màn hình xanh chết chóc như VIDEO TDR FAILURE.
Để khắc phục sự cố này, bạn chỉ cần xóa cookie hệ thống và các tệp tạm thời bằng các công cụ chuyên dụng như CCleaner . Hoặc, nếu không muốn cài đặt bất kỳ ứng dụng nào của bên thứ ba, bạn có thể chuyển sang tiện ích Dọn dẹp ổ đĩa tích hợp sẵn.
Cách sử dụng Disk Cleanup:
- Nhấp vào nút Bắt đầu , tìm kiếm Dọn dẹp ổ đĩa và mở ứng dụng này
- Chọn ổ đĩa nơi Windows được cài đặt (thường là C: ) và nhấp vào OK
- Chọn các tệp sau để xóa:
- Tệp chương trình đã tải xuống
- Tệp Internet tạm thời
- Tệp tạm thời
- Nhấp vào OK và Xóa tệp để xác nhận
9. Cài đặt lại bộ điều hợp đồ họa
Màn hình đồ họa của bạn có thể chưa được cài đặt đúng cách trên máy tính của bạn. Tuy nhiên, bạn có thể dễ dàng sửa lỗi này từ Trình quản lý thiết bị.
- Nhấp chuột phải vào nút Bắt đầu và chọn Trình quản lý Thiết bị
- Mở rộng danh mục Bộ điều hợp hiển thị
- Nhấp chuột phải vào bộ điều hợp hiển thị của bạn và chọn Gỡ cài đặt thiết bị
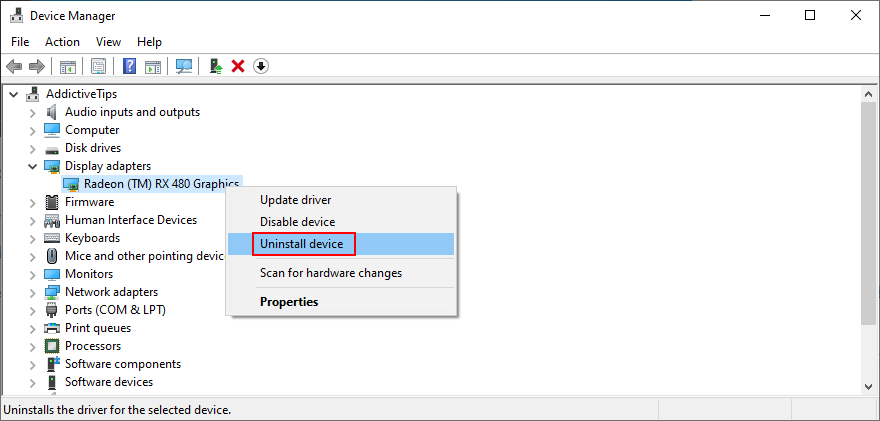
- Khởi động lại PC của bạn. Windows sẽ tự động cài đặt các bộ điều hợp bị thiếu
10. Cập nhật trình điều khiển GPU
Trình điều khiển đồ họa lỗi thời có thể gây ra sự cố thẻ video, sự cố chơi game và thậm chí là lỗi màn hình xanh như nvlddmkm.sys. Tuy nhiên, bạn có thể cập nhật trình điều khiển GPU lỗi thời với nỗ lực tối thiểu.
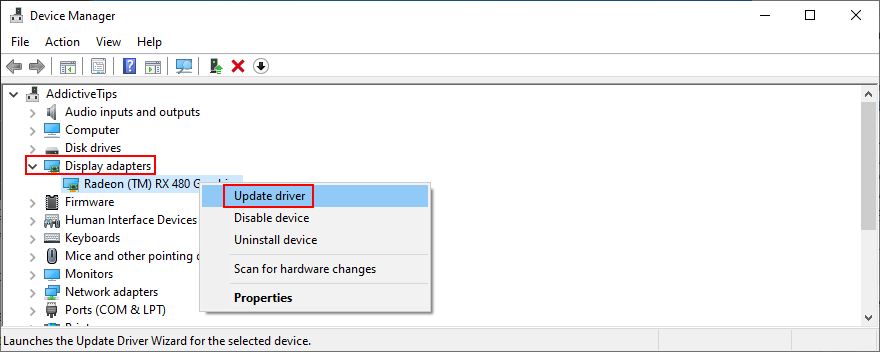
- Mở Trình quản lý Thiết bị , nhấp chuột phải vào bộ điều hợp hiển thị của bạn và chọn Cập nhật trình điều khiển
- Nhấp vào Tự động tìm kiếm trình điều khiển
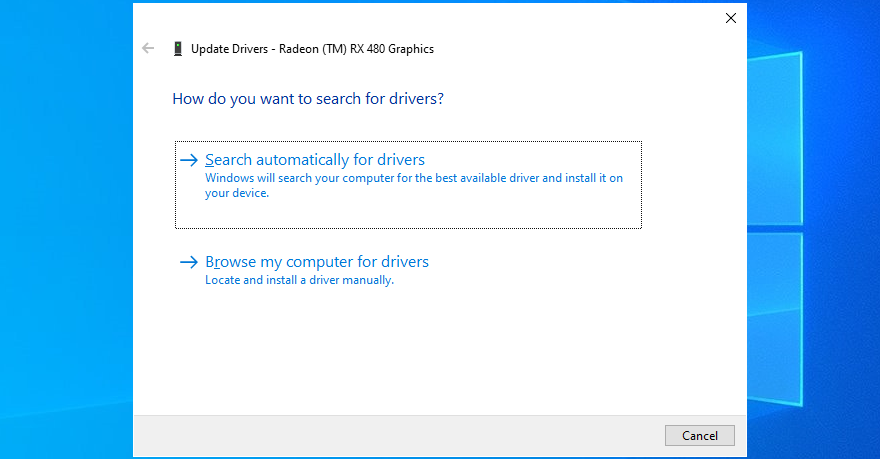
- Nếu bạn nhận được thông báo Trình điều khiển tốt nhất cho thiết bị của bạn đã được cài đặt , hãy nhấp vào Tìm kiếm trình điều khiển được cập nhật trên Windows Update . Tuy nhiên, nếu bạn đã kiểm tra hệ thống của mình để tìm các bản cập nhật thì không cần thực hiện lại
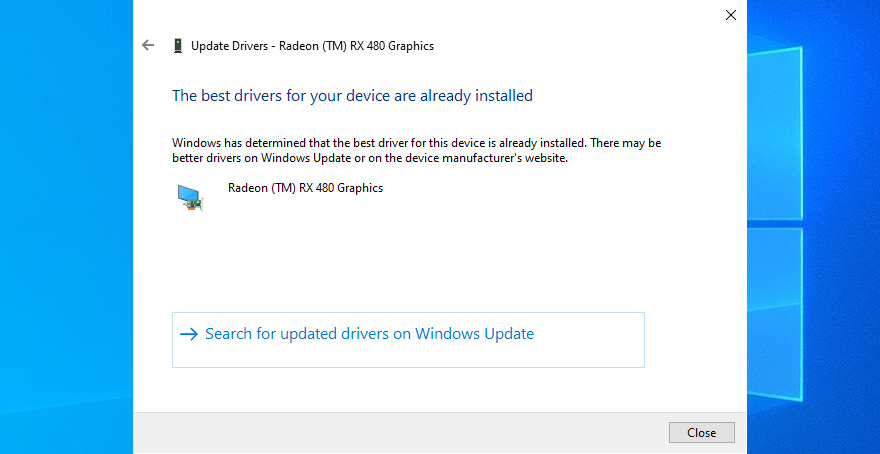
- Khởi động lại máy tính của bạn nếu trình điều khiển được cập nhật thành công
Thật không may, Windows thường không tìm thấy trình điều khiển mới hơn trong cơ sở dữ liệu của nó hoặc bằng cách sử dụng cấu phần Windows Update. Trong trường hợp đó, bạn có thể nhấp đúp vào bộ điều hợp GPU trong Trình quản lý thiết bị, chuyển sang tab Trình điều khiển và tìm hiểu nhà sản xuất trình điều khiển, phiên bản và ngày cài đặt. Sử dụng thông tin này, hãy truy cập nhà sản xuất của trang web để tải xuống và cài đặt trình điều khiển mới nhất.
Tuy nhiên, nếu bạn thấy quá trình này khó khăn hoặc không muốn mạo hiểm tải xuống trình điều khiển không được hỗ trợ, bạn có thể chuyển sang trình cập nhật trình điều khiển tự động phát hiện tất cả các trình điều khiển lỗi thời trên PC của bạn và đề nghị cài đặt phiên bản mới nhất ngay lập tức. Và bạn cũng sẽ không gặp rủi ro khi nhận các trình điều khiển không tương thích.
11. Khôi phục trình điều khiển GPU không được hỗ trợ
Nói đến trình điều khiển GPU không tương thích, nhiều người dùng PC tải chúng xuống từ các nguồn không xác định mà không thực sự biết chúng có hoạt động trên máy tính của họ hay không.
Nếu bạn là một trong những người dùng này, bạn nên khôi phục ngay trình điều khiển hiển thị không được hỗ trợ để khôi phục tính ổn định của máy tính, loại bỏ sự cố hệ thống lặp lại và tiến hành cập nhật trình điều khiển chính xác.
- Đi tới Trình quản lý Thiết bị và nhấp đúp vào bộ điều hợp GPU
- Chuyển sang phần Trình điều khiển
- Nhấp vào Trình điều khiển quay lại và làm theo hướng dẫn trên màn hình. Nếu nút chuyển sang màu xám, điều đó có nghĩa là không có phiên bản trình điều khiển nào trước đó được lưu trên PC của bạn, vì vậy bạn có thể bỏ qua toàn bộ giải pháp này
12. Chạy trình gỡ rối Phần cứng và Thiết bị
Windows 10 có trình khắc phục sự cố nội bộ để khắc phục các sự cố thường gặp xảy ra với các thành phần PC khác nhau, bao gồm cả phần cứng và thiết bị. Thông thường, bạn có thể định vị nó trong Cài đặt khắc phục sự cố . Tuy nhiên, nếu Trình gỡ rối phần cứng và thiết bị bị thiếu trong phần đó, đây là cách bạn có thể chạy nó ngay lập tức:
- Nhấn phím Win + R và chạy
msdt.exe-id DeviceDiagnostic - Nhấp vào Tiếp theo và đợi cho đến khi trình khắc phục sự cố quét PC của bạn
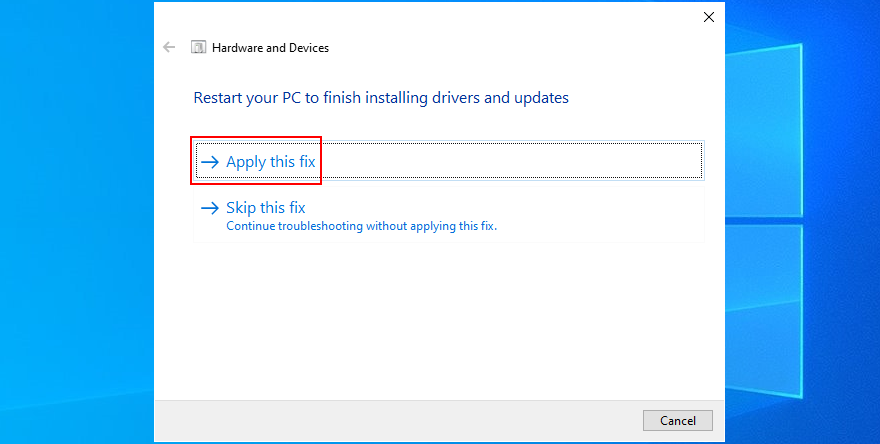
- Nếu tìm thấy bất kỳ cách giải quyết nào, hãy nhấp vào Áp dụng bản sửa lỗi này
- Khởi động lại PC của bạn khi nó kết thúc và kiểm tra lỗi BSOD
13. Tắt tăng tốc phần cứng
Nhiều ứng dụng phần mềm sử dụng tăng tốc phần cứng để cải thiện trải nghiệm của bạn, cho dù chúng ta đang nói về trò chơi, duyệt web, phát trực tuyến hay thứ gì khác. Nếu bạn nhận thấy rằng máy tính của mình hiển thị lỗi BSOD sau khi khởi chạy một ứng dụng cụ thể, hãy kiểm tra cài đặt của chương trình và tìm tùy chọn tăng tốc phần cứng để tắt nó. Dưới đây là một số gợi ý.
Cách tắt tăng tốc phần cứng trong Google Chrome :
- Trong Chrome, mở trình đơn Khác và đi tới Cài đặt

- Chọn Nâng cao > Hệ thống (hoặc truy cập
chrome://settings/system) - Tắt Sử dụng tăng tốc phần cứng khi có

- Khởi động lại Chrome
Cách tắt tăng tốc phần cứng trong Mozilla Firefox:
- Trong Firefox, mở trình đơn ≡ và đi tới Tùy chọn (hoặc truy cập
about:ferences)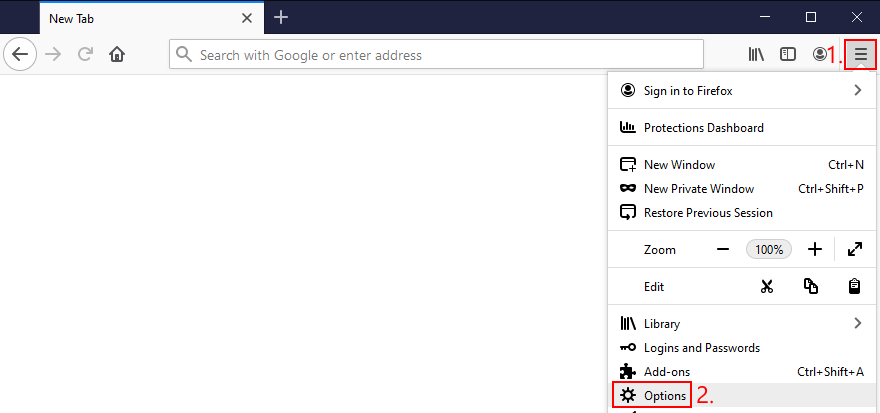
- In General, locate the Performance section
- Disable Use recommended performance settings
- Also disable Use hardware acceleration when available
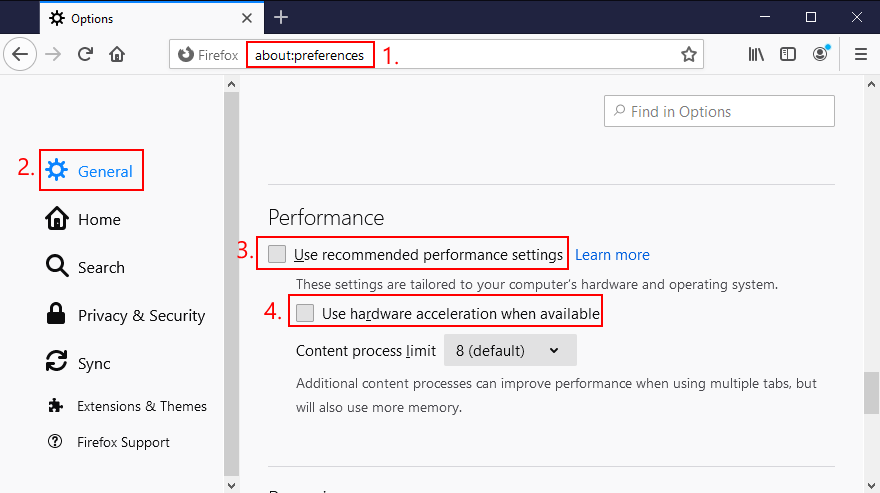
- Restart Firefox
How to disable hardware acceleration in Microsoft Edge:
- In Edge, open the More menu and select Settings
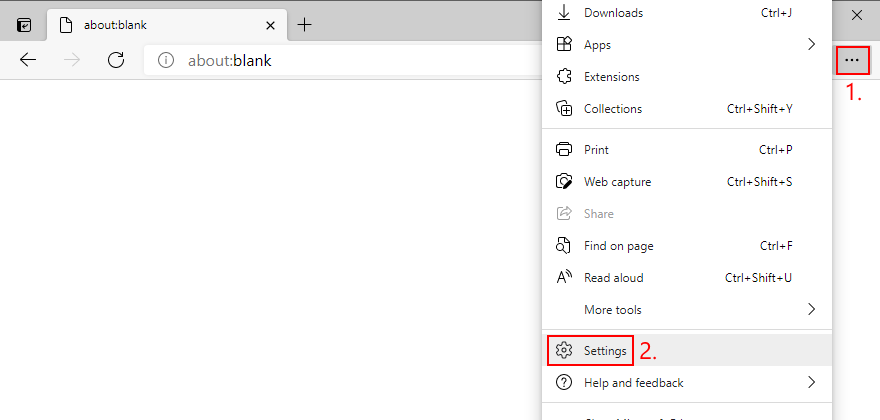
- Go to System (or visit
edge://settings/system) - Disable Use hardware acceleration when available

- Restart Edge
14. Analyze the crash dumps
If you’re the type of user who doesn’t shy away from the computer’s technical aspects, you can analyze the crash dumps left behind by the VIDEO TDR FAILURE error, in order to find out the exact driver that’s giving you trouble. Event Viewer is a great assistant for this role.
How to use Event Viewer:
- Restart your PC after a system crash
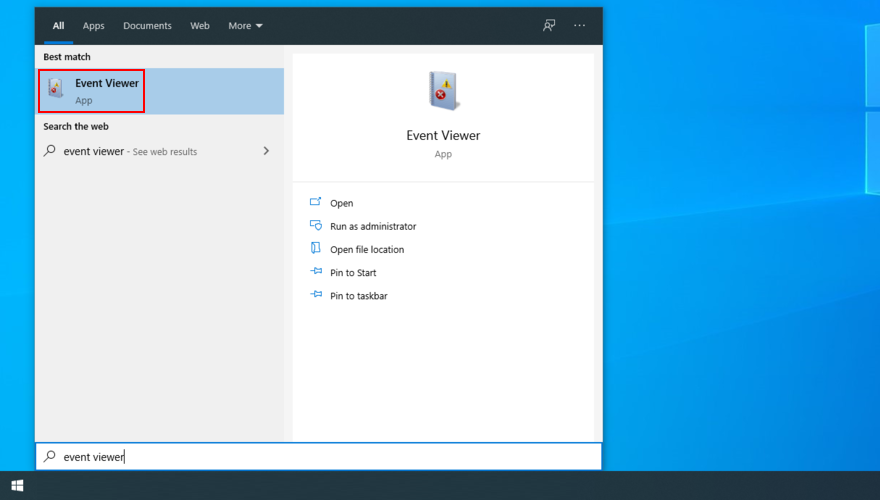
- Immediately press the Win key, search for Event Viewer, and open this app
- In the navigation pane on the left side, go to Windows Logs > System
- Select the first entry that says Error
- Inspect the information from the General and Details tab
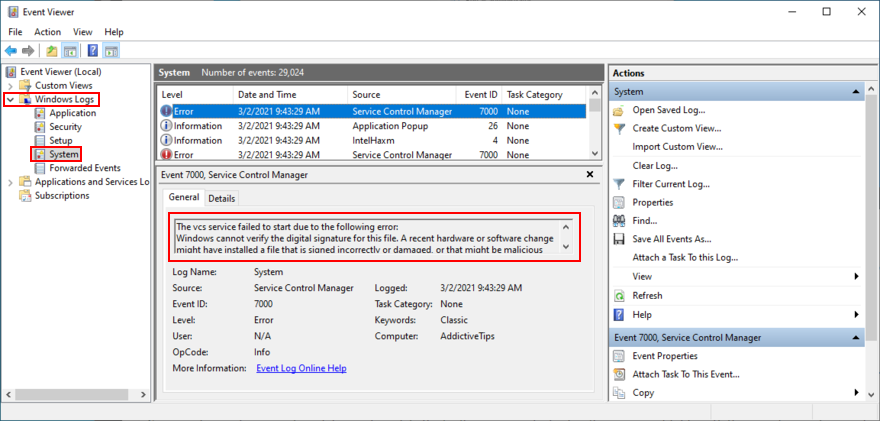
You can use this data to perform a Google search or get in touch with the Microsoft support team. However, if you find Event Viewer to be intimidating, we suggest using BlueScreenView instead. It has the same role but it’s wrapped in a simpler interface and has more intuitive options for analyzing minidump files.
15. Use Display Driver Uninstaller
Display Driver Uninstaller (DDU) is an awesome application that can reset your GPU software and drivers. If display driver nvlddmkm stopped responding on your Windows 10 PC, you can use DDU to safely troubleshoot the BSOD error.
- Make sure to create a system restore point if you haven’t so far
- Download Display Driver Uninstaller from the official website
- Unzip the downloaded archive and open the DDU file
- Start Windows 10 in Safe Mode with Networking (see Solution 1 from this list)
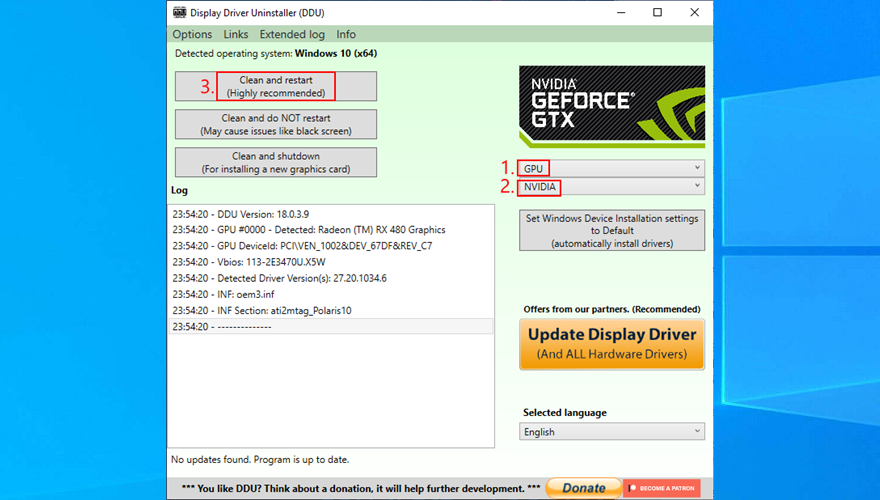
- Open Display Driver Uninstaller.exe
- When prompted with the configuration window, leave everything as is and click OK to continue
- Select GPU and NVIDIA from the two menus on the right side
- Then, click Clean and restart
16. Remove and reseat the GPU card
It’s possible that your graphics card needs to be reattached to your computer unit. If it’s not properly connected, this could trigger Blue Screen of Death errors like the VIDEO TDR FAILURE stop code.
Shut down your desktop, unplug all cables, remove the computer chassis, and carefully detach the GPU card. Then, put it back in the same slot firmly but without using force. Turn on your computer and see if anything changed.
17. Try the GPU card on another computer
If your graphics card is malfunctioning and needs to be replaced, then all your efforts at attempting to resolve the blue screen problem at the software level will have been in vain.
A simple way to test this is by removing the GPU card from your computer and inserting it into another PC, preferably with a clean Windows installation. If the system starts glitching, it should be pretty clear that you need to replace your hardware. Check out the best GPU cards for gaming.
18. Check system memory
System memory issues can affect the entire computer, leading to blue screen errors like nvlddmkm.sys. You can easily run a check-up by turning to Windows Memory Diagnostic, a tool that comes bundled with Windows 10.
How to use Windows Memory Diagnostic:
- Save your current work and close all programs
- Press Win key + R, type
mdsched.exe, and hit the Enter key - Click Restart now and check for problems

Your operating system will reboot and start running memory tests. It runs a standard test by default. However, if you have a bit of time on your hands, we suggest switching to the Extended test in order to obtain more accurate information about any potential RAM issues.
Press F1 to open the options section, select Extended, and press F10 to apply this setting. The entire memory test can take a long time, so you can leave your PC unattended since your intervention will not be required. Once the test is complete, Windows 10 boots as usual and shows the test results in the notifications center.
19. Use Startup Repair
If Windows 10 is experiencing boot problems, this can lead to all sorts of computer issues, including BSOD errors with the VIDEO TDR FAILURE stop code. But you can fix startup issues by running the Startup Repair tool from the Advanced Startup menu. Before doing so, you need an empty USB flash drive and Internet access to set up a system installation disk.
How to create a Windows 10 installation media disk:
- Plug a USB flash drive into the PC and make sure to save any important files saved there since the drive will be formatted
- Download Media Creation Tool from the official website
- Open Media Creation Tool and follow the steps to create a Windows 10 installation media disk on the USB flash drive
How to run Startup Repair:
- Make sure the USB flash drive with the Windows 10 installation media is plugged into the PC
- Click the Start button and open the menu with the power options
- While holding down the Shift key, click Restart to boot Windows 10 to the troubleshoot menu
- Go to Troubleshoot > Advanced options > Startup Repair

- Select your administrator account and enter your password to continue
- Follow the given instructions to complete the startup repair sequence
20. Fix HDD issues
Your hard drive may have corrupt files or bad sectors which prevent Windows from operating normally, But you can fix HDD issues without having to use a third-party software application, thanks to CHKDSK (Check Disk).
- Press Win key + R, type CMD, and press Ctrl + Shift + Enter to open Command Prompt with administrator rights

- If your OS is installed on the C: drive, run
chkdsk c:/f/r. Else, replacec:with the correct partition letter - When asked to confirm scheduling CHKDSK during the next system reboot, type y and press Enter
- Restart your computer and wait for CHKDSK to do its job
21. Repair corrupt system files
Not only hard disk problems but also damaged, modified, or missing OS files can cause blue screen errors on your computer. To restore system files on Windows 10, you can run DISM (Deployment Image Servicing and Management) and SFC (System File Checker).
- Start Windows 10 in Safe Mode with Networking (see Solution 1)
- Click the Start button, type cmd, and open Command Prompt
- Run
DISM.exe/Online/Cleanup-image/RestoreHealth. However, if the Windows Update component is broken, this command won’t work. Instead, you can create a Windows 10 installation media disk (see Solution 19) and set it as the repair source:DISM.exe/Online/Cleanup-Image/RestoreHealth/Source:C:\RepairSource\Windows(replaceC:\RepairSource\Windowswith the full path to your Windows 10 installation media disk) - After DISM does its job, run SFC (
sfc/scannow). If SFC is successful, it shows the Windows Resource Protection did not find any integrity violations message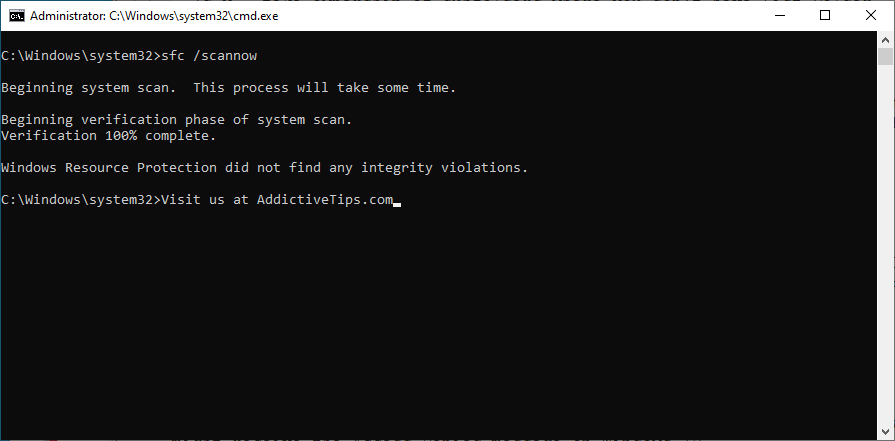
22. Disable Fast Startup
Fast Startup is a Windows component that boots your operating system faster by pre-loading drivers. Unfortunately, it’s known to cause serious PC problems. If drivers are not properly shut down and restarted, it could trigger blue screen errors like nvlddmkm.sys.
To solve this problem, you can disable Fast Startup:
- Press the Win key, search for Control Panel, and open this app
- Double-click Power Options
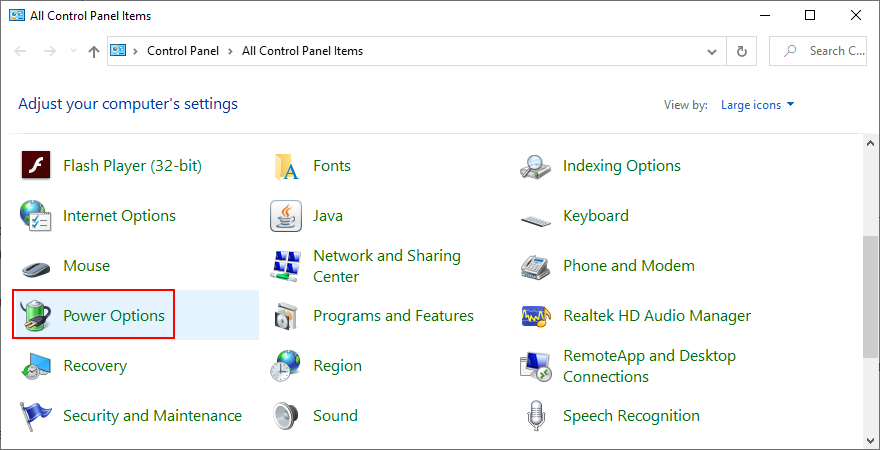
- Click Choose what the power buttons do
- Click Change settings that are currently unavailable (admin rights are required)
- Disable Turn on fast startup and click Save changes
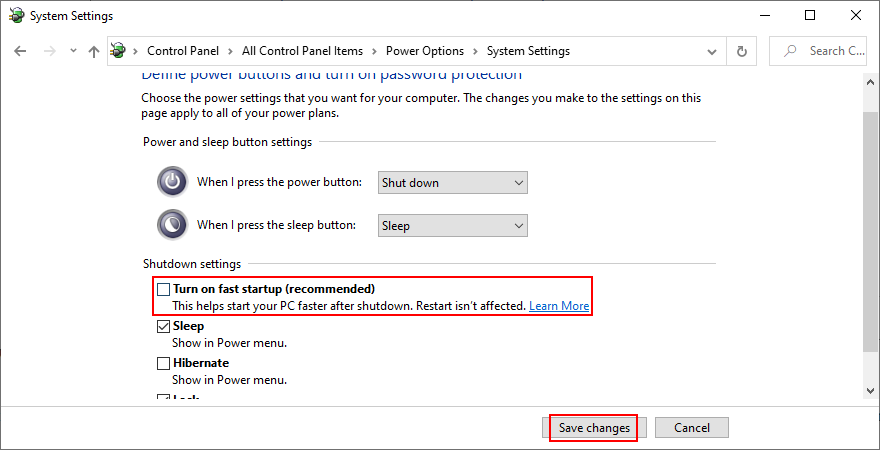
- Restart your computer
23. Disable the PCI Express power option
Many users reported that turning off the PCI Express power option helped fix the VIDEO TDR FAILURE error on their computer. Here’s what you need to do:
- Click the Start button, type edit power plan, and press Enter
- Click Change advanced power settings
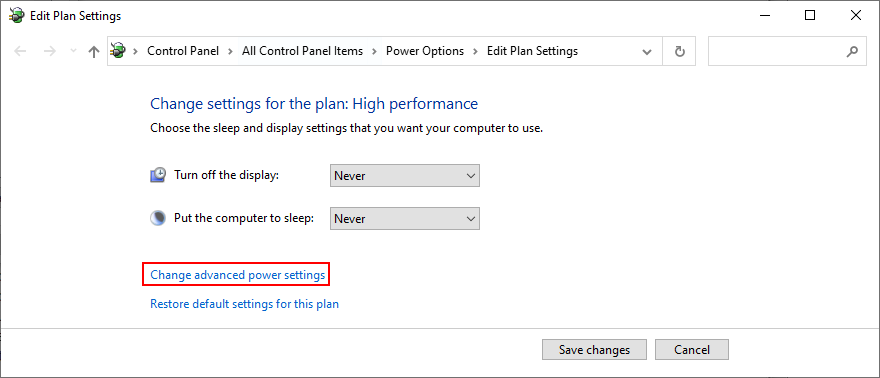
- Expand the PCI Express group
- Set Link State Power Management to Off
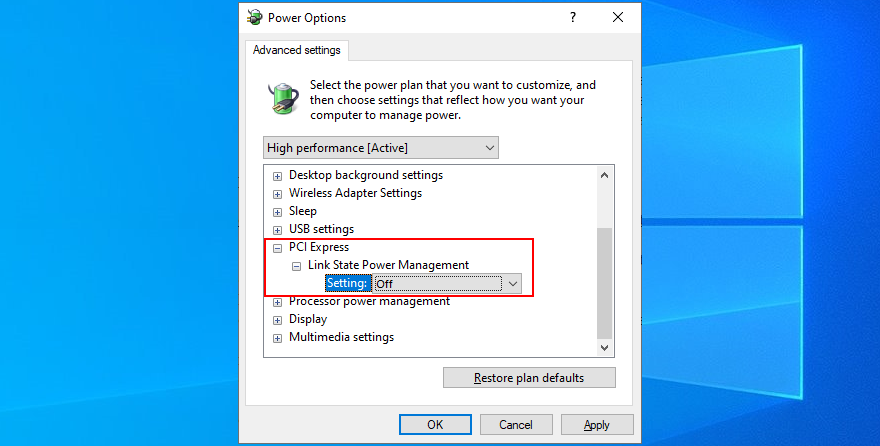
- Click Apply
- Restart your computer
24. Run a malware scan
Malware infections can be severe enough to corrupt critical system files and prevent you from running system tools like Task Manager or Command Prompt. If you suspect that your computer was recently infected with a virus, you should run a scan to eliminate any threats and regain the control of your PC.
How to run a malware scan with Windows Defender:
- Press the Windows key, type Windows Security, and launch this tool
- Select Virus & threat protection
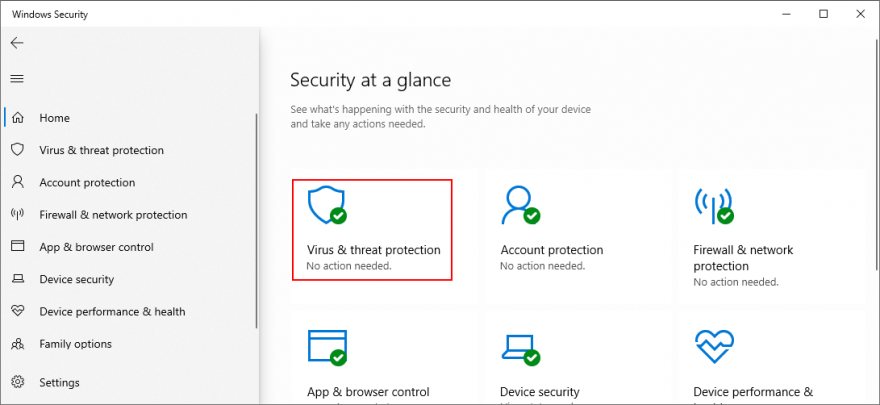
- Click Scan options
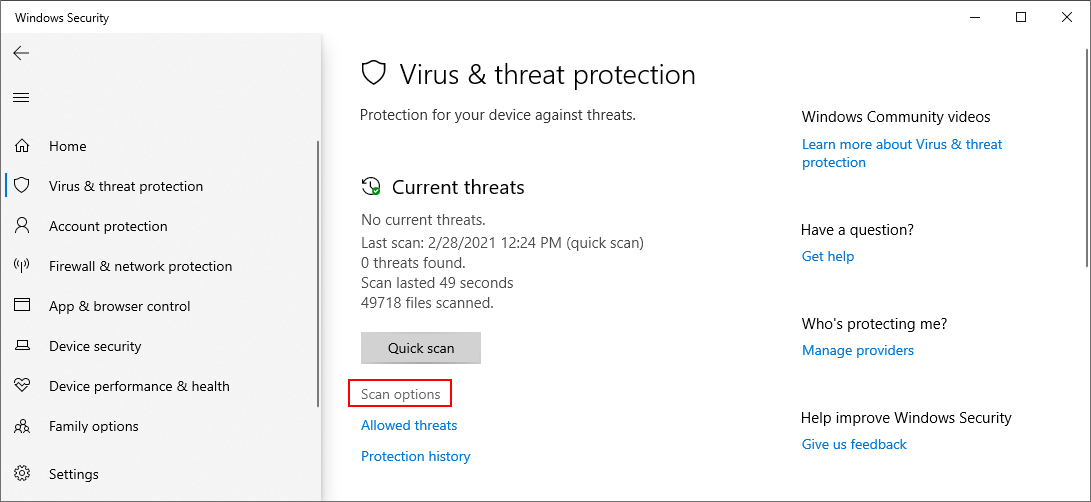
- Choose Quick scan and press Scan now
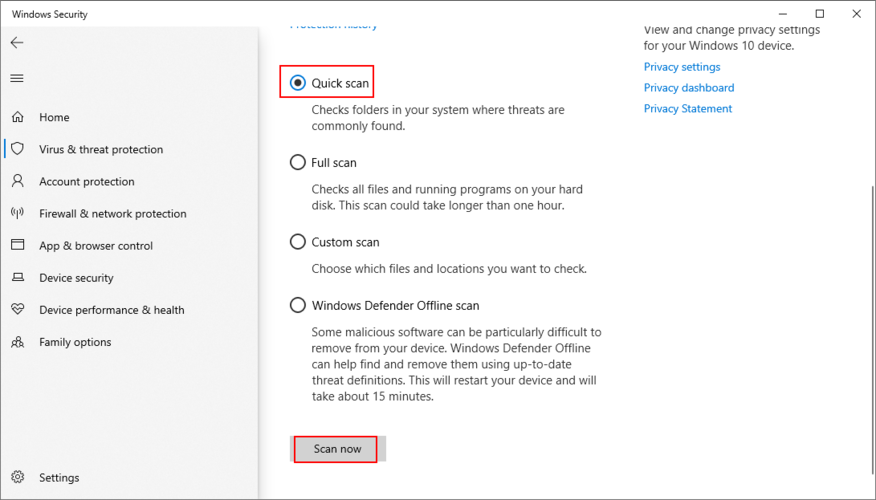
- If the computer search reveals nothing, select Windows Defender Offline scan and click Scan now
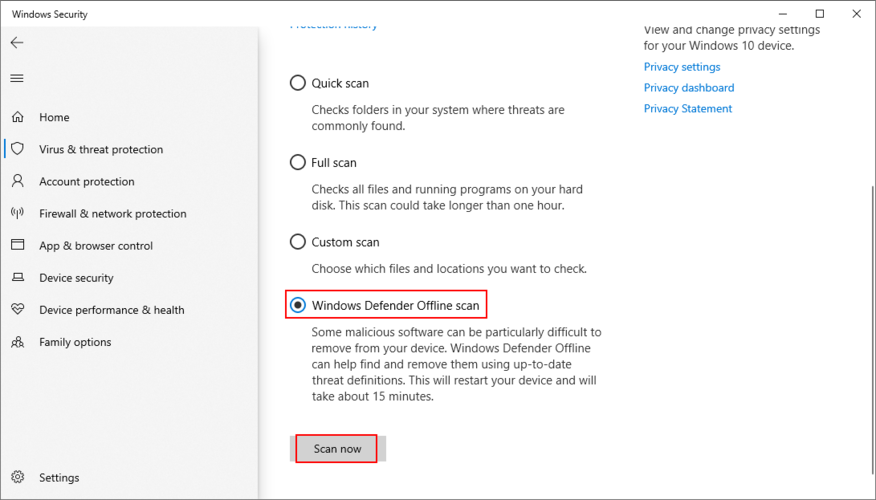
- Allow Windows Defender to remove or quarantine any threats. If you think it has wrongfully detected safe files as malware, make sure to add them to the whitelist in order to exclude the items from future scans
25. Fix the system registry
Missing, modified, corrupt, or incorrect registry settings can be devastating for your operating system and can even trigger blue screen errors like nvlddmkm.sys. But you can restore the original registry configuration from Command Prompt before system boot.
- Click the Start button and open the power menu
- Hold down the Shift key and click Restart to reboot Windows in Advanced Startup mode
- Select Troubleshoot > Advanced options > Command Prompt
- Pick your admin account and enter your password
- Run these commands (press Enter after each line):
-
cd %SystemRoot%System32\config
-
ren %SystemRoot%System32\config\DEFAULT DEFAULT.old
-
ren %SystemRoot%System32\config\SAM SAM.old
-
ren %SystemRoot%System32\config\SECURITY SECURITY.old
-
ren %SystemRoot%System32\config\SOFTWARE SOFTWARE.old
-
ren %SystemRoot%System32\config\SYSTEM SYSTEM.old
-
copy %SystemRoot%System32\config\RegBack\DEFAULT %SystemRoot%System32\config\
-
copy %SystemRoot%System32\config\RegBack\DEFAULT %SystemRoot%System32\config\
-
copy %SystemRoot%System32\config\RegBack\SAM %SystemRoot%System32\config\
-
copy %SystemRoot%System32\config\RegBack\SECURITY %SystemRoot%System32\config\
-
copy %SystemRoot%System32\config\RegBack\SYSTEM %SystemRoot%System32\config\
-
copy %SystemRoot%System32\config\RegBack\SOFTWARE %SystemRoot%System32\config\
-
- Start Windows as usual
26. Unplug external devices
If you have recently attached new hardware components into your desktop or laptop, such as a webcam, a USB flash drive, a microphone, headphones, or a wireless network adapter, it’s possible that the device is experiencing compatibility issues with your Windows 10 PC, triggering the VIDEO TDR FAILURE stop code as a result.
You can easily test this by unplugging all external devices from your PC, except for your keyboard and mouse, in order to inspect results. If the keyboard and mouse are also brand new, try replacing them if you have others.
27. Use System Restore
System Restore allows you to revert Windows 10 to a checkpoint that was recorded before you started experiencing blue screen errors. However, it means that System Restore must be enabled on your computer and at least one restore point must have been created prior to the BSOD event.
Even if you didn’t manually set up a restore point, it’s possible that some of your applications did, such as driver updaters, so it doesn’t hurt to at least check.
How to use System Restore:
- Sign in to Windows 10 using an administrator account
- Press the Win key, type Control Panel, and launch this app
- Go to Recovery
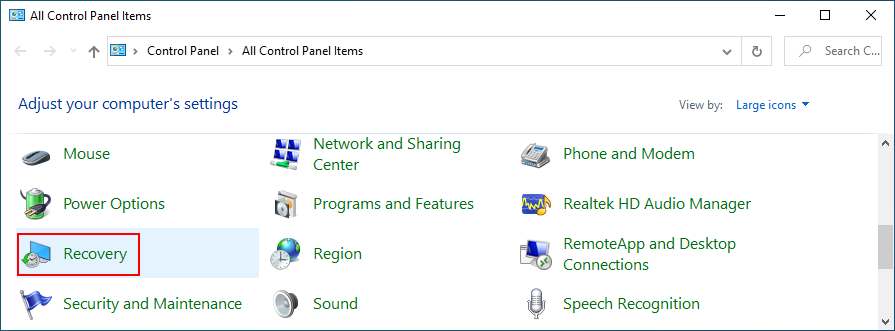
- Click Open System Restore
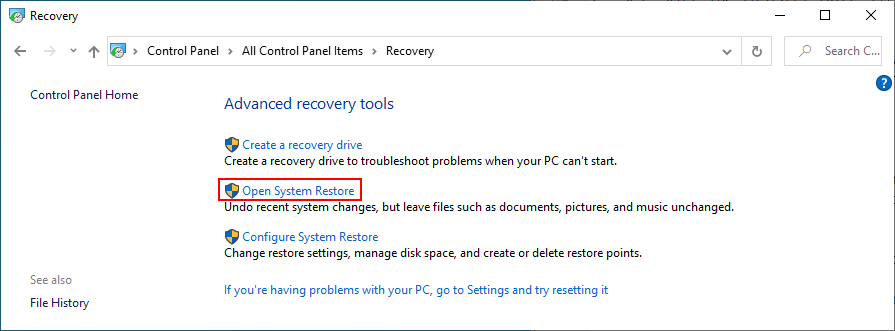
- Select a restore point or click Show more restore points to evaluate more options. You can also click Scan for affected programs to find out which applications you will have to reinstall after restore
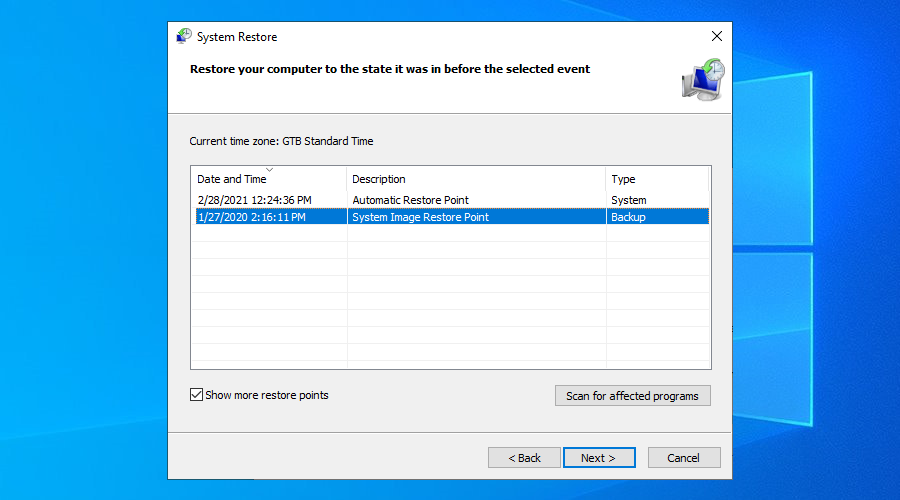
- Click Next and follow the instructions. Your PC will reboot
28. Reset Windows 10
If everything failed up until this point, you should prepare Windows 10 for factory reset in order to uninstall all programs and restore system settings to default. The good news is that your personal files will be left untouched.
But make sure to write down all applications you will have to install, save program preferences, and get hold of serial keys required for reactivation. Then, proceed to the following steps:
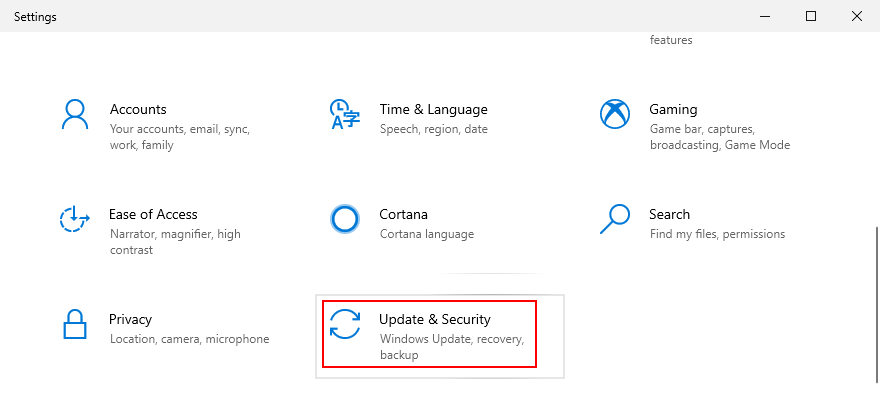
- Right-click the Start button and go to Settings
- Select Update & Security
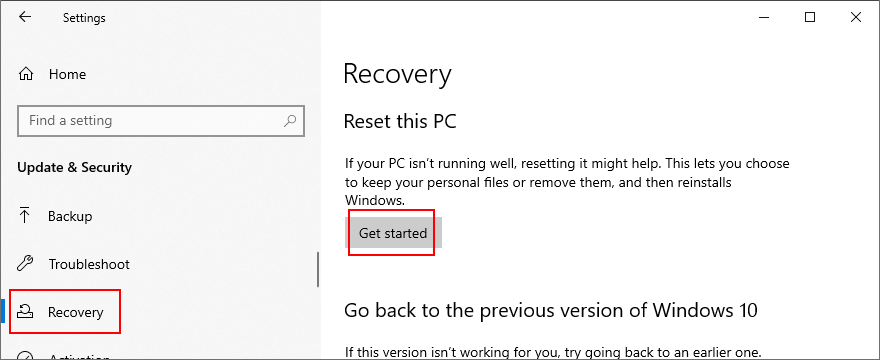
- Choose Recovery and click Get started
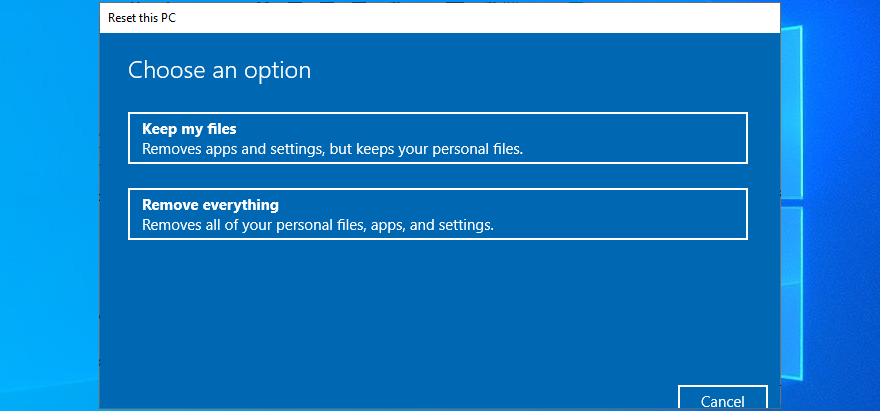
- Click Keep my files and follow the remaining instructions
Stop code VIDEO TDR FAILURE (nvlddmkm.sys) can be fixed on Windows 10
To recap, VIDEO TDR FAILURE is a BSOD error that indicates a problem with your video settings. If it’s accompanied by the nvlddmkm.sys file, it means that you can troubleshoot the file errors to get rid of system crashes.
To fix this problem, you can start Windows 10 in Safe Mode, run a clean system boot, check for system updates, disable overclocking software, reset and update BIOS, restore the nvlddmkm.sys file, clear system cookies and temp files, reinstall the graphics adapter, as well as update or roll back GPU drivers.
It’s also a good idea to run the Hardware and Devices troubleshooter, disable hardware acceleration, analyze crash dumps, use Display Driver Uninstaller, remove and reseat the GPU card, try the GPU card on another computer, check system memory, use Startup Repair, or fix HDD issues and corrupt system files.
In addition, you can disable Fast Startup and the PCI Express power option, run a computer malware scan, fix the system registry, unplug external devices, and use System Restore to roll back Windows 10 to a previous checkpoint. If all these solutions fail, you can go to the last resort, which means resetting Windows 10 to factory settings.
How did you manage to fix the nvlddmkm.sys file and VIDEO TDR FAILURE stop code? Tell us all about it in the comments section below.
