Windows 8 đã được thiết kế lại hoàn toàn Lỗi BSOD và cách khắc phục chúng . So với Windows 7 và các phiên bản trước đó, nó đã chọn cách tiếp cận thân thiện với người dùng hơn để người dùng bình thường có thể tra cứu mã dừng trên trang hỗ trợ của Microsoft.
Khi Windows 10 gặp lỗi nghiêm trọng, Windows 10 sẽ làm mọi cách để ngăn chặn mất mát và hỏng dữ liệu lớn, hiển thị màn hình màu xanh lam với hình mặt cười buồn và dòng chữ trắng cho biết PC của bạn đã gặp sự cố và cần khởi động lại , chúng tôi chỉ đang thu thập một số thông tin lỗi .
Sẽ không thành vấn đề khi bạn chỉ gặp trường hợp này một lần vì bạn có thể khởi động lại máy tính của mình và tiếp tục nơi bạn đã dừng lại. Nhưng nó thực sự trở nên có vấn đề khi thông báo lỗi PC của bạn gặp sự cố và cần khởi động lại đi vào một vòng lặp. Đôi khi nó bị kẹt ở mức 100% và không khởi động được Windows, buộc bạn phải khởi động lại.

Nguyên nhân nào dẫn đến lỗi PC của bạn gặp sự cố và cần khởi động lại ?
PC của bạn có thể bị ảnh hưởng bởi sự kiện phần mềm, lỗi phần cứng hoặc cả hai. Dưới đây là một số nguyên nhân có thể xảy ra:
- Lỗi phần cứng
- Các thành phần bị lỗi trong đĩa
- Tệp hệ thống hoặc kho lưu trữ thành phần bị hỏng
- Hệ điều hành, trình điều khiển hoặc BIOS đã lỗi thời
- Cài đặt BIOS hoặc đăng ký không chính xác
- Không đủ dung lượng đĩa
- Các ứng dụng, bản cập nhật hệ thống hoặc phần cứng không tương thích
- Nhiễm phần mềm độc hại
- Sự cố bộ nhớ hệ thống
- Quá nhiệt do ép xung
Cách khắc phục PC của bạn gặp sự cố và cần khởi động lại trên Windows 10
Có một số cách mà bạn có thể tiếp cận việc khắc phục sự cố. Nhưng bạn nên thiết lập điểm khôi phục hệ thống trước khi tiếp tục với giải pháp đầu tiên trong danh sách này. Bằng cách này, bạn luôn có thể hoàn nguyên các thay đổi nếu mắc phải bất kỳ lỗi nào.
1. Khởi động Windows ở Chế độ An toàn
Nếu bạn không thể khởi động hệ điều hành của mình để truy cập màn hình và thực hiện bất kỳ tác vụ nào vì bạn ngay lập tức bị đưa vào vòng lặp PC của bạn gặp sự cố và cần khởi động lại thì bạn có thể khởi động Windows ở Chế độ An toàn . Đó là một biện pháp phòng ngừa tạo ra một môi trường an toàn để chẩn đoán.
Cách khởi động Windows ở Chế độ An toàn mà không cần khởi động:
- Khởi chạy Windows và làm gián đoạn trình tự khởi động
- Làm điều này ba lần để vào chế độ Khôi phục
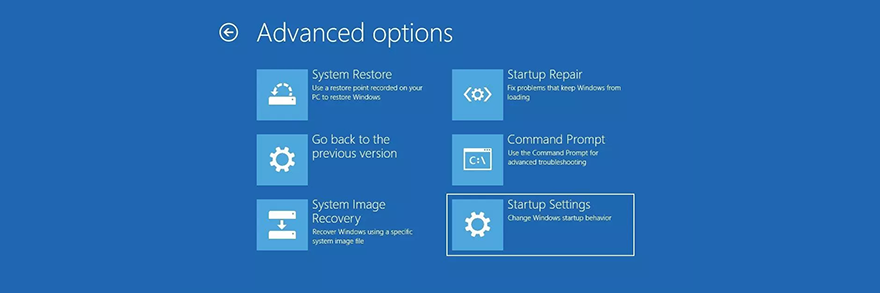
- Trong màn hình Chọn một tùy chọn , chọn Khắc phục sự cố

- Đi tới Tùy chọn nâng cao
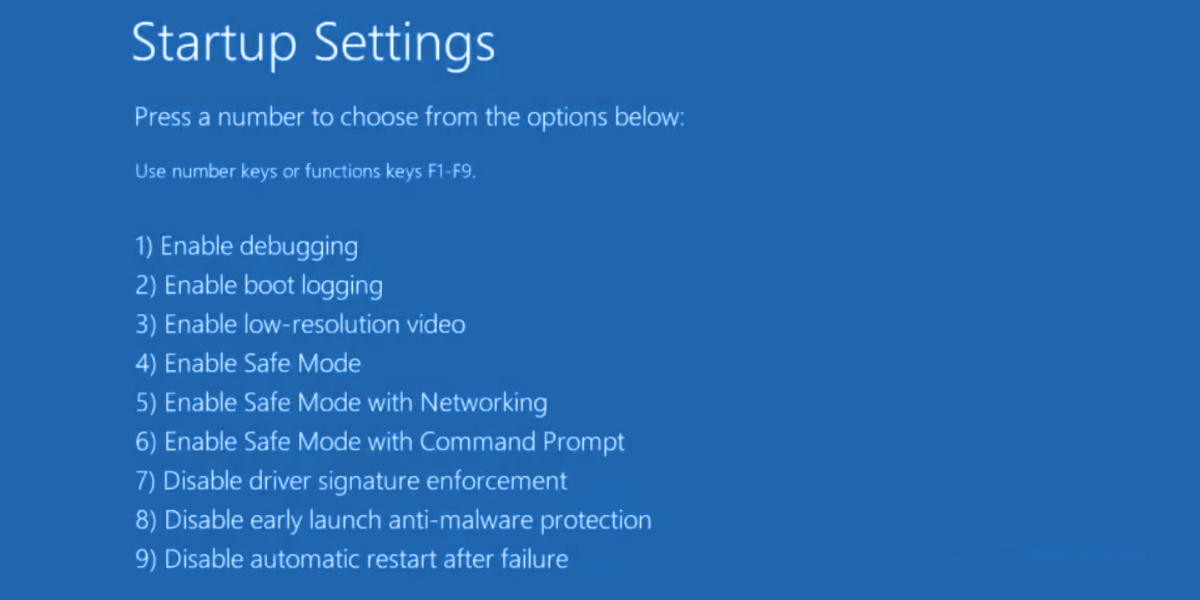
- Chọn Cài đặt khởi động
- Nhấp vào Khởi động lại
- Nhấn F4 để bật Chế độ An toàn

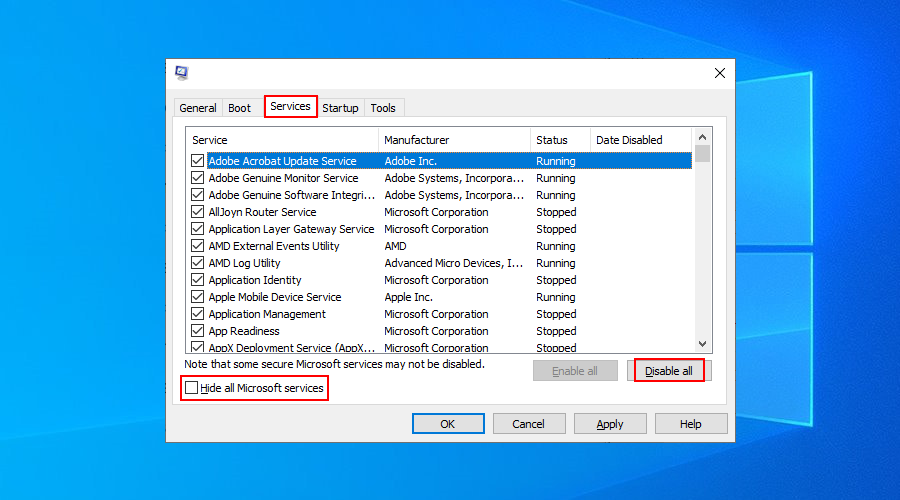
2. Chạy khởi động sạch
Nếu lỗi PC của bạn gặp sự cố và cần khởi động lại không được kích hoạt trong Chế độ an toàn, bạn có thể xóa khởi động Windows 10 để vô hiệu hóa mọi quy trình, trình điều khiển hoặc dịch vụ không cần thiết điều đó có thể gây ra sự cố. Dưới đây là cách biến điều đó thành hiện thực:
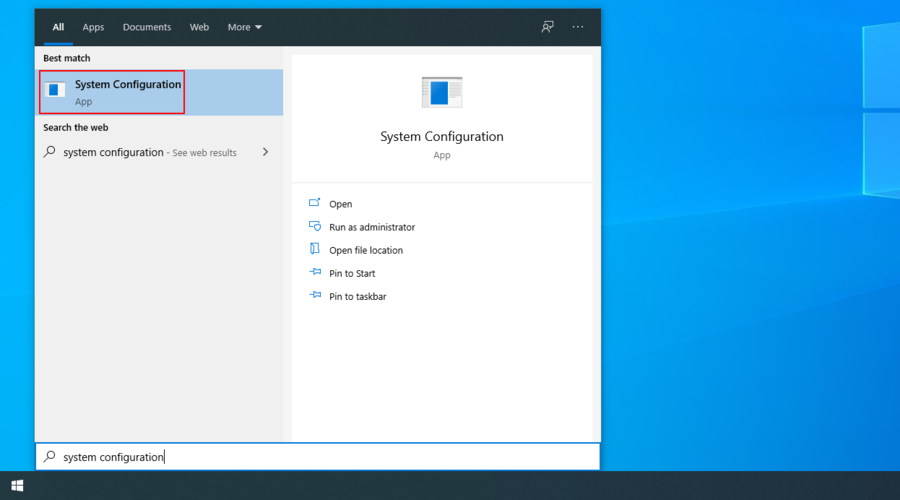
- Nhấp vào nút Bắt đầu , nhập Cấu hình hệ thống và nhấn Enter
- Đi tới phần Dịch vụ
- Bỏ chọn Ẩn tất cả các dịch vụ của Microsoft và nhấp vào Tắt tất cả

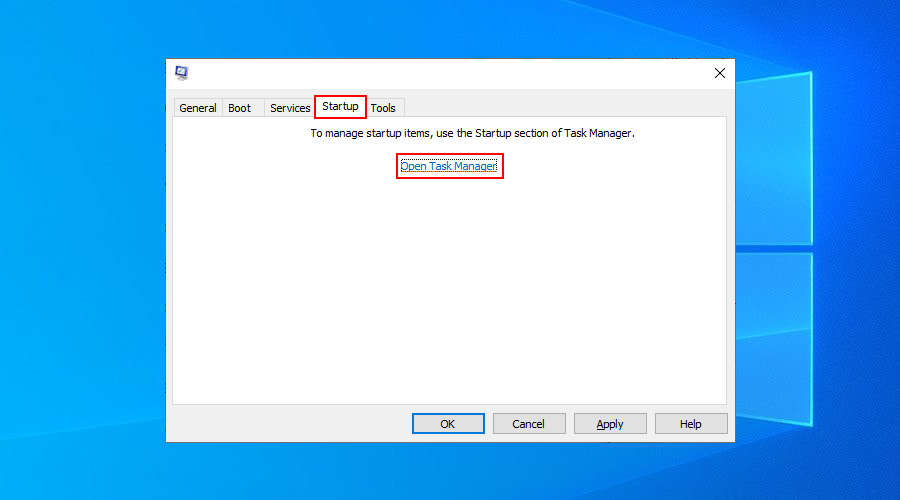
- Chuyển sang tab Khởi động và nhấp vào Mở Trình quản lý Tác vụ
- Chọn một ứng dụng có trạng thái Đã bật và nhấp vào Tắt
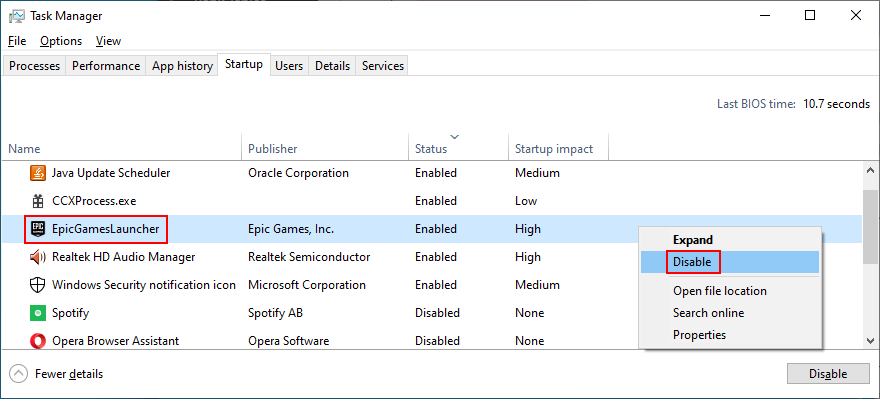
- Thực hiện việc này cho tất cả các ứng dụng có trạng thái Đã bật
- Khởi động lại PC của bạn và kiểm tra các sự cố
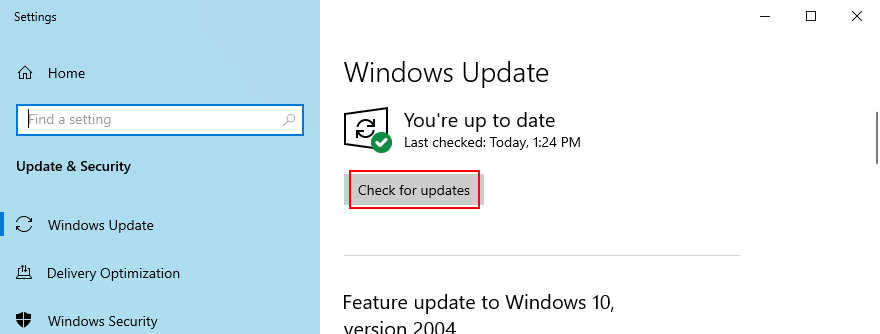
3. Chạy Windows Update
Điều quan trọng là phải cập nhật Windows với các bản vá lỗi bảo mật và hotfix mới nhất để tránh các vấn đề về ổn định hệ thống và thông báo lỗi PC của bạn gặp sự cố và cần khởi động lại .
- Nhấn phím Win , nhập Kiểm tra bản cập nhật và nhấn Enter
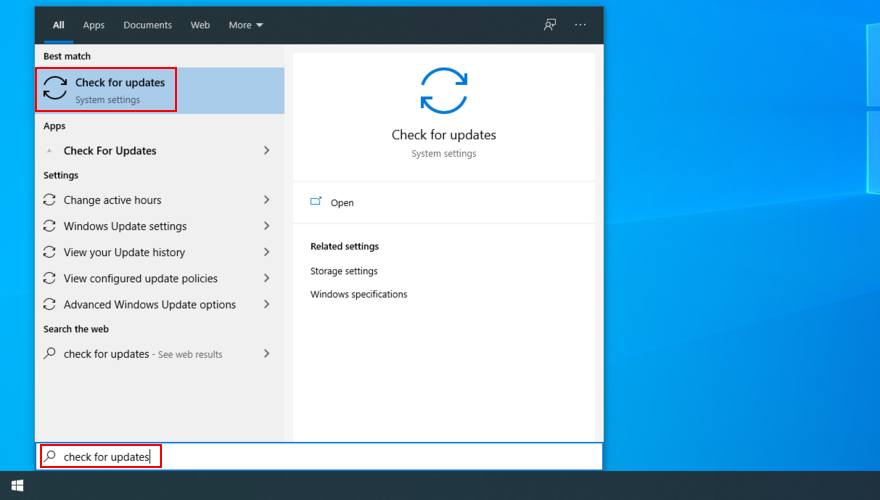
- Nhấp vào Kiểm tra các bản cập nhật và đợi

- Nếu Windows tìm thấy bất kỳ thứ gì, hãy nhấp vào Tải xuống
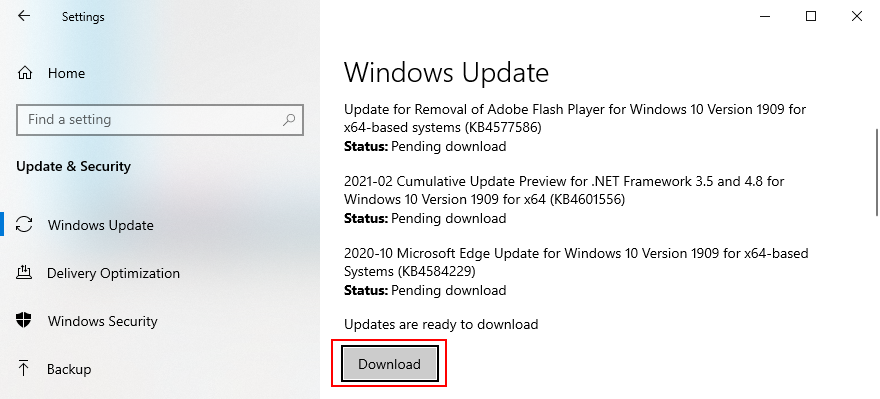
- Khởi động lại PC của bạn sau khi cập nhật xong và kiểm tra lỗi

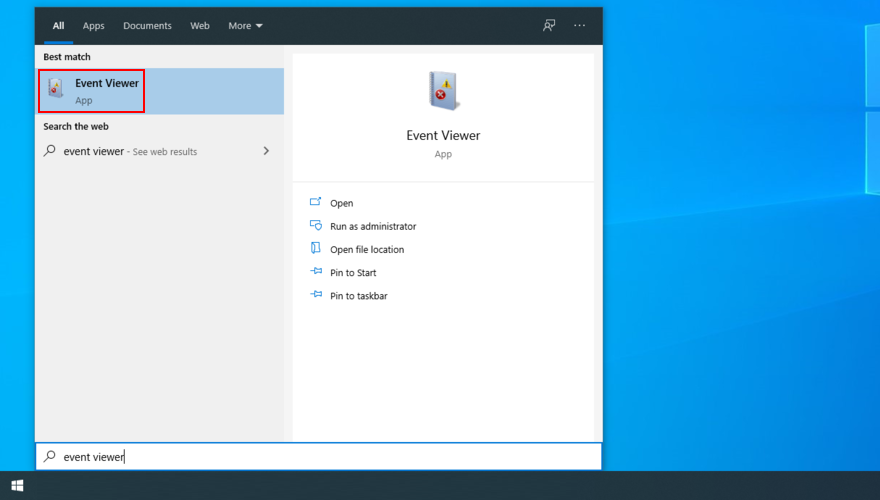
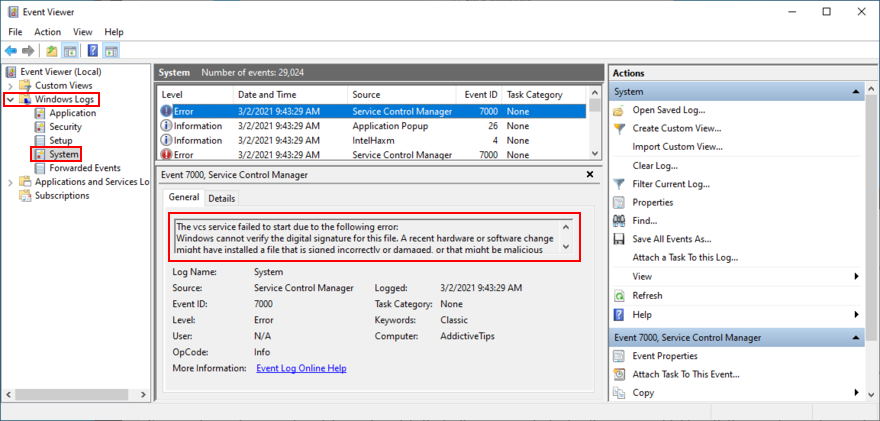
4. Kiểm tra nhật ký hệ thống
Windows thu thập nhật ký về tất cả các sự kiện chính xảy ra trên máy của bạn, bao gồm cả sự cố. Để tìm hiểu thêm chi tiết về lỗi PC của bạn gặp sự cố và cần khởi động lại , bạn có thể kiểm tra nhật ký hệ thống bằng cách sử dụng Event Viewer hoặc BlueScreenView.
Event Viewer là một công cụ thông tin hệ thống được tích hợp trong hệ điều hành. Bạn có thể sử dụng nó để phân tích các lỗi nhỏ do sự cố hệ thống tạo ra, nhằm tìm ra trình điều khiển nào đã gây ra lỗi PC của bạn gặp sự cố và cần khởi động lại .
Cách sử dụng Trình xem sự kiện:
- Khởi động lại hệ điều hành của bạn ngay lập tức sau sự cố
- Nhấp vào nút Bắt đầu , nhập Trình xem sự kiện và mở ứng dụng này
- Truy cập phần Nhật ký Windows ở phía bên trái
- Mở thư mục Hệ thống
- Chọn lỗi đầu tiên trong danh sách
- Phân tích thông tin về sự cố hệ thống trong tab Chung và Chi tiết
Nếu bạn thích cách tiếp cận thân thiện với người dùng hơn để điều tra các tệp minidump, bạn có thể cài đặt và sử dụng BlueScreenView. Đây là một công cụ nhẹ, di động và dễ sử dụng.
Cách sử dụng BlueScreenView:
- Tải xuống BlueScreenView từ trang web chính thức
- Khởi chạy ứng dụng và mở tệp.dmp được tạo bởi sự cố hệ thống
- Khám phá các tệp trình điều khiển đã gây ra sự kiện
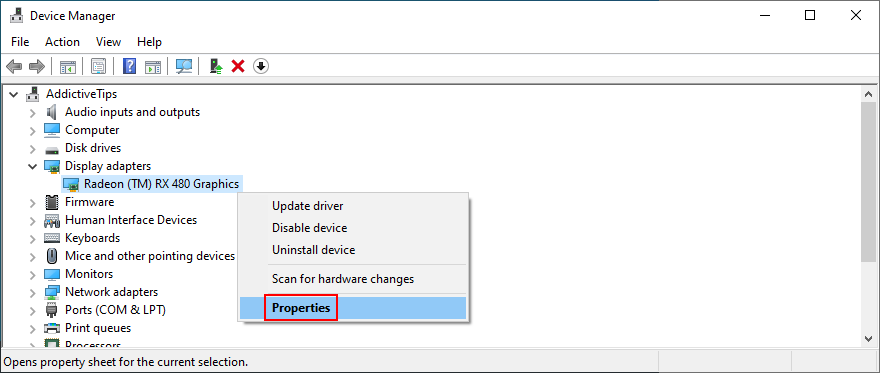
5. Kiểm tra trình điều khiển thiết bị của bạn
Khi bạn phát hiện ra các trình điều khiển bị trục trặc dẫn đến thông báo lỗi PC của bạn gặp sự cố và cần khởi động lại , bạn có thể khắc phục sự cố chúng theo ba phương pháp: cài đặt lại bộ điều hợp, cập nhật trình điều khiển hoặc cuộn quay lại trình điều khiển về phiên bản trước.
Cách cài đặt lại bộ điều hợp:
- Nhấp chuột phải vào nút Bắt đầu và chọn Trình quản lý Thiết bị
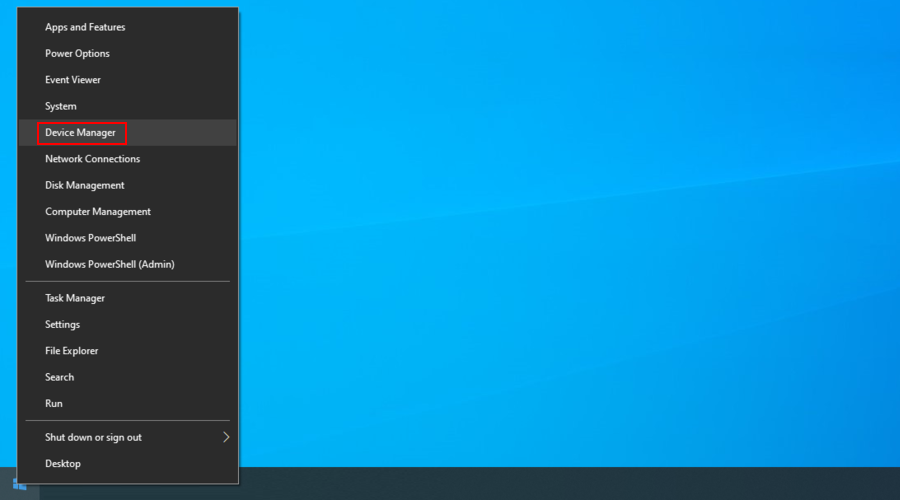
- Chọn thiết bị bị lỗi từ danh sách, nhấp chuột phải vào thiết bị đó và chọn Gỡ cài đặt thiết bị
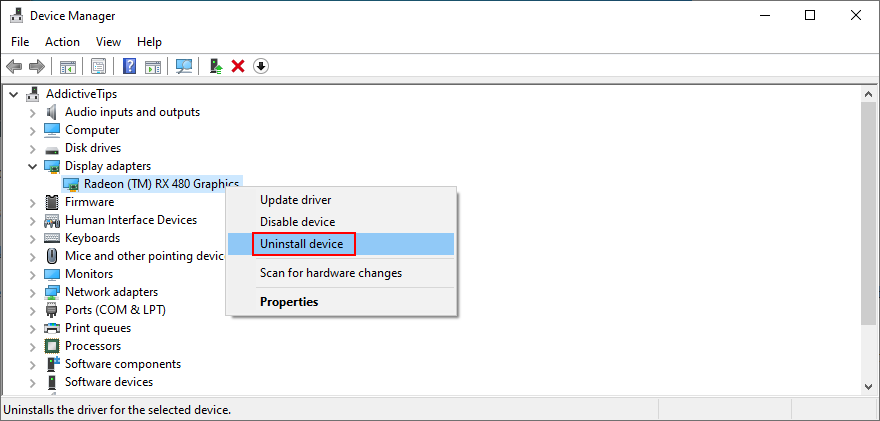
- Làm theo các bước trên màn hình
- Chọn bất kỳ thiết bị nào, mở trình đơn Hành động và nhấp vào Quét các thay đổi phần cứng
- Khởi động lại PC của bạn. Bộ điều hợp bị thiếu sẽ được Windows tự động cài đặt lại
- Kiểm tra các vấn đề khác về độ ổn định của hệ thống

Giải pháp này sẽ loại bỏ thông báo lỗi PC của bạn gặp sự cố và cần khởi động lại nếu nguyên nhân là do thiết bị không được kết nối đúng cách với hệ điều hành.
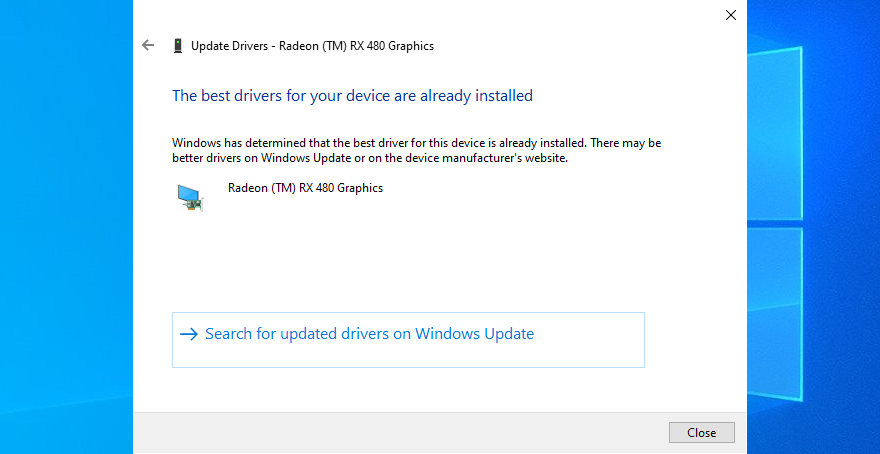
Cách cập nhật trình điều khiển:
- Quay lại Trình quản lý thiết bị
- Nhấp chuột phải vào thiết bị lỗi thời và chọn Cập nhật trình điều khiển
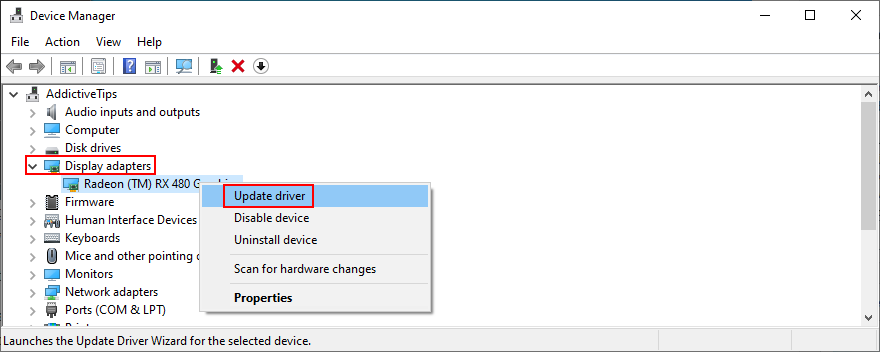
- Nhấp vào Tự động tìm kiếm phần mềm trình điều khiển được cập nhật
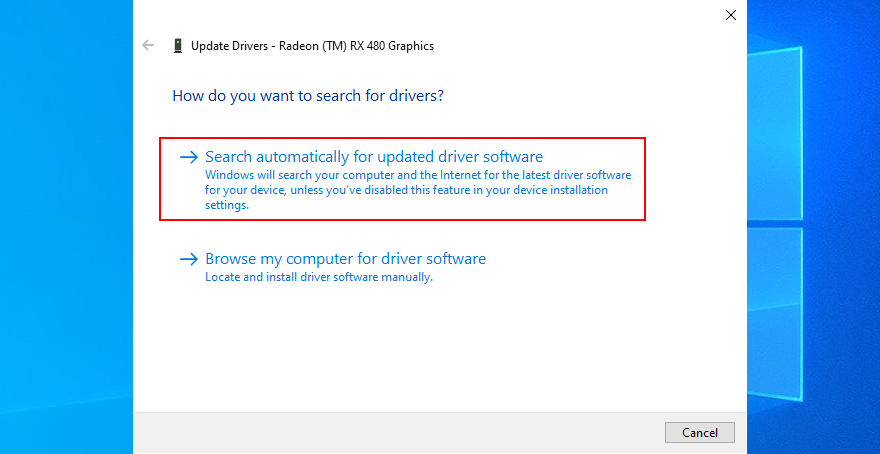
- Nếu không tìm thấy trình điều khiển, hãy nhấp vào Tìm kiếm trình điều khiển được cập nhật trên Windows Update
- Khởi động lại PC của bạn và kiểm tra lỗi hệ điều hành

Trình điều khiển lỗi thời có thể gây ra sự cố máy tính, vì vậy, việc cập nhật chúng nên thực hiện thủ thuật. Tuy nhiên, nếu Windows Update không tìm thấy trình điều khiển mới hơn, bạn có thể tải xuống và cài đặt trình điều khiển đó từ trang web của nhà sản xuất.
Tuy nhiên, thật là rủi ro vì bạn có thể vô tình cài đặt một trình điều khiển không tương thích. Để tránh trường hợp này, tốt hơn nên sử dụng trình điều khiển cập nhật ứng dụng tự động tải xuống và cài đặt trình điều khiển mới hơn.
Mặt khác, nếu hệ điều hành của bạn bắt đầu gặp sự cố sau khi cập nhật trình điều khiển, thì có thể là do phiên bản mới nhất không hỗ trợ đầy đủ Windows 10. Khi điều này xảy ra, bạn nên khôi phục trình điều khiển về phiên bản ổn định trước đó.
Cách khôi phục trình điều khiển:
- Quay lại Trình quản lý Thiết bị
- Chọn thiết bị, nhấp chuột phải vào thiết bị và đi tới Thuộc tính
- Chọn phần Trình điều khiển
- Nhấp vào Trình điều khiển quay lại và làm theo các bước
- Nếu bạn không thể nhấp vào nút vì nó chuyển sang màu xám, điều đó có nghĩa là không có phiên bản trình điều khiển trước đó trên PC của bạn, vì vậy bạn không thể hoàn tất quá trình khôi phục
- Khởi động lại máy tính và kiểm tra lỗi

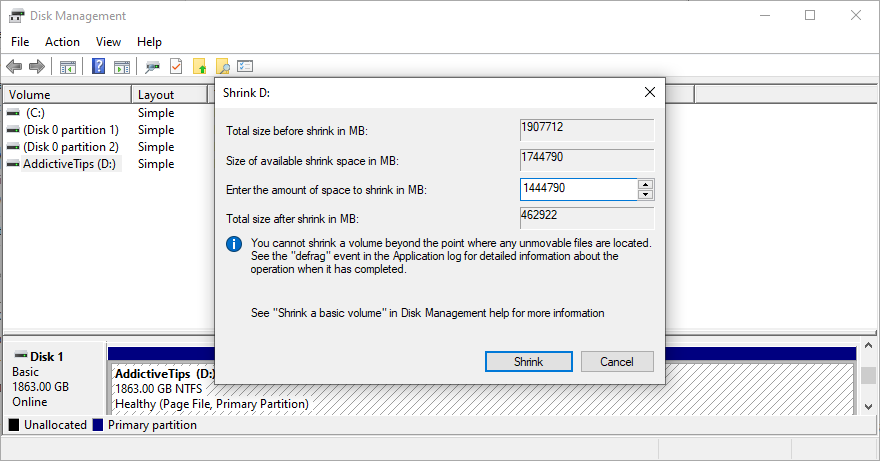
6. Kiểm tra dung lượng ổ đĩa của bạn
Hệ điều hành của bạn liên tục yêu cầu dung lượng đĩa trống cho các hoạt động khác nhau. Nếu không, nó có thể gặp sự cố và khiến bạn bị khóa PC cho đến khi bạn giải quyết được vấn đề. Bạn có thể phân bổ thêm dung lượng ổ đĩa cho phân vùng hệ điều hành của mình từ một ổ đĩa khác hoặc xóa các tệp hiện có để tạo khoảng trống.
Cách tăng kích thước phân vùng HĐH bằng Disk Management:
- Nhấn phím Win + R , nhập diskmgmt.msc và nhấn Nhập
- Chọn một ổ đĩa lớn bên cạnh ổ đĩa có Windows
- Nhấp chuột phải vào nó và chọn Thu nhỏ âm lượng

- Đặt kích thước mới của trình điều khiển và nhấp vào Thu nhỏ

- Bây giờ, nhấp chuột phải vào phân vùng Windows và chọn Mở rộng âm lượng
- Chỉ định kích thước mới bằng cách thêm dung lượng đĩa trống mà bạn đã có trước đó
- Hoàn tất các thay đổi, khởi động lại PC của bạn và kiểm tra sự cố

Nếu không thể phân bổ thêm dung lượng đĩa từ một phân vùng khác, thì bạn có thể xóa các tệp hiện có. Ví dụ: bạn có thể di chuyển bộ sưu tập ảnh và phim của mình sang đĩa ngoài, tải nó lên tài khoản đám mây hoặc ghi ra đĩa DVD. Bạn nên gỡ cài đặt các trò chơi và ứng dụng lớn mà bạn không cần nữa.
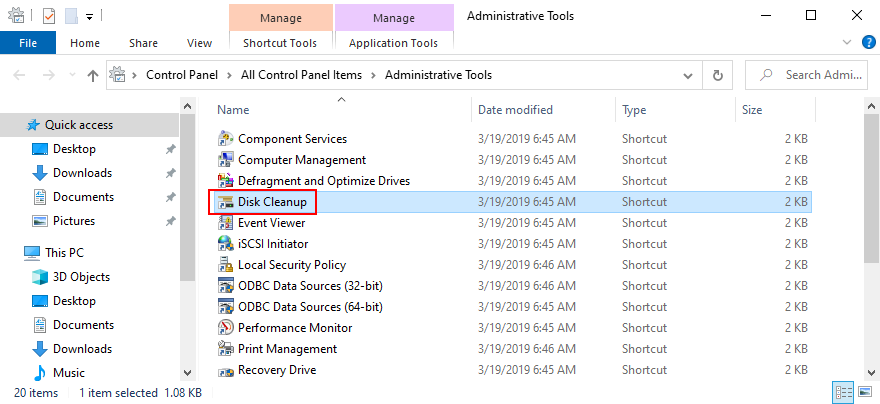
Và, khi nói đến dữ liệu rác, bạn có thể loại bỏ nó bằng cách chuyển sang trình dọn dẹp hệ thống . Hoặc, nếu không muốn cài đặt thêm ứng dụng, bạn có thể sử dụng công cụ Dọn đĩa của Windows.
Cách sử dụng Windows Disk Cleanup:
- Đảm bảo đăng nhập vào Windows 10 bằng tài khoản quản trị viên
- Đi tới Tải xuống và Thùng rác để kiểm tra xem có tệp nào bạn muốn giữ lại trước khi xóa không
- Nhấp vào trình đơn Bắt đầu , nhập bảng điều khiển và nhấn Nhập
- Chọn Công cụ quản trị

- Nhấp đúp vào Disk Cleanup để khởi chạy ứng dụng này
- Chọn phân vùng Windows và nhấp vào OK
- Tại Tệp cần xóa , chọn tất cả các mục và nhấp vào Dọn dẹp tệp hệ thống
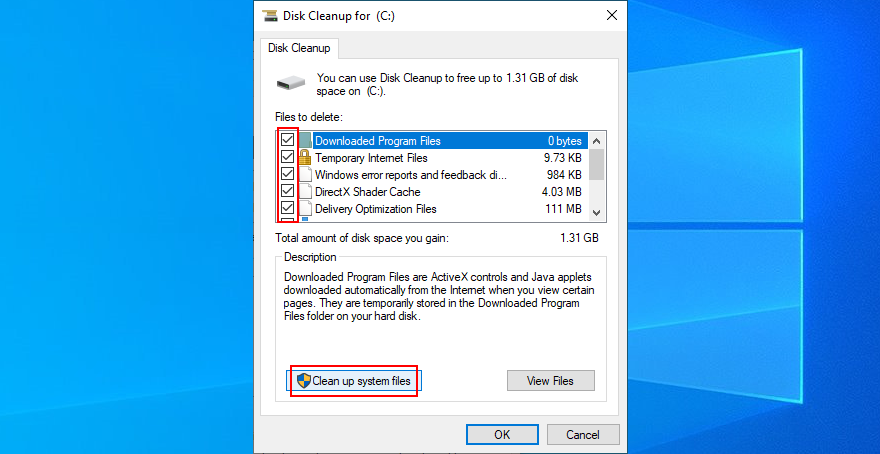
- Sau khi quá trình quét kết thúc, hãy chọn lại tất cả các tệp
- Nhấp vào OK và Xóa tệp để xác nhận xóa
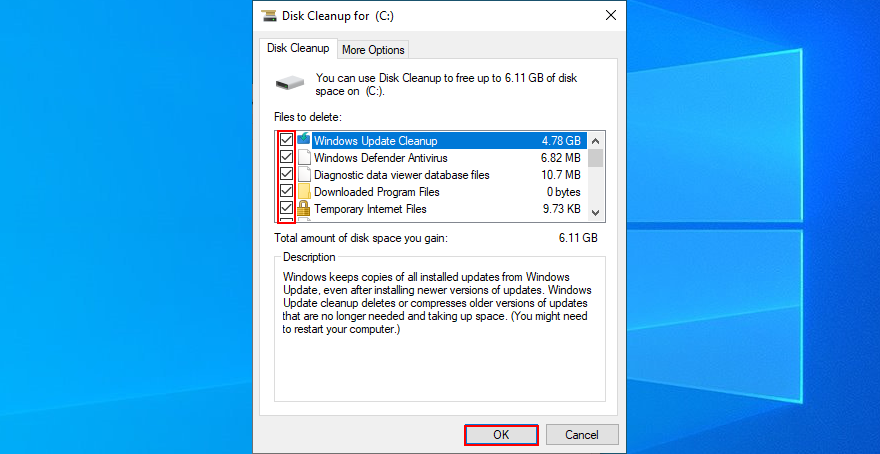
- Don’t shut down or turn off your PC during the cleanup
- Once it’s over, reboot your PC and check for system stability issues
7. Unplug new hardware devices
The Your PC ran into a problem and needs to restart error can be triggered by peripheral devices that have compatibility issues with your computer and operating system. If you notice that you started having problems with your computer after plugging in a new piece of hardware, you should take it out.
It can be anything, from a webcam to a Wi-Fi adapter. Furthermore, if the peripheral device is connected through a USB cable, then you should switch USB ports in case not all of them are functioning correctly.
8. Scan your PC for malware
If your computer was infected with malware, it’s possible that critical processes and services were disabled in an attempt to take down your defenses. It often translates to system crashes, too, represented by a blue screen with an error message and perhaps a stop code.
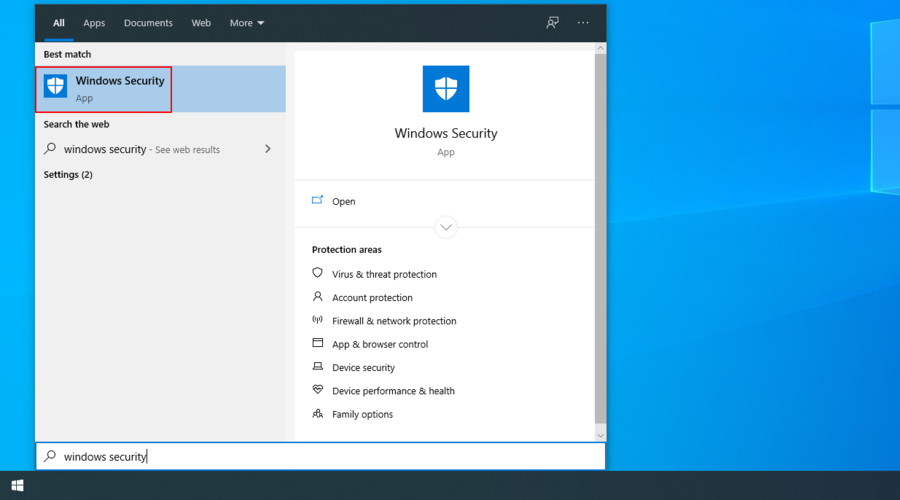
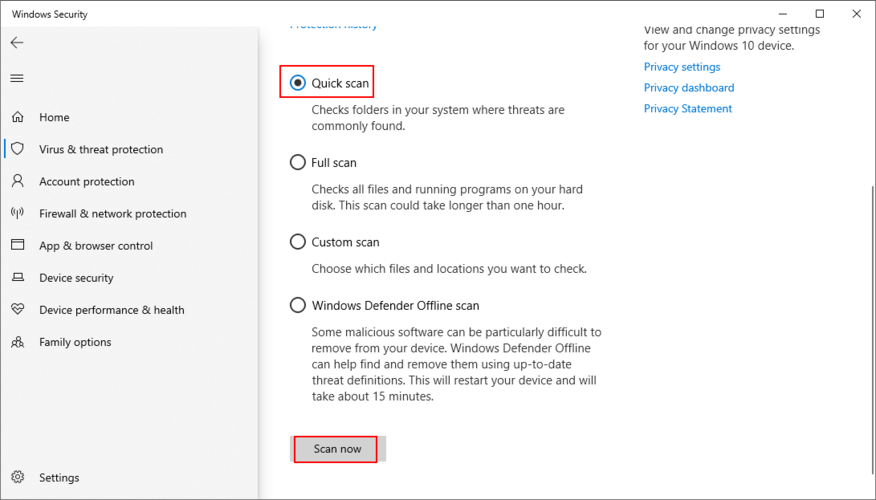
How to run Windows Defender:
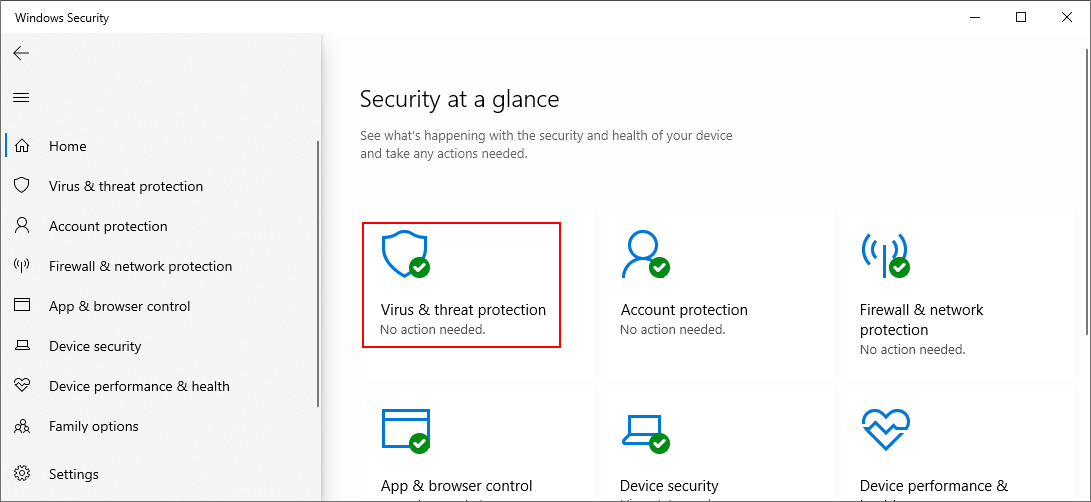
- Press the Windows key, type Windows Security, and open this app
- Select the Virus & threat protection section
- Click Scan options
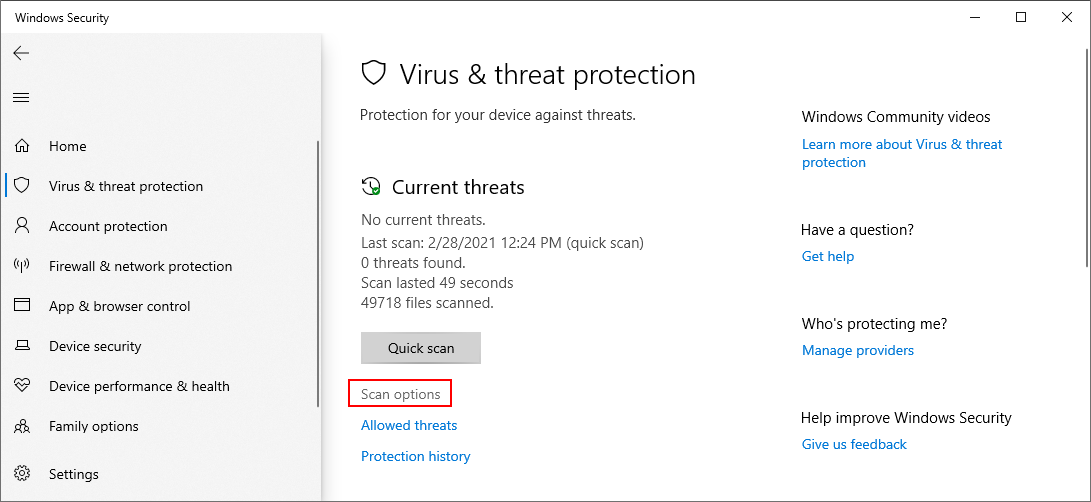
- Pick Quick scan and click Scan now
- If the scan doesn’t reveal anything suspicious, select Windows Defender Offline scan and click Scan now
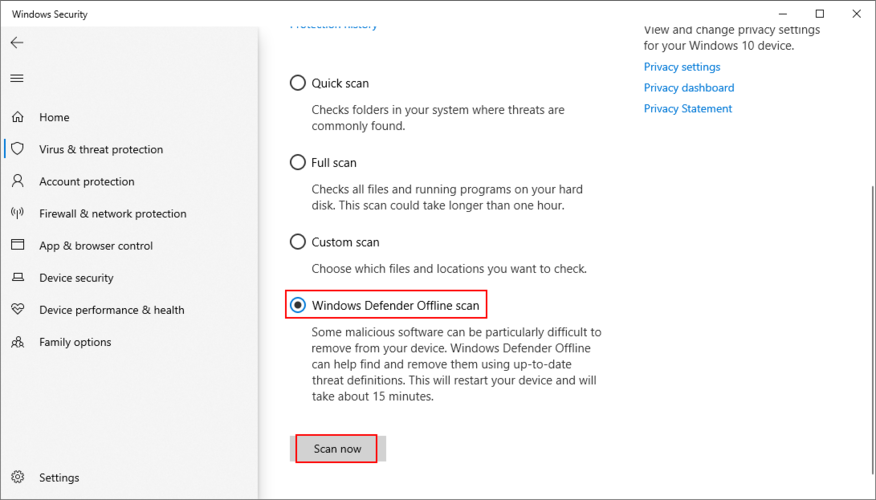
- Once Defender removes the infected files, restart your PC and check for errors
If you have any antivirus solution installed beside Windows Defender, make sure to adapt the steps above.
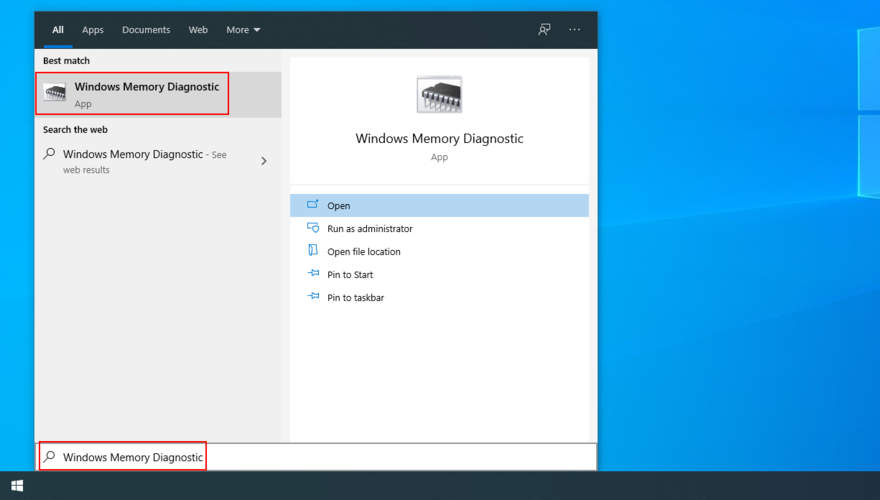
9. Check the system memory
Any issues with your RAM card can affect the entire computer, leading to system crashes and various stop codes. However, you can quickly verify the system memory with the help of Windows Memory Diagnostic, a built-in tool.
How to use Windows Memory Diagnostic:
- Save your work and close all programs
- Click the Start button, type Windows Memory Diagnostic, and open this app
- Click Restart now and check for problems (recommended)
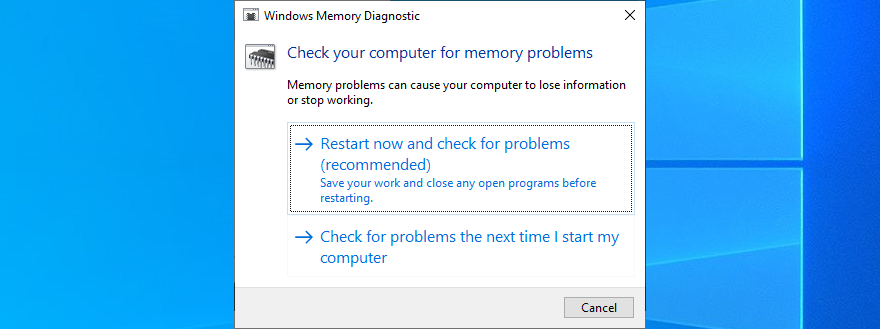
- Your PC will reboot and start checking your RAM
- Once it repairs all memory problems, boot Windows and check for stability issues
Windows Memory Diagnostic is pretty good at what it does. But if you’re looking for something a little more advanced, you should check out MemTest86.
10. Disable overclocking tools
Gamers typically use overclocking tools like MSI Afterburner, AMD Overdrive, CPU-Z or GPU-Z to crank up their systems and enhance their gaming experience. However, it’s not often done properly.
For example, you must have a cooler powerful enough to handle the heat resulted from overclocking. Else, your PC will shut down and show the Your PC ran into a problem and needs to restart error message to prevent overheating and protect itself.
So it’s a good idea to turn off all overclocking software solutions you have on your PC, whether you applied them for your GPU, CPU, or RAM. Then, reset the clock settings to default and check your PC for any additional stability problems.
11. Reset BIOS to default
It’s possible to control many computer settings from the BIOS area, including overclocking and caching. However, if you don’t know what you’re doing, you can end up harming your PC and triggering system crashes with can’t carry out its activities properties due to missing or damaged files. However, you can try to fix these problems by resorting to three command-linethe Your PC ran into a problem and needs to restart error message.
But you can fix it by resetting all BIOS settings to their factory values. Here’s how to make it happen:
- Restart your computer
- During reboot, press the key shown on the screen to access BIOS mode
- Find the advanced options
- Locate the setting that resets configuration data and turn it on
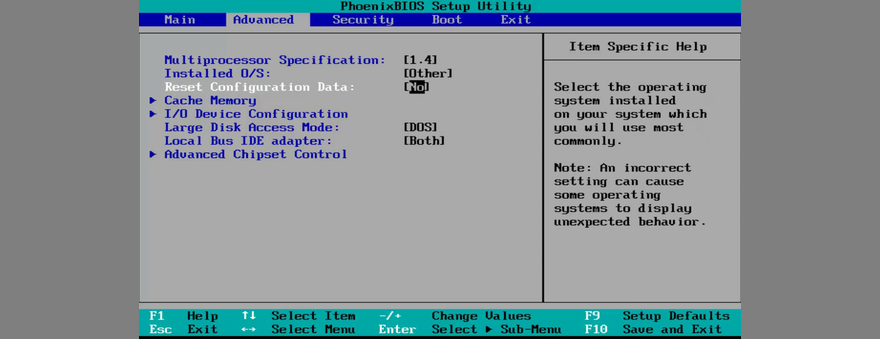
- Save the current BIOS layout and exit
- After Windows starts, check for stability issues
12. Update BIOS
Since you’re already changing BIOS settings, it’s a good idea to update BIOS to the latest version to avoid computer functionality problems and the Your PC ran into a problem and needs to restart loop. Đây là cách thực hiện:
- Click the Start button, type System Information, and open this app

- Select the System Summary area
- Take note of the BIOS Version/Date

- Start a web browsing session and visit the website of your BIOS manufacturer
- Find and download a newer BIOS version that’s compatible with your PC
- Unzip the downloaded archive and copy contents to a USB flash drive
- Restart your PC and press the key that enters BIOS mode
- Back up the current BIOS version and save it to the pen drive
- Begin the BIOS update and proceed with the on-screen instructions
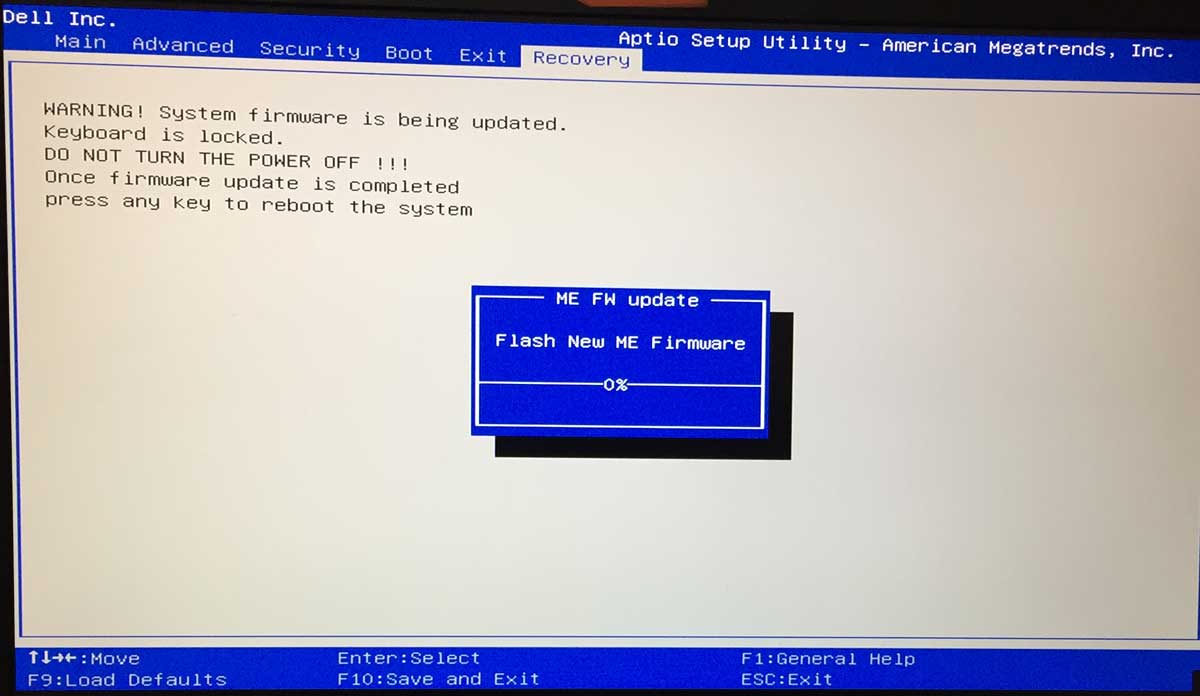
- Don’t shut down or restart your PC during the update
- Start Windows and check for errors
13. Repair disk and system errors
Your hard disk may have bad sectors, or your operating system may have corrupt files. As a result, Windows 10 can’t carry out its activities due to missing or damaged files. However, you can try to fix these problems by resorting to three command-line tools built into the OS: CHKDSK (Check Disk), SFC (System File Checker), and DISM (Deployment Image Servicing and Management).
How to fix bad sectors with CHKDSK:
- Press Win key + R, type cmd, and press Ctrl + Shift + Enter to open Command Prompt with admin rights

- If Windows is installed on the C: drive, run
chkdsk c:/f. Otherwise, replacec:with the right partition letter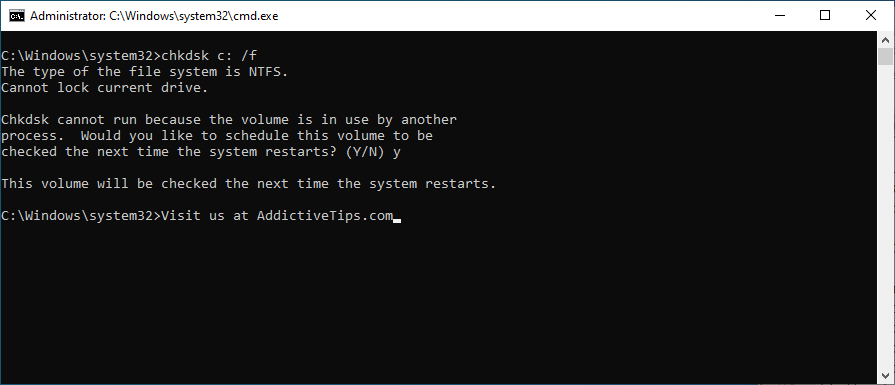
- Type y and press Enter when you’re asked to schedule the task at the next system startup
- Restart your PC and wait for CHKDSK to do its job
- Once it finishes, start Windows as normal and check if it still crashes
How to fix system errors with SFC:
- Run Command Prompt as administrator
- Type
sfc/scannowand press Enter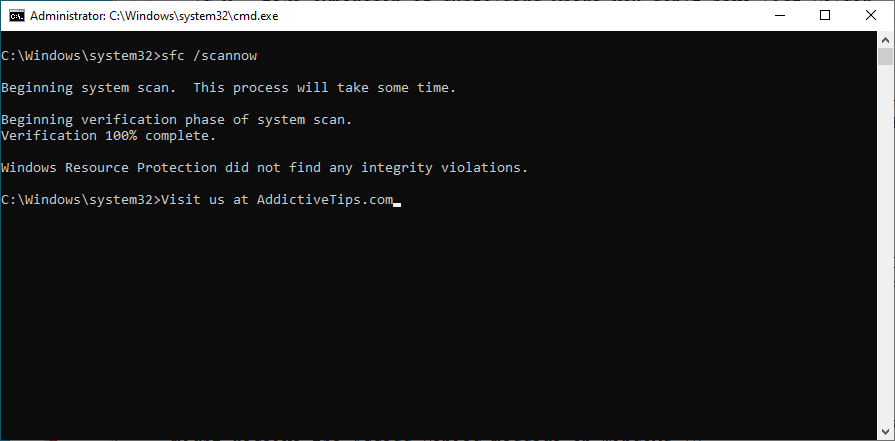
- SFC will begin to scan and repair any problems it detects
- Once it finishes, restart your PC and check for issues
How to fix component store issues with DISM:
- Run CMD with elevation rights
- Type
DISM/online/cleanup-image/scanhealthand press Enter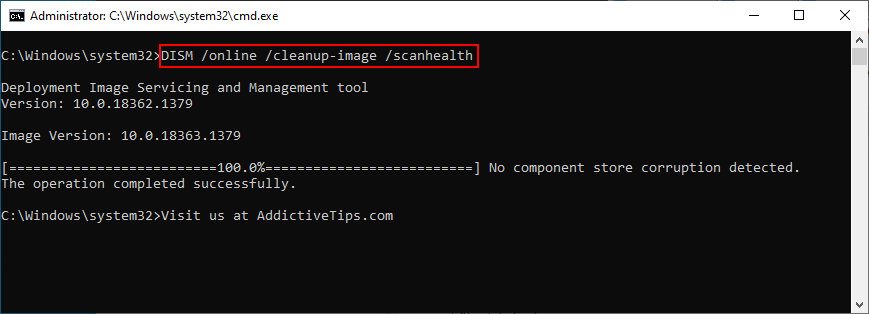
- If it finds any problems, fix them using
DISM/online/cleanup-image/restorehealth - Reboot your PC
- Launch CMD as admin again and run SFC
- Restart your PC one last time to check for stability issues
14. Remove new system updates
Many users report getting the Your PC ran into a problem and needs to restart, we’re just collecting some error info error message right after installing a new Windows update. It’s quite possible that the system update does not fully support Windows 10, resulting in crashes.
To fix this problem, you have to uninstall the most recent system update. Đây là cách thực hiện:
- Press the Windows key + R, type control panel, and press Enter
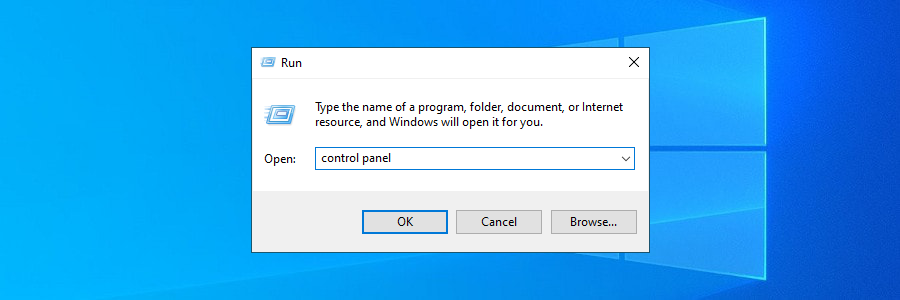
- Go to Programs and Features

- Click View installed updates on the top-left corner

- Click the Installed On column to sort the update (newest first)
- Right-click the first update in the list and select Uninstall
- Click Yes to confirm
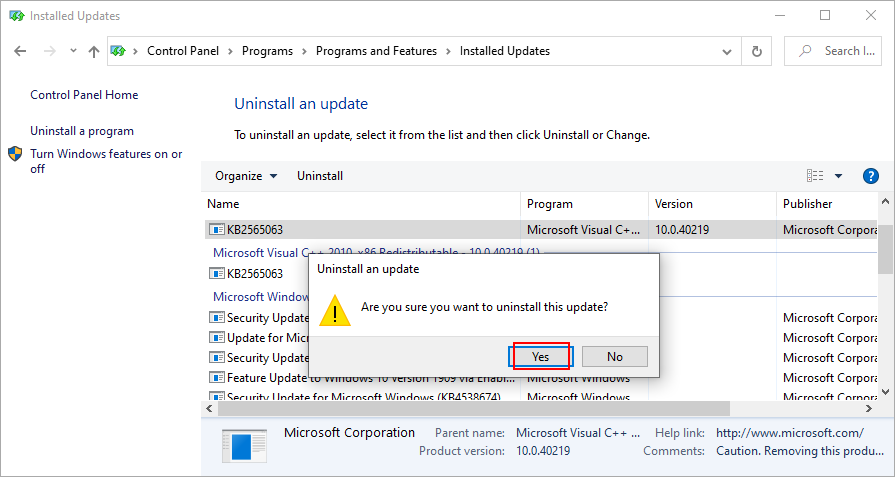
- Restart your PC to inspect results
15. Uninstall third-party applications
Some types of software are known to cause PC functionality problems due to their poor support for Windows 10 as well as the fact that they require access to sensitive parts of the system. It’s the case of several free antivirus and VPN tools, for example. You just have to get rid of them to restore your computer’s performance.
How to uninstall recent programs:
- Right-click the Start button and go to Apps and Features

- Click the menu next to Sort by and select Install date (newest first)
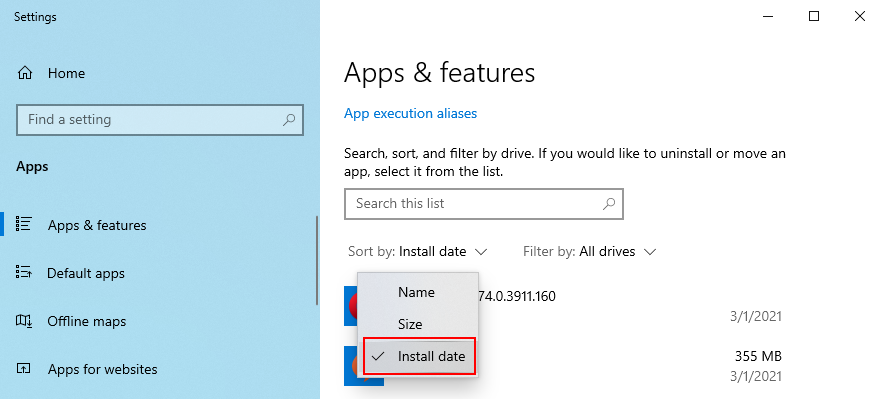
- Choose the first application in the list and click Uninstall
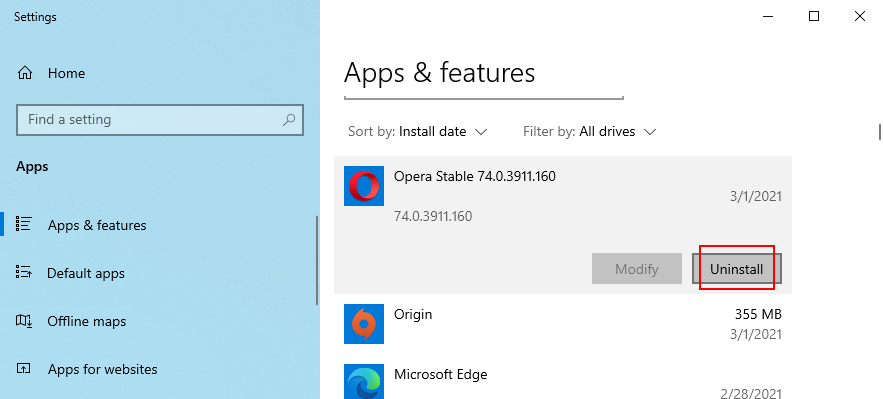
- Click Uninstall again to confirm its removal
- Once the app is removed, restart your PC to check for errors
This method won’t work for applications that have made significant changes to the system registry. However, you can turn to a program uninstaller, which is more thorough than the Windows default uninstaller because it also eliminates leftover files and registry entries.
16. Repair registry settings
If there are incorrect settings in the system registry, like an entry with a wrong value or a missing key, then you should expect system crashes and error messages like Your PC ran into a problem and needs to restart. However, it’s possible to apply some quick fixes from Command Prompt and without having to use an OS emergency disk.
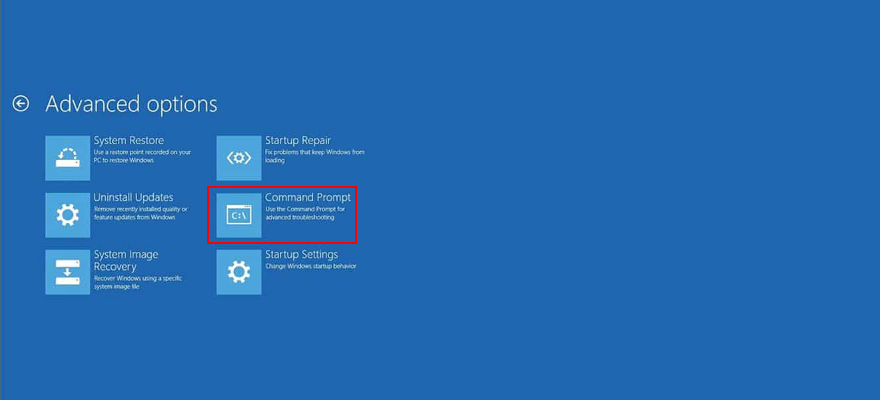
- Press the power button to open a menu
- Hold down Shift and press Restart to trigger Recovery mode
- Or, if you can’t boot Windows at all, interrupt the startup sequence three times to start Recovery mode
- Select Troubleshoot
- Go to Advanced
- Click Command Prompt
- Copy and paste the following lines (press Enter after each line):
-
cd c:\Windows\System32\config
-
ren c:\Windows\System32\config\DEFAULT DEFAULT.old
-
ren c:\Windows\System32\config\SAM SAM.old
-
ren c:\Windows\System32\config\SECURITY SECURITY.old
-
ren c:\Windows\System32\config\SOFTWARE SOFTWARE.old
-
ren c:\Windows\System32\config\SYSTEM SYSTEM.old
-
copy c:\Windows\System32\config\RegBack\DEFAULT c:\Windows\System32\config\
-
copy c:\Windows\System32\config\RegBack\DEFAULT c:\Windows\System32\config\
-
copy c:\Windows\System32\config\RegBack\SAM c:\Windows\System32\config\
-
copy c:\Windows\System32\config\RegBack\SECURITY c:\Windows\System32\config\
-
copy c:\Windows\System32\config\RegBack\SYSTEM c:\Windows\System32\config\
-
copy c:\Windows\System32\config\RegBack\SOFTWARE c:\Windows\System32\config\
-
- Reboot your PC and inspect results
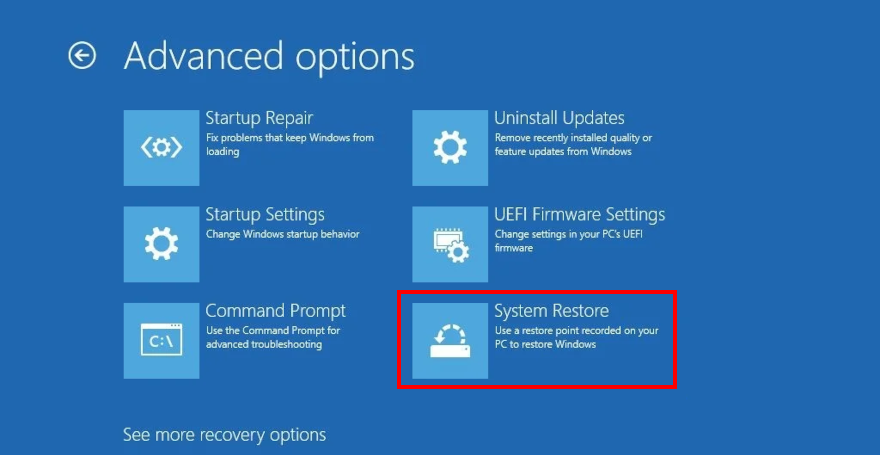
17. Use System Restore
Any software events that you can’t identify can be reversed by rolling back Windows 10 in System Restore more. But that means that you must have created a restore point before you started experiencing system stability problems that lead to the Your PC ran into a problem and needs to restart error message.
How to use System Restore:
- Press Win key + R, type control panel, and press Enter
- Click Recovery
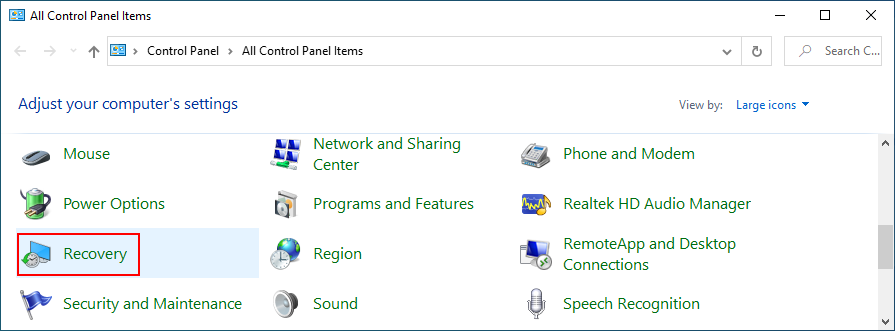
- Click Open System Restore (you need administrator rights)

- Choose a restore point. You can click Scan for affected programs to learn more about the changes
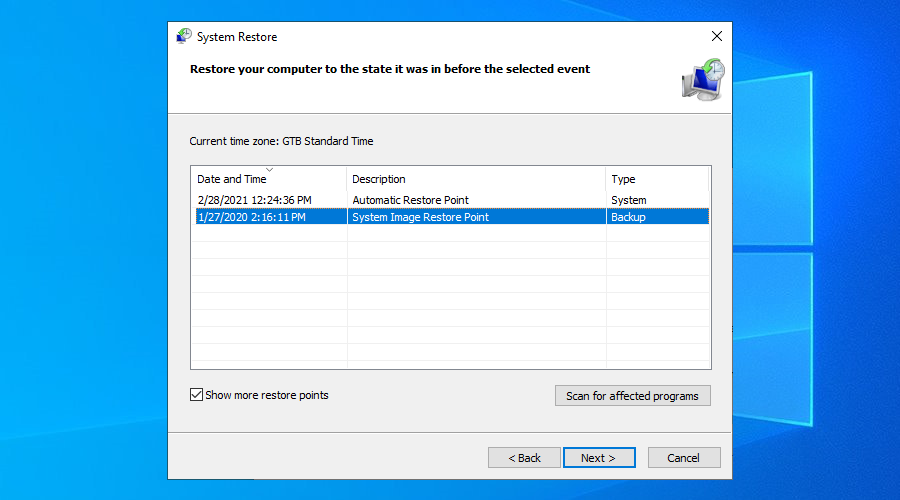
- Click Next and follow the steps
- Restart your PC and check for errors
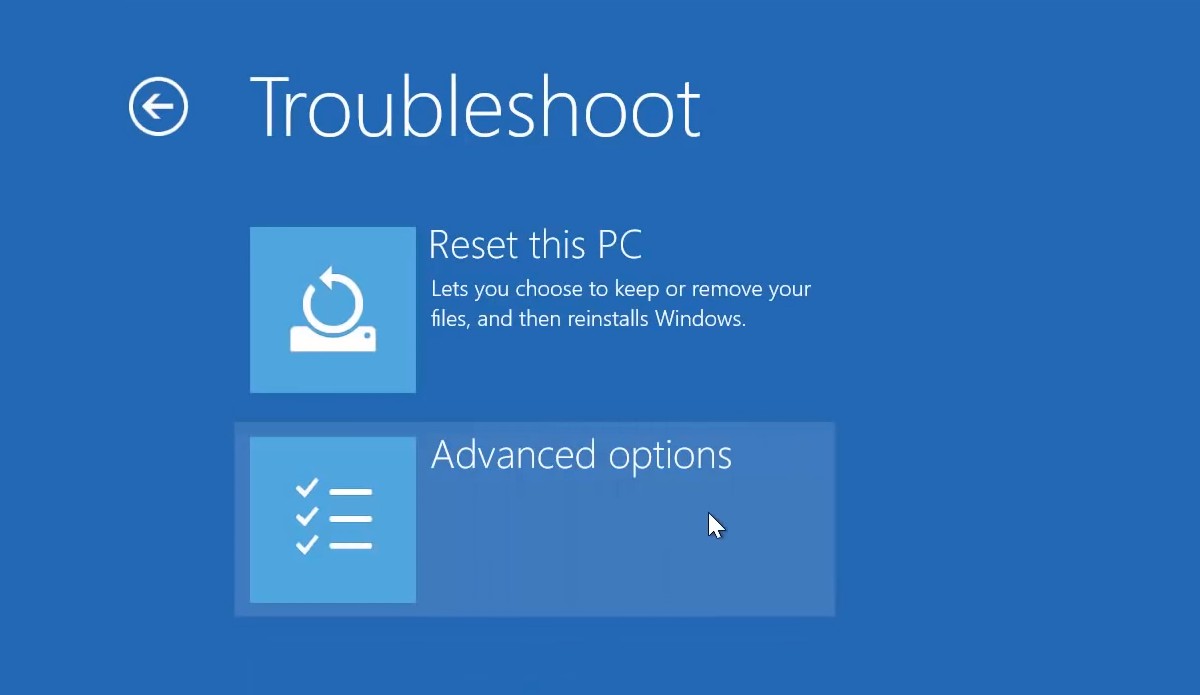
If you can’t boot Windows, interrupt the startup sequence three times to start Recovery mode. Then, go to Troubleshoot > Advanced options to access System Restore.
18. Reset Windows 10
Resetting your OS to factory values is among the last solutions you should try when you can’t get rid of the Your PC ran into a problem and needs to restart error message. You will keep your personal files, but all applications will be removed, so you will have to reinstall everything afterward.
How to reset Windows 10 without boot:
- Interrupt the Windows boot three times to enter Recovery mode
- Click Troubleshoot
- Select Reset this PC
- Click Keep my files
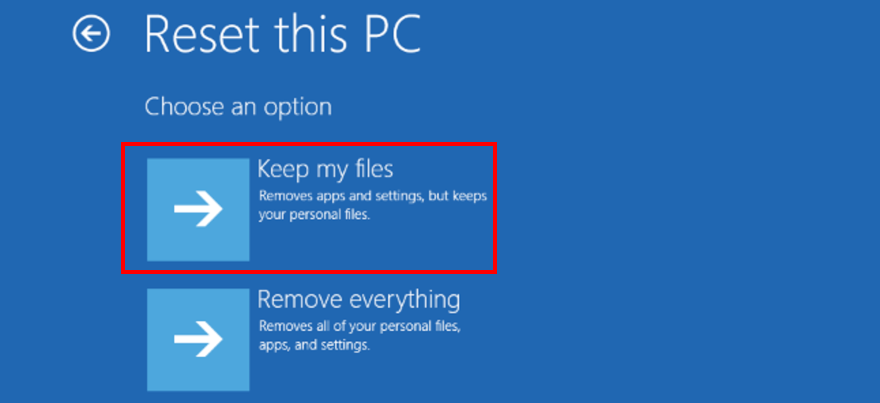
- Follow the on-screen instructions
19. Run System Image Recovery
If all solutions failed until this point, it’s time to create and use OS recovery media with the help of the System Image Recovery tool. Note that it means losing all applications and files, so it’s a good idea to back up everything important to you before proceeding with this solution.
How to create OS recovery media:
- Get an empty USB pen drive with 16 Gb minimum storage capacity
- Plug the pen drive into your PC
- Press the Windows key, type Create a recovery drive and hit Enter
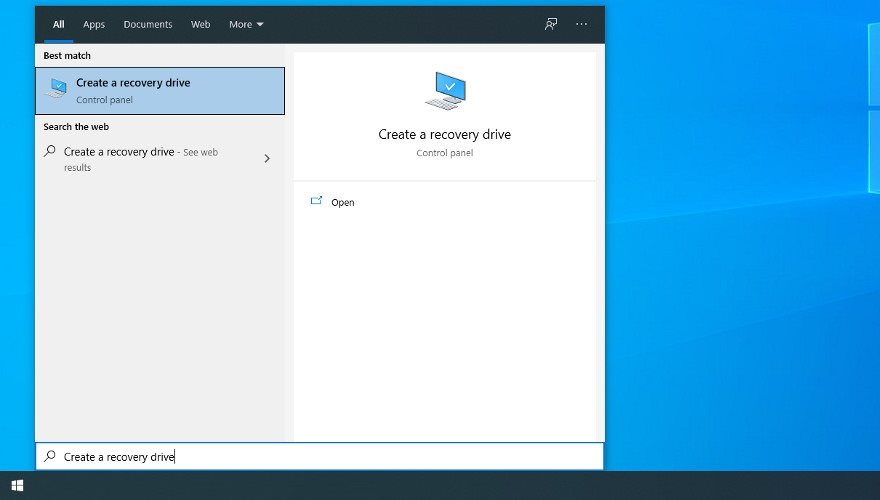
- Specify your admin password if prompted for authorization
- Select Back up system files to the recovery drive and click Next
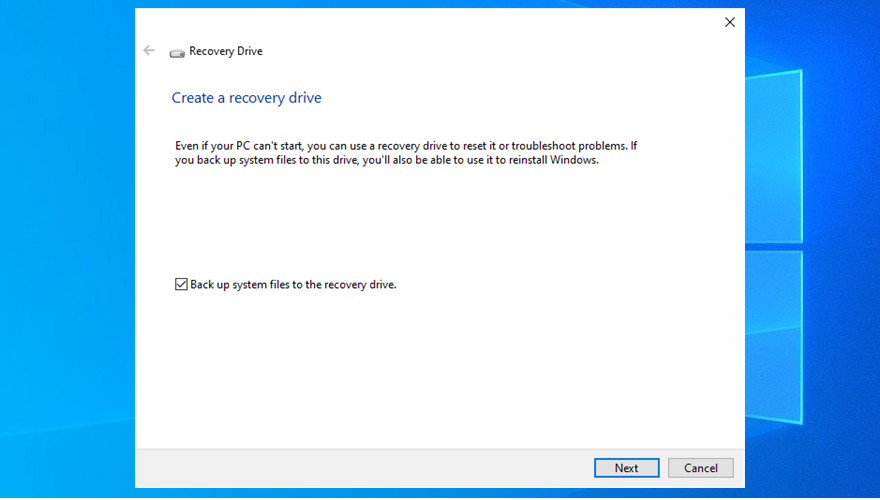
- Select the empty USB drive from the list
- Click Next and then Create
- Patiently wait while Windows creates your recovery media drive
How to use OS recovery media:
- With the USB flash drive still plugged into your computer, restart Windows
- Interrupt the boot sequence three times to trigger Recovery mode
- Go to Troubleshoot and select Advanced Options
- Click System Image Recovery and proceed with the given steps
Conclusion
To review, the Your PC ran into a problem and needs to restart error message is shown on the screen when your display turns blue and your operating system is trying to protect itself from data loss and corruption. It can be caused by various events at the software or hardware level.
However, you can try to repair this error by starting Windows in Safe Mode, running a clean boot, using Windows Update, investigating the system log, checking the device drivers and disk space, or unplugging new gear.
It’s also a good idea to scan your computer for malware infections, check the system memory, disable overclocking tools, reset BIOS to default, update BIOS, repair disk and system errors, and remove new system updates that may not be compatible with your PC.
In addition, you can uninstall third-party applications, repair registry settings, use System Restore, reset Windows 10, and run System Image Recovery.
What solutions did you use to get rid of the Your PC ran into a problem and needs to restart error? Did we miss any important steps? Let us know in the comment area below.