Các sự cố máy tính chắc chắn sẽ xảy ra thỉnh thoảng, vì vậy bạn phải chuẩn bị hành động trong mọi tình huống. Ví dụ: nếu có không có âm thanh phát ra từ PC chạy Windows 10 của bạn , có thể do nhiều sự cố khác nhau, chẳng hạn như lỗi trình kết xuất âm thanh. Nhưng bạn không cần phải lo lắng vì bạn có thể khắc phục sự cố này bằng cách làm theo các hướng dẫn bên dưới.
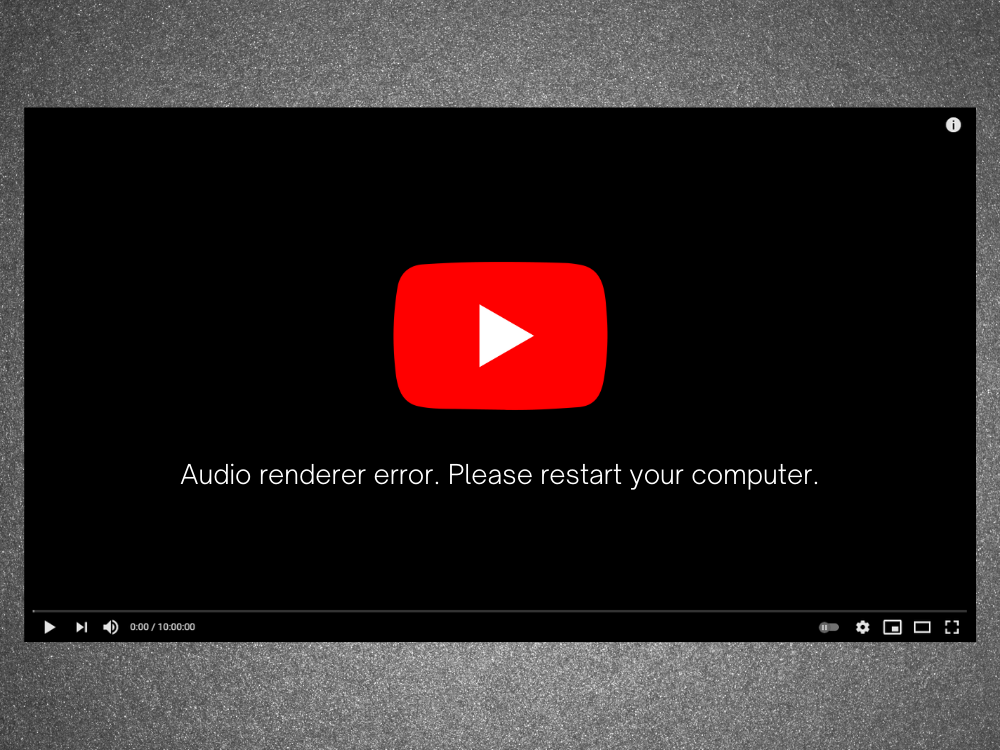
Lỗi trình kết xuất âm thanh: Vui lòng khởi động lại máy tính của bạn!
Lỗi trình kết xuất âm thanh, vui lòng khởi động lại máy tính của bạn là thông báo lỗi xuất hiện trên màn hình khi máy tính của bạn không thể phát các bản âm thanh. Nó có thể xảy ra ở bất cứ đâu, cho dù bạn đang cố gắng xem một video trên YouTube hay một bộ phim trong trình phát đa phương tiện của mình.
Hành vi thật kỳ lạ. Đôi khi, âm thanh được phát mà không gặp bất kỳ sự cố nào cho đến khi lỗi đột ngột xảy ra và vô hiệu hóa tất cả âm thanh phát ra từ máy tính của bạn. Nó vui lòng yêu cầu bạn khởi động lại máy tính của mình, điều này dường như giải quyết được vấn đề.
Tuy nhiên, khởi động lại PC chỉ là một giải pháp tạm thời vì cuối cùng lỗi lại xuất hiện. Tại thời điểm đó, bạn buộc phải nhập một vòng lặp khởi động lại máy tính chỉ để giữ cho âm thanh tiếp tục. Có thể dễ dàng hiểu tại sao nó lại khiến người dùng khó chịu như vậy, đặc biệt là khi gốc rễ của vấn đề không rõ ràng.
Chúng tôi đã kiểm tra sự cố này, trò chuyện với nhiều người dùng khác nhau và thu thập danh sách các giải pháp khả thi để giải quyết lỗi trình kết xuất âm thanh trên hầu hết các PC chạy Windows 10.
Cách khắc phục lỗi trình kết xuất âm thanh trên Windows 10
Lỗi kết xuất âm thanh có thể do sự cố với trình duyệt web hoặc cài đặt máy tính của bạn. Điều quan trọng là phải trang bị cho mình sự kiên nhẫn vì có thể mất một lúc cho đến khi bạn cạn kiệt tất cả các lựa chọn.
Trước khi bắt đầu khắc phục sự cố khó chịu này, bạn nên thiết lập điểm khôi phục hệ thống . Nó cho phép bạn hoàn nguyên Windows 10 về trạng thái ổn định trong trường hợp bạn gặp nhiều sự cố hơn trong quá trình thực hiện.
1. Xóa bộ nhớ cache duyệt web
Nhiều người dùng báo cáo gặp lỗi trình kết xuất âm thanh trên YouTube. Nó có thể do sự cố trình duyệt, chẳng hạn như bộ nhớ cache và cookie đã lưu. Một cách đơn giản để khắc phục nó là làm mới trình duyệt web của bạn . Để thực hiện điều này, chỉ cần chọn tab YouTube và nhấn Ctrl + Shift + R . Sau đó, hãy kiểm tra xem bạn có còn gặp lỗi không.
Tuy nhiên, đây chỉ là một bản sửa lỗi tạm thời vì bạn vẫn phải xóa bộ nhớ cache của trình duyệt theo cách truyền thống.
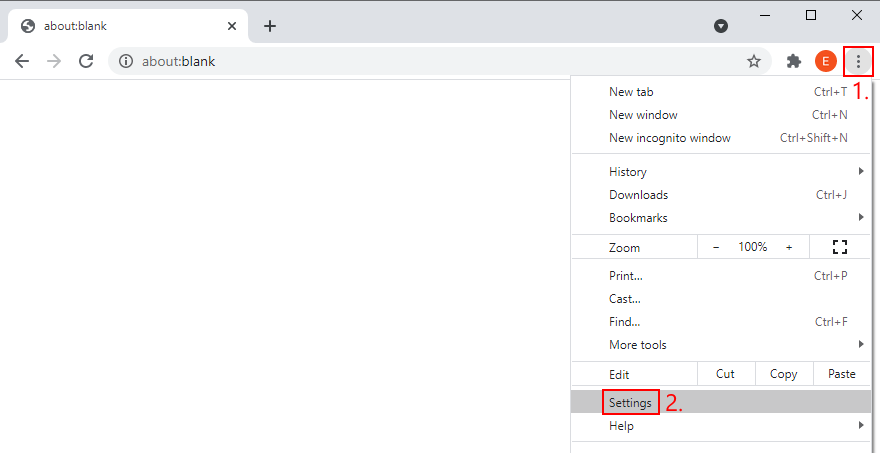
Cách xóa bộ nhớ cache của Chrome:
- Khởi chạy Chrome và mở trình đơn Thêm ở góc trên cùng bên phải
- Đi tới Cài đặt
- Chuyển đến Quyền riêng tư và bảo mật ở bên trái
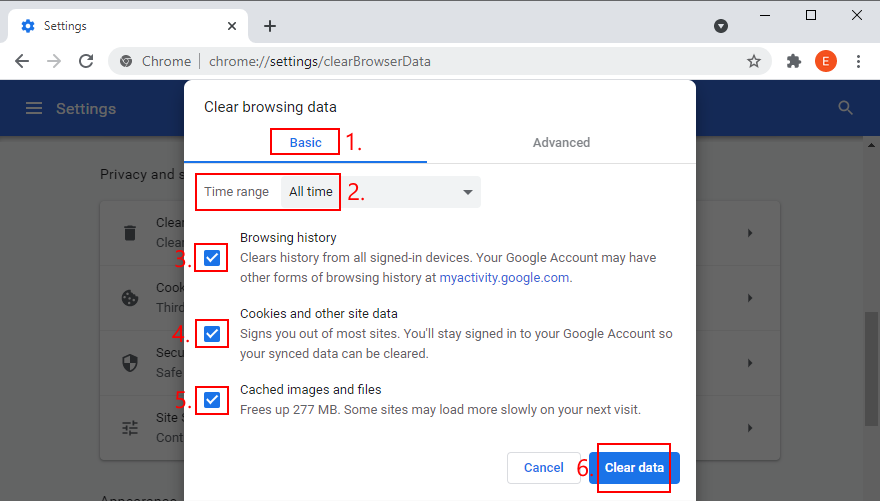
- Nhấp vào Xóa dữ liệu duyệt web . Ngoài ra, bạn có thể nhập địa chỉ
chrome://settings/clearBrowserData
- Vẫn ở trong phần Cơ bản
- Đặt Phạm vi thời gian thành Mọi lúc
- Đảm bảo rằng các tùy chọn sau được bật:
- Lịch sử duyệt web
- Cookie và các dữ liệu trang web khác
- Tệp và hình ảnh được lưu trong bộ nhớ cache
- Nhấp vào Xóa dữ liệu
- Khởi động lại Chrome và thử xem YouTube ngay bây giờ
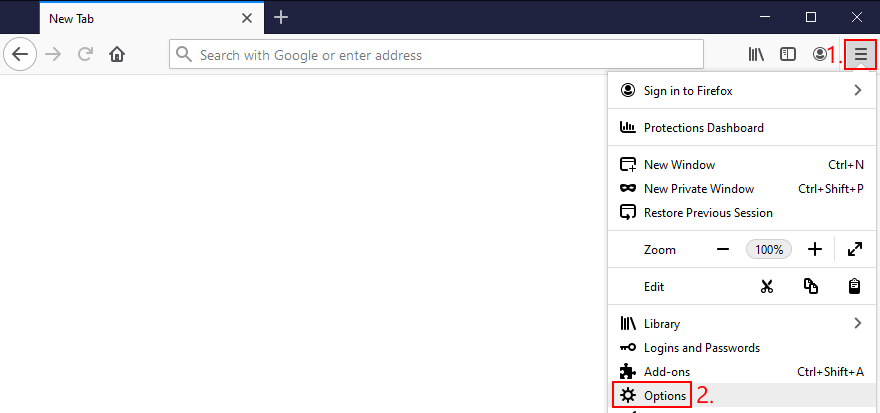
Cách xóa bộ nhớ cache của Firefox:
- Mở Firefox và nhấp vào nút ≡ hamburger
- Chọn Tùy chọn
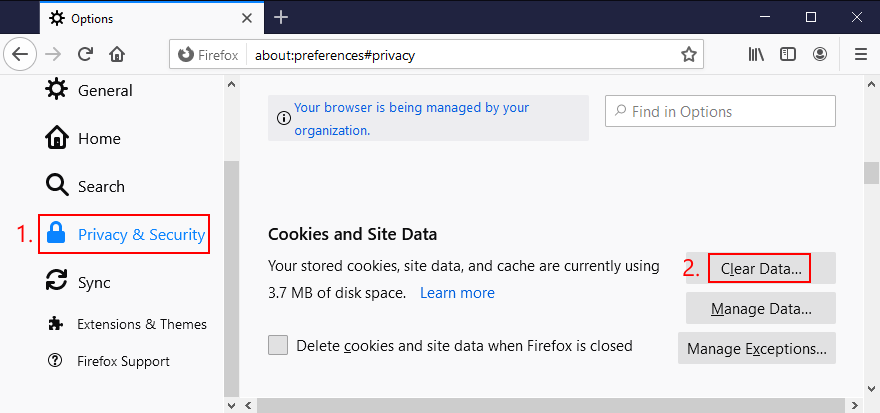
- Chuyển đến Quyền riêng tư & Bảo mật và nhấp vào Xóa dữ liệu

- Kiểm tra xem các cài đặt tiếp theo đã được chọn chưa:
- Cookie và Dữ liệu Trang web
- Nội dung Web được Lưu trong Bộ nhớ cache
- Nhấp vào Xóa
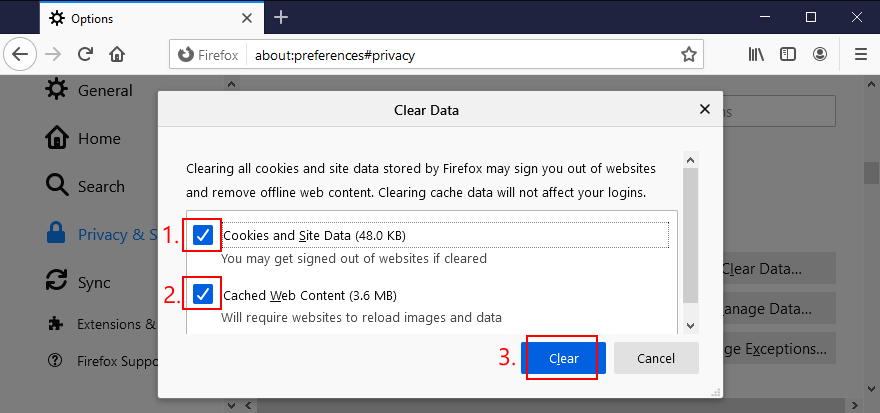
- Khởi chạy lại Firefox và kiểm tra lỗi âm thanh
Cách xóa bộ nhớ cache của Microsoft Edge:
- Khởi động Microsoft Edge
- Nhấp vào nút Thêm ở góc trên bên phải

- Chọn Cài đặt
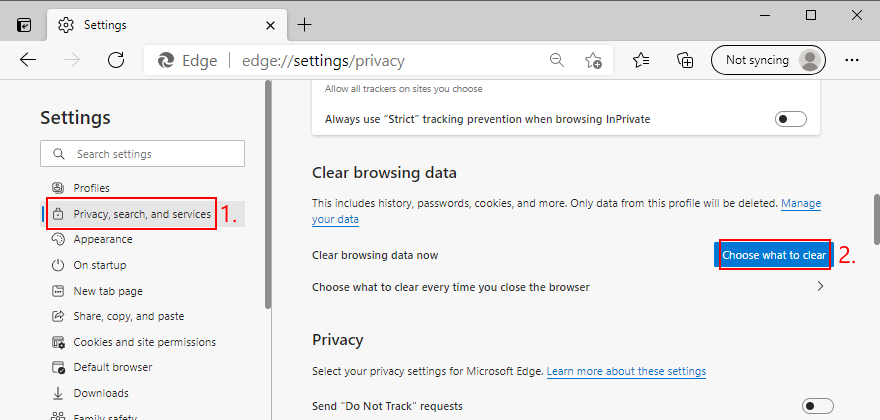
- Chuyển đến Bảo mật, tìm kiếm và dịch vụ . Ngoài ra, bạn có thể sử dụng địa chỉ
edge://settings/privacy - Tại Xóa dữ liệu duyệt web ngay bây giờ , nhấp vào Chọn nội dung cần xóa
- Đặt Phạm vi thời gian thành Mọi lúc
- Đánh dấu vào các hộp của các tuỳ chọn sau:
- Lịch sử duyệt web
- Lịch sử tải xuống
- Cookie và các dữ liệu trang web khác
- Tệp và hình ảnh được lưu trong bộ nhớ cache
- Nhấp vào Xóa ngay bây giờ
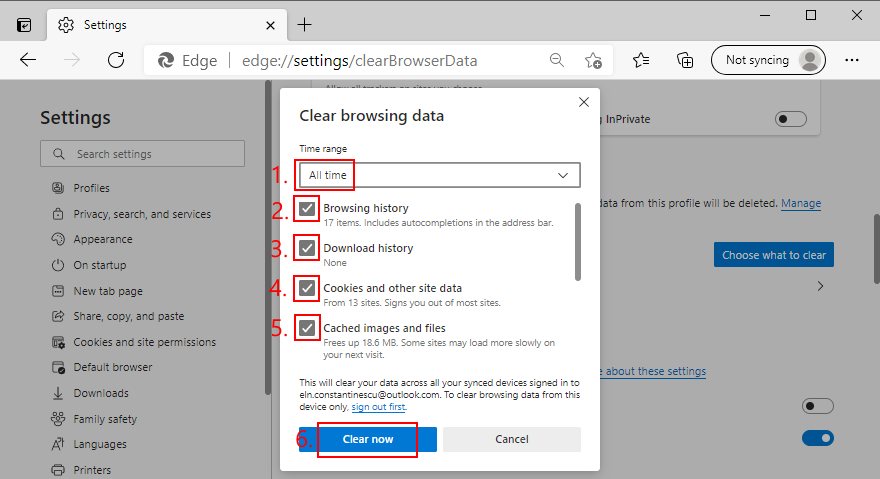
- Khởi động lại Edge và cố gắng thưởng thức YouTube mà không gặp sự cố âm thanh

2. Chạy trình gỡ rối âm thanh
Windows 10 đi kèm với trình khắc phục sự cố tích hợp để khắc phục các sự cố âm thanh thường gặp. Thật đáng thử nếu bạn cảm thấy mệt mỏi với việc xử lý lỗi trình kết xuất âm thanh.
- Nhấp chuột phải vào nút Bắt đầu của Windows 10 và đi tới Cài đặt
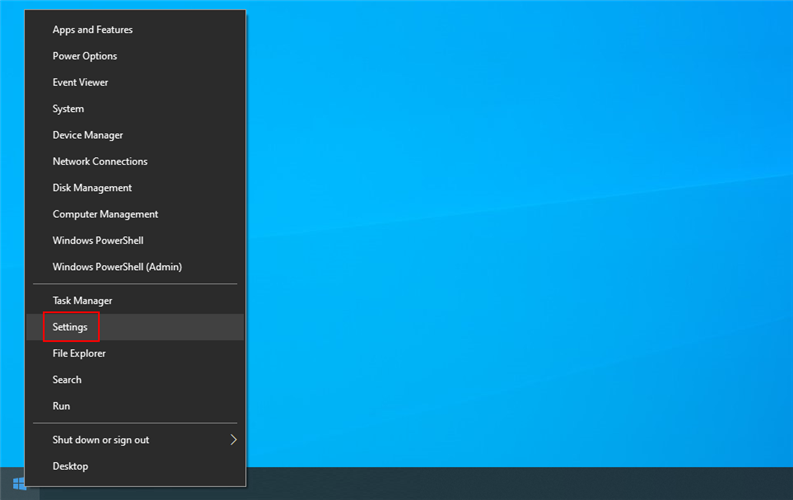
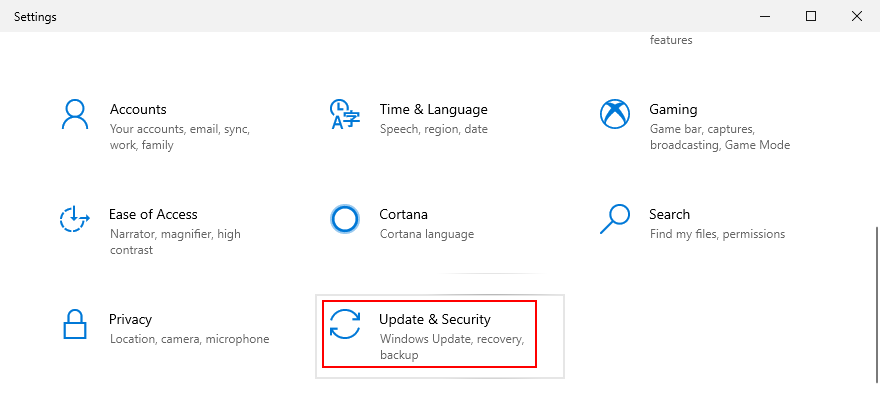
- Chọn Cập nhật & Bảo mật

- Chuyển đến Khắc phục sự cố ở phía bên trái
- Nhấp vào Trình gỡ rối bổ sung

- Chọn Phát âm thanh và nhấp vào Chạy trình khắc phục sự cố

- Làm theo hướng dẫn trên màn hình
- Kiểm tra lỗi âm thanh

3. Bật thiết bị âm thanh
Nếu bạn đã kết nối nhiều thiết bị âm thanh vào máy tính của mình, bạn có thể đã vô tình làm sai cài đặt thiết bị âm thanh và tắt bộ điều hợp âm thanh chính. Dưới đây là cách bật lại nó:
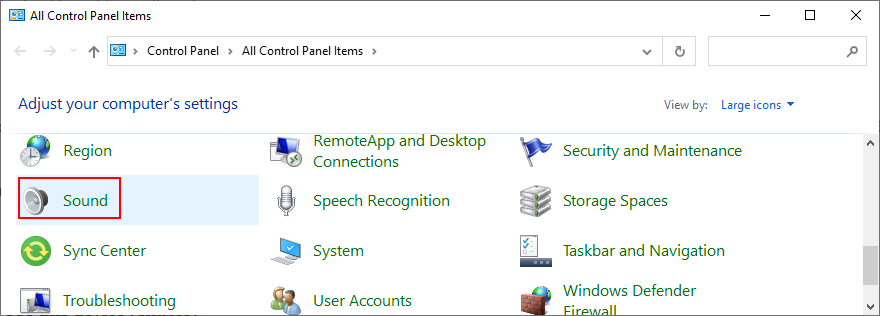
- Nhấp vào nút Bắt đầu , nhập Bảng điều khiển và mở ứng dụng này
- Đi tới phần Âm thanh
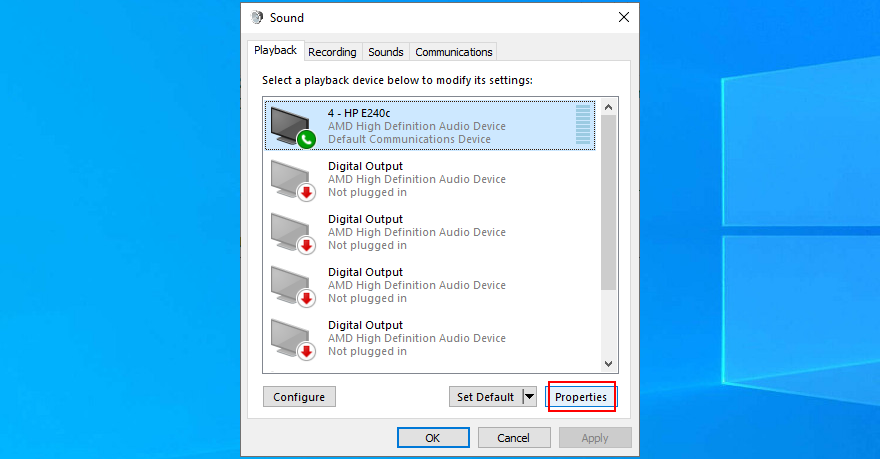
- Chuyển sang tab Phát lại
- Chọn thiết bị âm thanh của bạn từ danh sách
- Nhấp vào Thuộc tính
- Trong tab Chung , đặt Sử dụng thiết bị thành Sử dụng thiết bị này (bật)

- Nhấp vào Áp dụng và thoát
- Kiểm tra các sự cố âm thanh ngay bây giờ
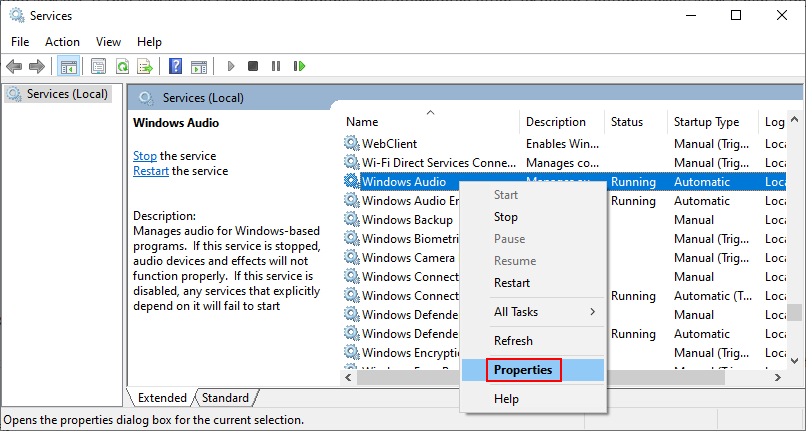
4. Khởi động lại dịch vụ Windows Audio
Tất cả âm thanh phát ra từ máy tính của bạn đều do dịch vụ nền vận hành. Nếu dịch vụ đó hiện không chạy, thường xuyên bị gián đoạn hoặc không tự động khởi động khi Windows khởi động, thì bạn có thể gặp các vấn đề như lỗi trình kết xuất âm thanh.
Nhưng bạn có thể khắc phục sự cố này bằng cách khởi động lại dịch vụ Windows Audio. Đây là cách thực hiện:
- Nhấn phím Windows , nhập Dịch vụ và mở ứng dụng này
- Tìm và nhấp chuột phải vào Windows Audio
- Đi tới Thuộc tính
- Vẫn ở trong tab Chung
- Đặt Kiểu khởi động thành Tự động
- Nếu Trạng thái dịch vụ cho biết Đã dừng , hãy nhấp vào nút Bắt đầu
- Nhấp vào Áp dụng và thoát khỏi

- Kiểm tra các vấn đề về âm thanh
5. Đồng bộ hóa tần số âm thanh (trình điều khiển ASIO)
Người dùng có trình điều khiển ASIO4ALL đã báo cáo xung đột với cài đặt âm thanh hệ thống. Cụ thể hơn, nếu tốc độ lấy mẫu không được đặt ở cùng một giá trị trong cả hai phần, máy tính sẽ bắt đầu gặp sự cố về âm thanh. Dưới đây là cách dễ dàng giải quyết vấn đề này:
- Nhấp vào nút Bắt đầu , nhập Bảng điều khiển và nhấn Nhập
- Chọn vùng Âm thanh
- Trong tab Phát lại , chọn thiết bị âm thanh của bạn và nhấp vào Thuộc tính
- Chuyển sang tab Nâng cao
- Ghi lại tốc độ mẫu được chỉ định tại Định dạng mặc định
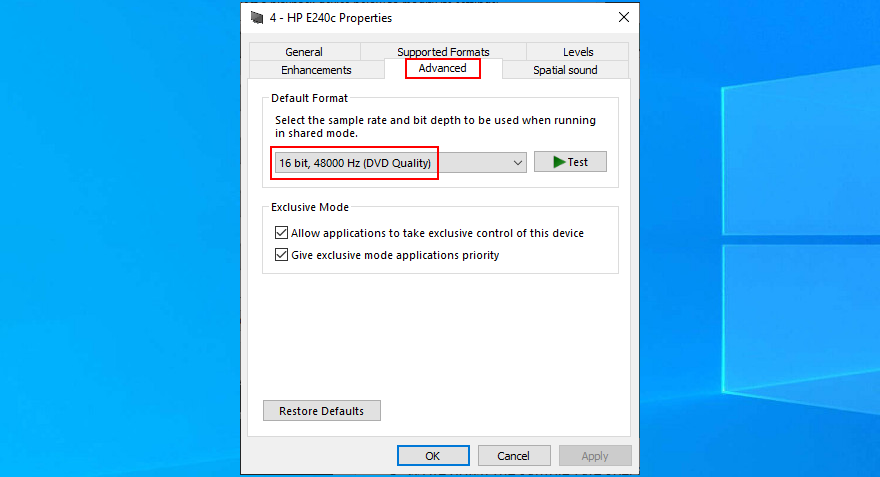
- Thoát khỏi khu vực này
- Mở tiện ích ASIO
- Chuyển sang tab Âm thanh
- Đặt Tốc độ mẫu thành cùng một giá trị như trong Windows
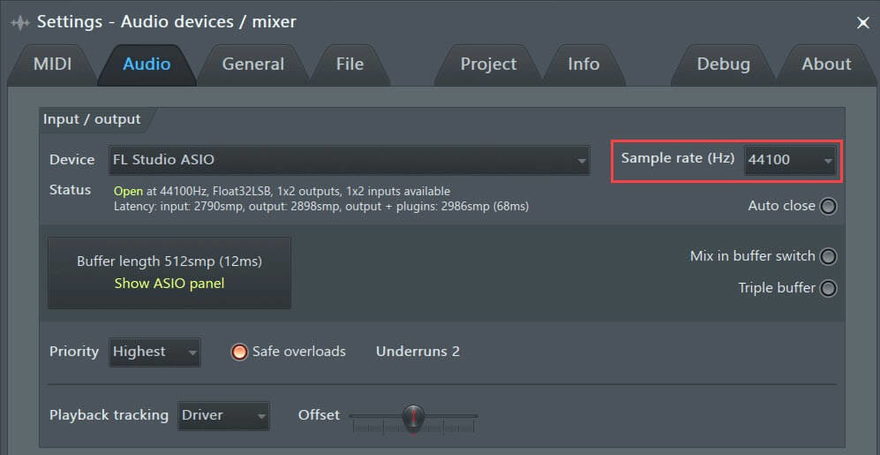
- Khởi động lại PC của bạn và kiểm tra kết quả
6. Chạy kiểm tra âm thanh (máy tính xách tay HP)
Người dùng HP có thể chuyển sang công cụ chẩn đoán âm thanh có tên là HP PC Hardware Diagnostics (UEFI). Dưới đây là cách sử dụng nó:
- Khởi động lại máy tính xách tay HP của bạn
- Trong khi khởi động lại, nhấn nhanh phím cấp cho bạn quyền truy cập vào HP PC Hardware Diagnostics (UEFI)
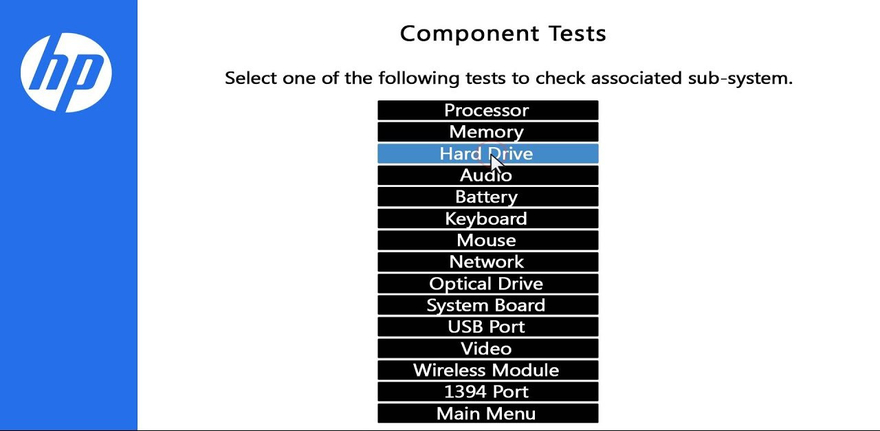
- Đi tới phần Âm thanh
- Nhấp vào Chạy một lần để bắt đầu đánh giá các thiết bị âm thanh của bạn
- Chọn Loa và làm theo hướng dẫn trên màn hình
- Hoàn thành bài kiểm tra và khởi động Windows
- Kiểm tra các vấn đề về âm thanh
Bạn cũng có thể tải xuống HP Audio Check từ trang web chính thức và sử dụng nó để chạy các thử nghiệm bổ sung.
7. Đặt thiết bị âm thanh mặc định
Windows đôi khi gặp sự cố khi xác định thiết bị âm thanh mặc định. Và đây cũng là lý do tại sao nó có thể hiển thị lỗi trình kết xuất âm thanh, cho dù bạn gặp lỗi trên YouTube hay bất kỳ nơi nào khác. Để khắc phục sự cố khó chịu này, bạn chỉ cần đặt lại thiết bị âm thanh yêu thích của mình làm mặc định. Đây là cách thực hiện:
- Nhấn phím Win , nhập Control Panel và mở ứng dụng này
- Nhấp vào Âm thanh
- Chọn thiết bị âm thanh của bạn từ tab Phát lại
- Nhấp vào Đặt mặc định
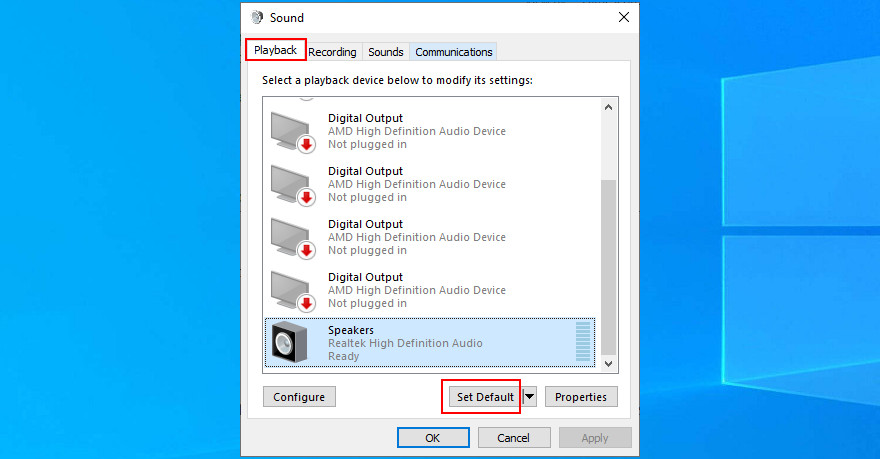
- Nếu nút Đặt mặc định chuyển sang màu xám, hãy chọn bất kỳ thiết bị nào khác để đặt nó làm mặc định, sau đó quay lại tùy chọn đầu tiên của bạn
- Nhấp vào Áp dụng và thoát khỏi khu vực này
- Kiểm tra các vấn đề về âm thanh
8. Cài đặt lại bộ điều hợp âm thanh
Bộ điều hợp âm thanh của bạn có thể không được kết nối đúng cách với máy tính của bạn. Tuy nhiên, bạn có thể dễ dàng cài đặt lại nó mà không gây hại cho PC của bạn trong quá trình này. Đây là những gì bạn cần làm:
- Nhấp chuột phải vào nút Bắt đầu và chọn Trình quản lý Thiết bị

- Mở rộng nhóm Đầu vào và đầu ra âm thanh
- Xác định thiết bị âm thanh chính của bạn, nhấp chuột phải vào thiết bị đó và chọn Gỡ cài đặt thiết bị

- Chọn bất kỳ mục nhập nào từ danh sách
- Mở trình đơn Hành động và nhấp vào Quét các thay đổi phần cứng
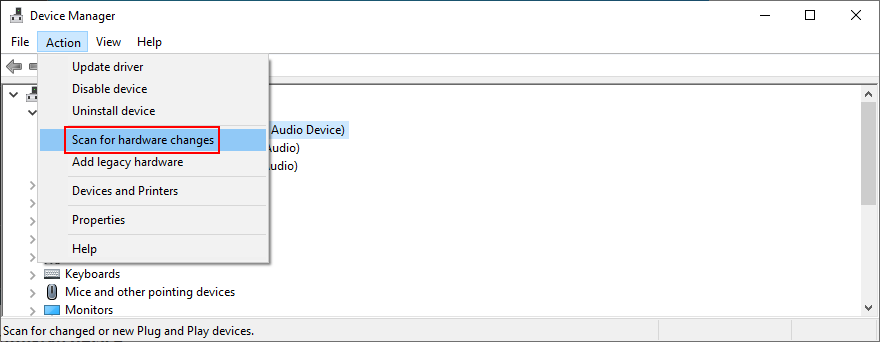
- Khởi động lại máy tính của bạn. Windows will auto-reinstall the missing audio driver
- Check for sound problems

9. Update the audio driver
Even if your sound adapter is correctly installed, perhaps it’s equipped with an obsolete driver that’s no longer supported by Windows 10. It would certainly explain the audio renderer error. However, you can easily update the audio driver:
- Click the Start button, type Device Manager, and press Enter
- Expand the Audio inputs and outputs category
- Right-click your primary audio adapter and select Update driver
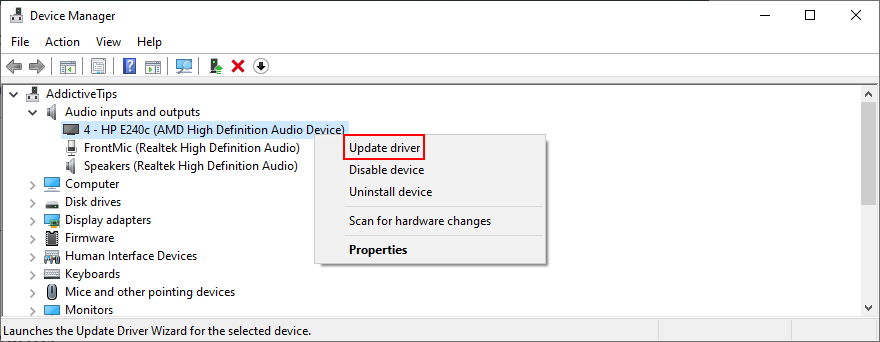
- Click Search automatically for updated driver software

- If you see the The best drivers for your device are already installed message, click Search for updated drivers on Windows Update
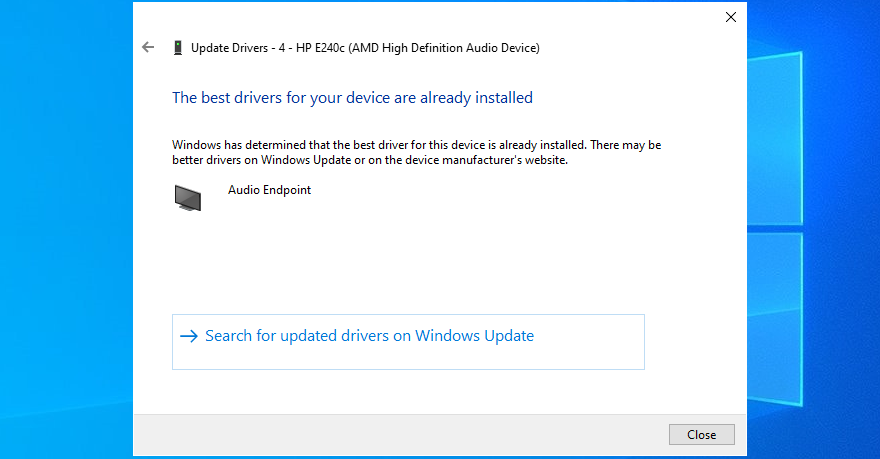
- Reboot your PC and check for additional audio issues
It’s possible that Microsoft fails to find a newer audio driver using Windows Update. In that case, you should head over to the manufacturer website of your sound adapter, then find, download, and install a newer driver that’s compatible with your OS configuration.
However, if you don’t want to go through that trouble as well as risk installing an incompatible driver that could cause more problems, we suggest opting for a driver updating software solution. You can use it to keep all your device drivers in check.
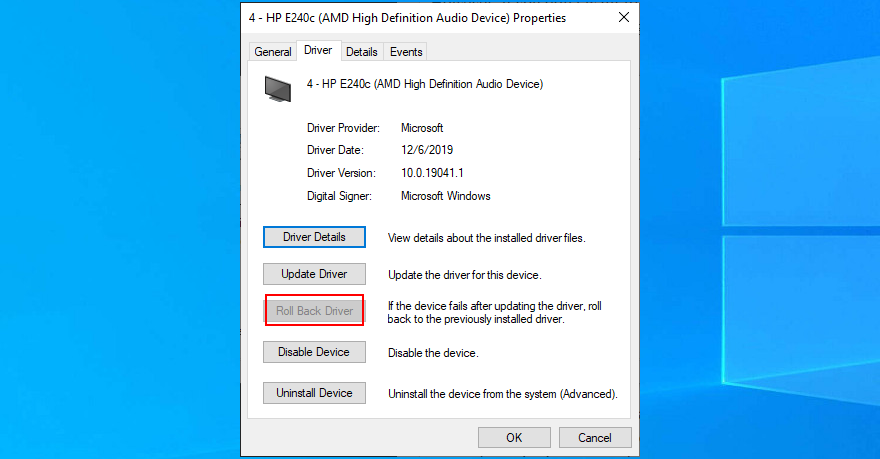
10. Roll back the audio driver
If you have recently updated your sound driver, perhaps you installed an incompatible version that’s throwing you the audio renderer error. To fix it, you should roll back to the previous driver version. Đây là cách thực hiện:
- Head over to Device Manager
- Right-click your audio device and go to Properties

- Select the Driver tab
- Click Roll Back Driver and follow the given instructions
- If the button is greyed out, it means that your operating system doesn’t have the previous driver version, so you can skip this solution
- Restart your computer and inspect results
11. Check the audio cable
It’s a good idea to check your audio cable to see if there’s anything wrong with it since hardware problems can cause audio renderer errors, too. If you have multiple audio inputs on your computer, try sticking the audio jack somewhere else in case you have malfunctioning jacks.
In fact, if you have several external playback devices plugged into your machine, it’s a good idea to remove the ones you’re not currently using. Furthermore, make sure that you didn’t accidentally swap the audio and microphone jacks in the process.
12. Disable audio mixing software
Certain audio mixing tools are not fully compatible with the Windows 10 sound drivers, resulting in conflicts and the audio renderer error message. As soon as you start an audio mixing tool and configure sound drivers, the application overrides the system settings, causing various problems.
To fix this problem, you just need to disable your audio mixing tools when trying to watch a movie offline or a clip on YouTube.
13. Update your web browser
If you’re getting the audio renderer error message on YouTube when trying to enjoy a video, it’s a good idea to update your web browser to the latest version.
How to update Google Chrome:
- Open the More menu on the top-right corner
- Visit the Help submenu and click About Google Chrome. Alternatively, you can visit the
chrome://settings/helpaddress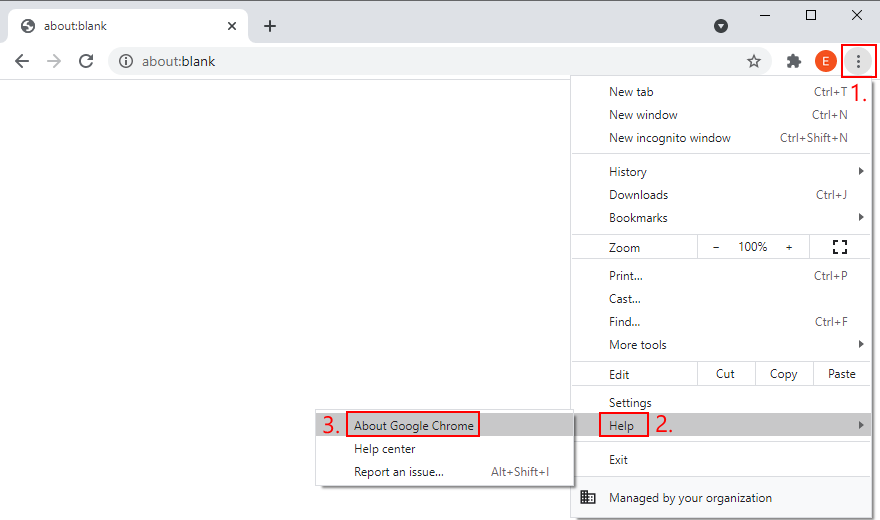
- Wait until Chrome downloads and installs any available updates
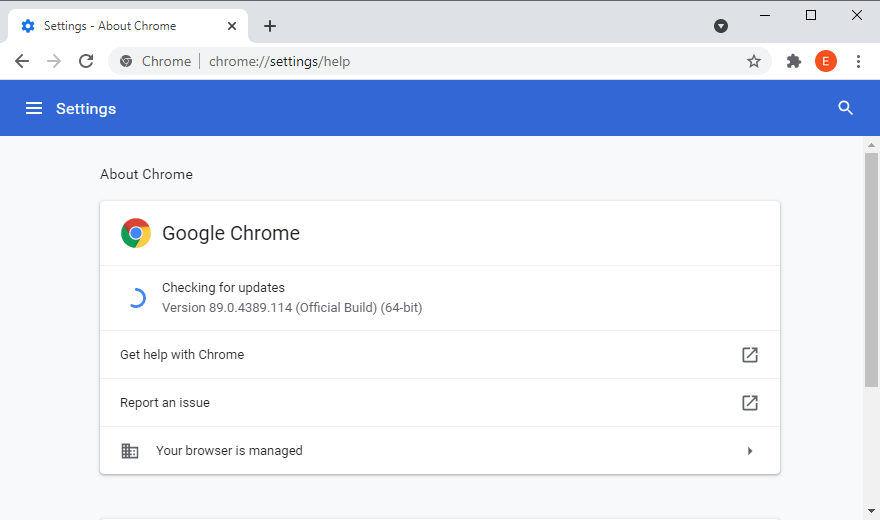
- Click Relaunch and try to watch YouTube
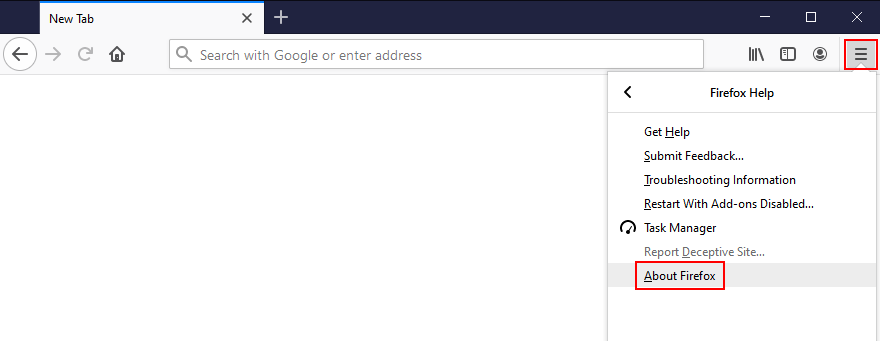
How to update Mozilla Firefox:
- Open the ≡ hamburger menu on the upper-right corner
- Select the Help section and click About Firefox
- If Firefox finds any updates, give it time to install them
- When it’s over, restart the web browser and check for audio issues
How to update Microsoft Edge:
- Click the More button on the top-right corner
- Go to the Help & feedback menu and click About Microsoft Edge
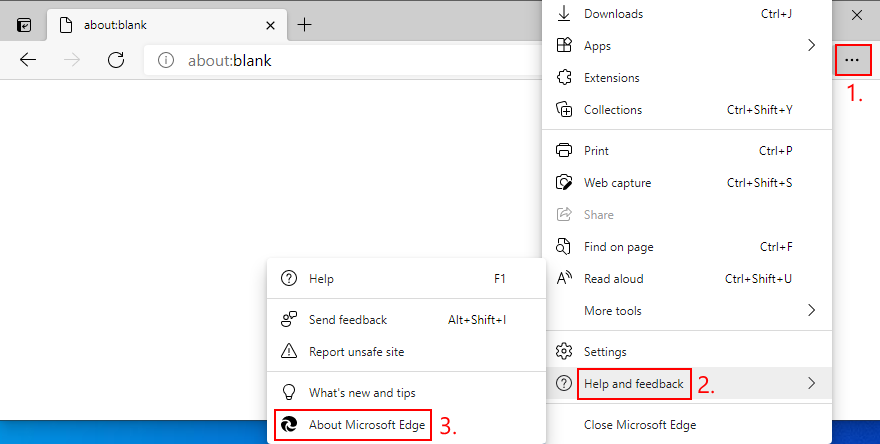
- Else, you can go to the
edge://settings/helpaddress - Wait until Edge finds and installs any updates
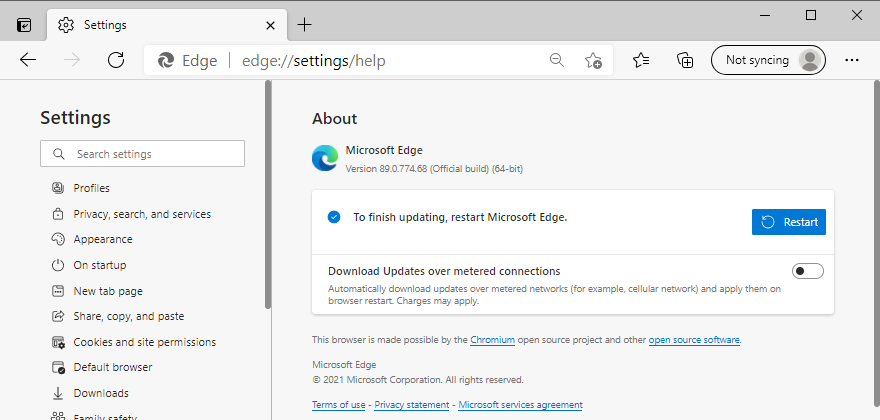
- Restart the browser and inspect results
14. Disable hardware acceleration
Modern web browsers take advantage of your computer’s hardware acceleration to improve the page loading speed and enhance your overall browsing experience. However, users report that it has interfered with the audio driver, causing rendering errors. To fix this issue, you have to turn off hardware acceleration for each browser.
How to disable hardware acceleration in Google Chrome:
- Open the More button and go to Settings
- Scroll down to the bottom of the page and click Advanced
- At System, turn off Use hardware acceleration when available
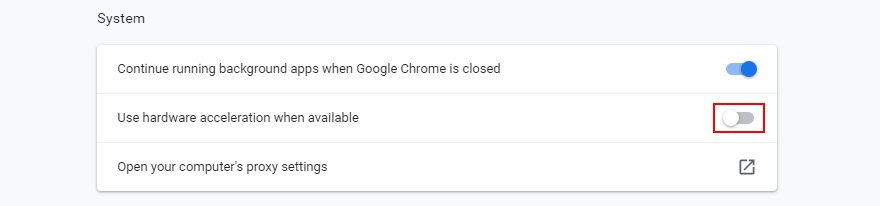
- Relaunch Chrome and check for audio errors
How to disable hardware acceleration in Mozilla Firefox:
- Click the ≡ hamburger button and go to Options (or visit the
about:preferencesaddress) - In the General tab, scroll down to Performance
- Uncheck Use recommended performance settings
- Also uncheck Use hardware acceleration when available
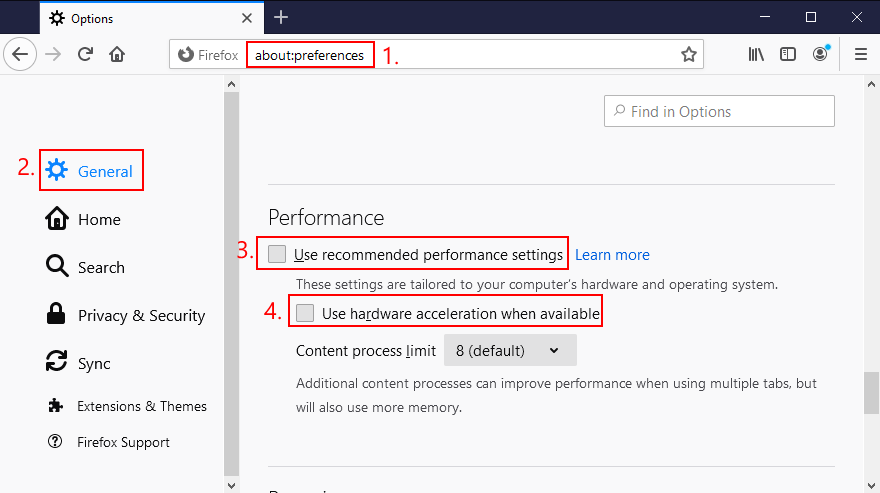
- Restart Firefox and check for audio errors
How to disable hardware acceleration in Microsoft Edge:
- Open the More menu and head over to Settings
- Jump to the System section on the left side (or visit
edge://settings/system) - Turn off Use hardware acceleration when available
- Click the Restart button
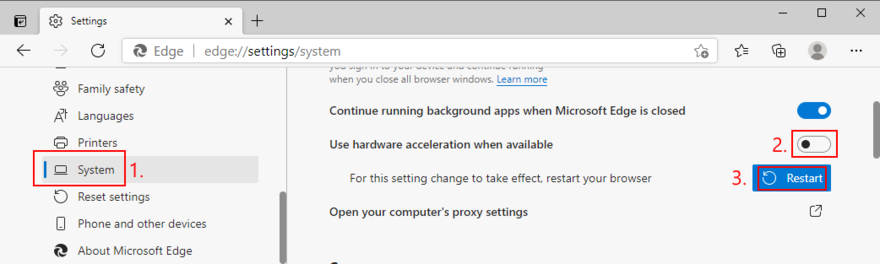
- Watch YouTube and check for audio errors
15. Disable your ad blocker
Many YouTube users who have encountered the audio renderer error said that they managed to fix this problem by deactivating the ad blocker built into the web browser. Otherwise, you should whitelist YouTube to make sure that video ads are permitted.
For example, if you’re using Adblock Plus, here’s how you can whitelist YouTube:
- Go to the Adblock Plus settings panel
- Jump to the Whitelisted websites area
- Type
youtube.comand click Add website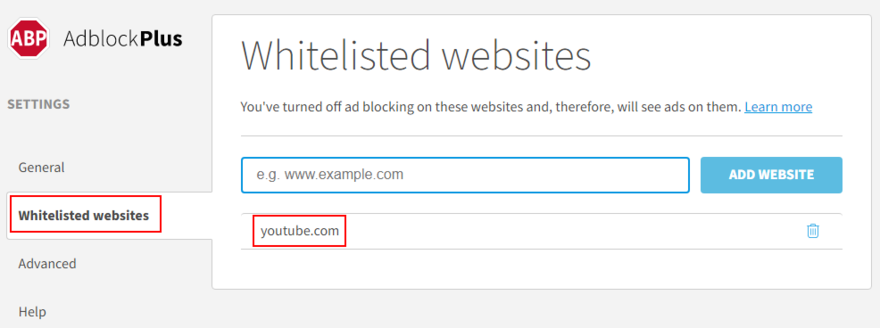
- Go to YouTube and check for audio rendering issues
16. Try using a different web browser
An unforeseen number of browser settings can interfere with multimedia features, so it’s a good idea to change your web browser. Switch to an application that has default settings. You can import your bookmarks and other website data, but make sure to leave the browser configuration untouched.
Then, head over to YouTube or the platform that throws the audio renderer error to test it out. If it works, you can stick to the new browser for audio and use your preferred application for everything else.
17. Update Windows 10
It’s essential to keep Windows 10 updated to the latest edition so that you can take advantage of the newest features, hotfixes, and security patches. If there’s a known problem with the audio, it will likely get fixed in the upcoming system update.
How to run Windows Update:
- Press the Win key, type Check for updates, and press Enter
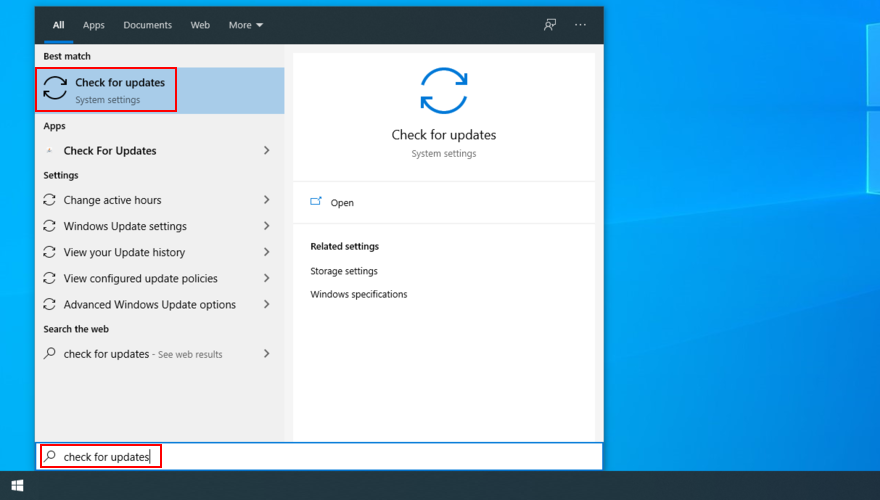
- Click Check for updates and wait
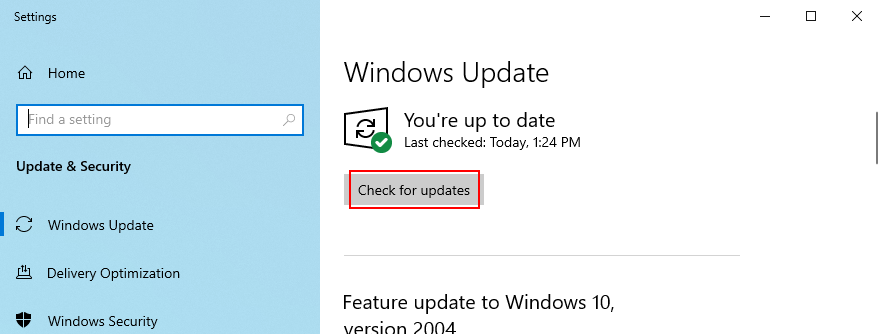
- If it finds any updates, click Download
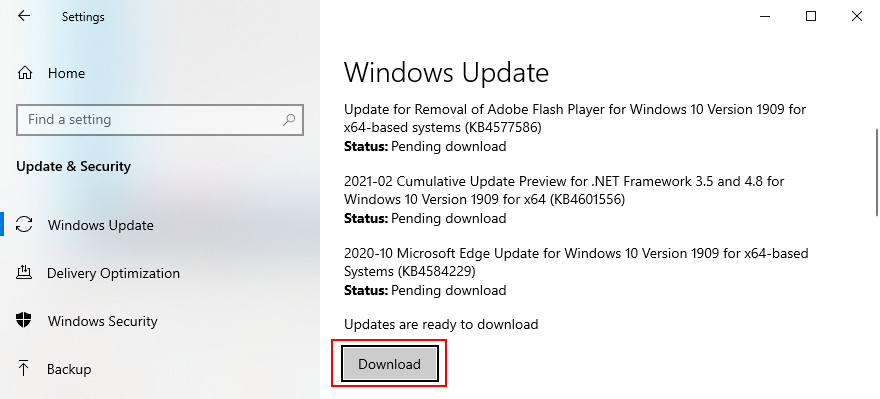
- Leave your PC unattended while it’s busy with updates. It might restart several times
- Check for audio rendering issues
18. Uninstall system updates
On the other hand, a recent Windows update may have compromised your entire operating system, causing various problems like the audio renderer error. When this happens, you have to uninstall the malfunctioning update. Đây là cách thực hiện:
- Press the Win key, type control panel, and hit Enter
- Go to Programs and Features

- Click View installed updates on the left side
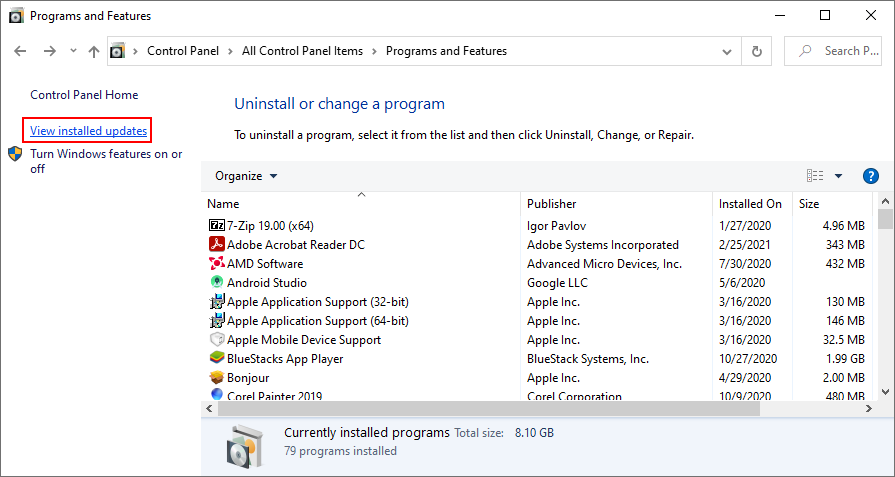
- Click the Installed On column to sort the updates (newest first)
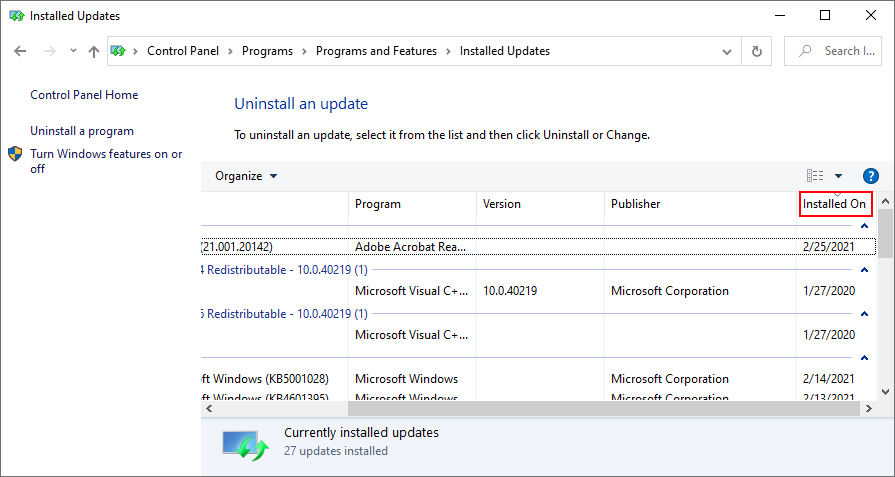
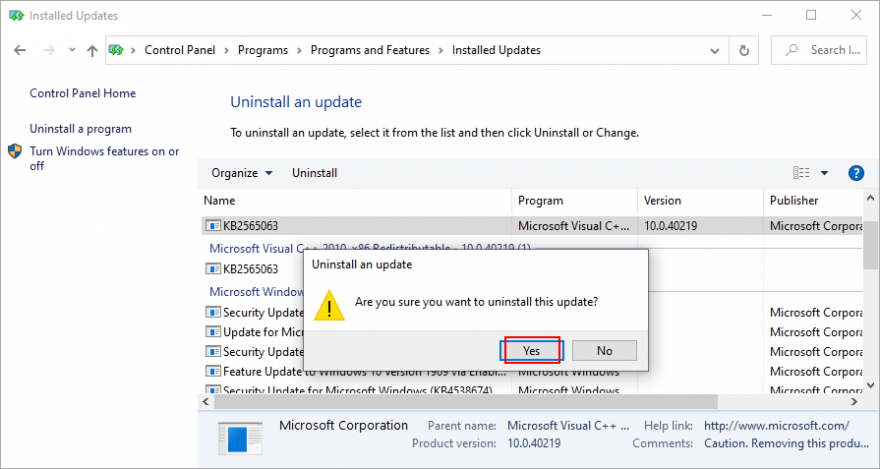
- Right-click the first update in the list and select Uninstall
- Click Yes to confirm
- Restart your PC and check for audio errors
19. Sign in with a different PC account
Windows 10 sometimes experiences issues due a lack of permissions caused by your account. To solve this problem, you can try signing in with a different profile. For example, if you’re currently logged in with the Microsoft account, switch to a local user account (or the other way around).
How to sign in with a Microsoft account:
- Right-click the Start button and select Settings
- Go to Accounts
- Click Login to your Microsoft account
- Enter your email address and password
- Click Verify to confirm your identity
- Log out of Windows 10
- Log back in using the Microsoft account
- Check for audio renderer errors
How to create a local user account:
- Right-click the Start button and go to Settings
- Select Accounts
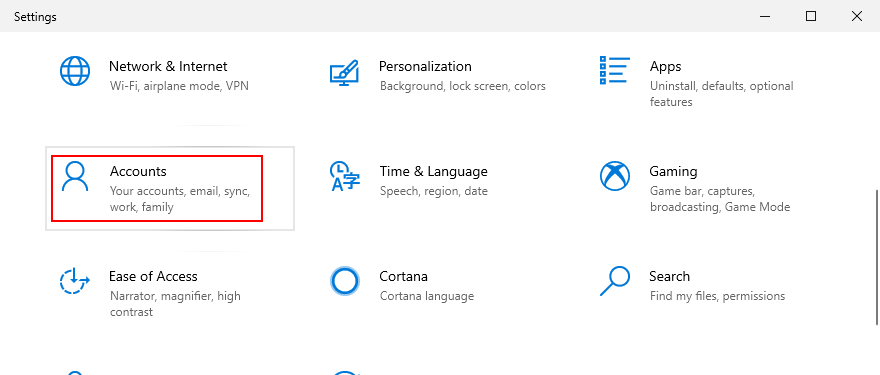
- Click Sign in with a local account instead
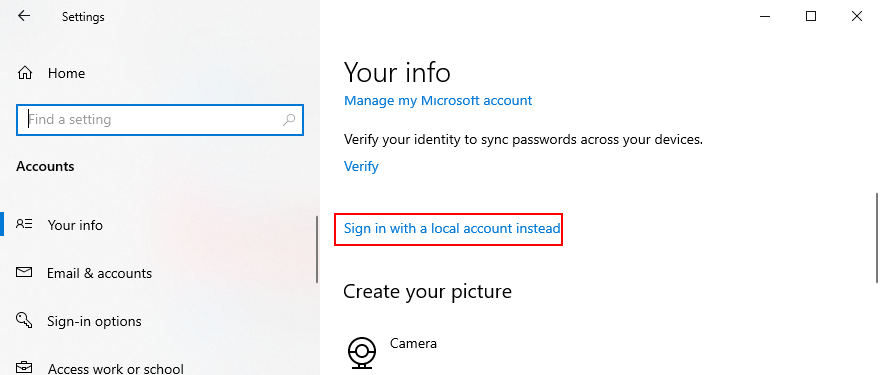
- Specify your computer password or PIN
- At Enter your local account info, set a new username and password
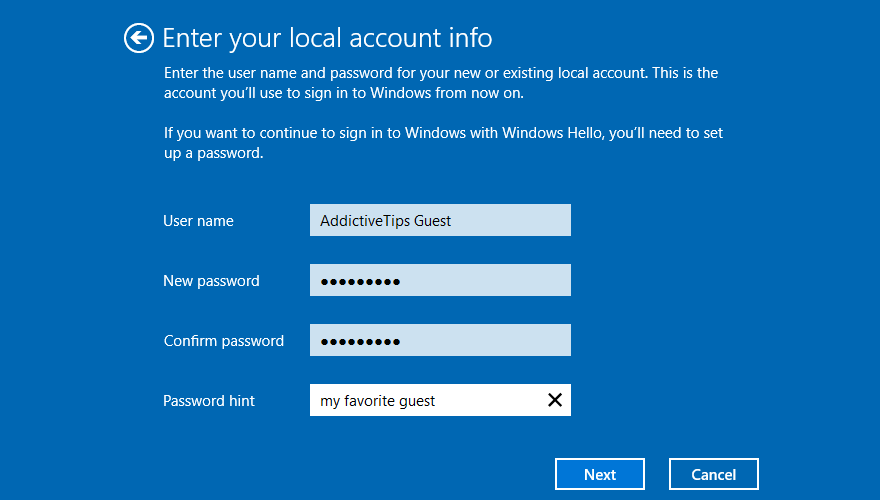
- Click Next and then Sign out and finish
- Log back in to Windows 10 using the new local account
- Check for audio issues
20. Reset BIOS
DELL users have reported that they were experiencing the audio renderer error due to incorrect BIOS settings. And they were able to solve it by restoring BIOS to default settings. Here’s how you can easily do that:
- Restart your computer
- During reboot, rapidly press the key displayed on the screen to access BIOS
- Locate and access the advanced BIOS options
- Enable the setting that resets BIOS configuration data
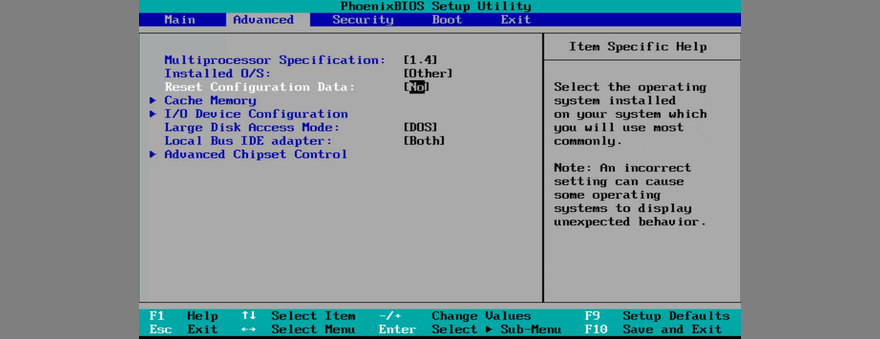
- Save the current BIOS settings and exit
- Wait until Windows boots, then check for audio issues
21. Update BIOS
Another way to deal with BIOS issues on DELL systems is by updating it to the latest version since an obsolete BIOS is known to cause system stability and even audio problems. Đây là cách thực hiện:
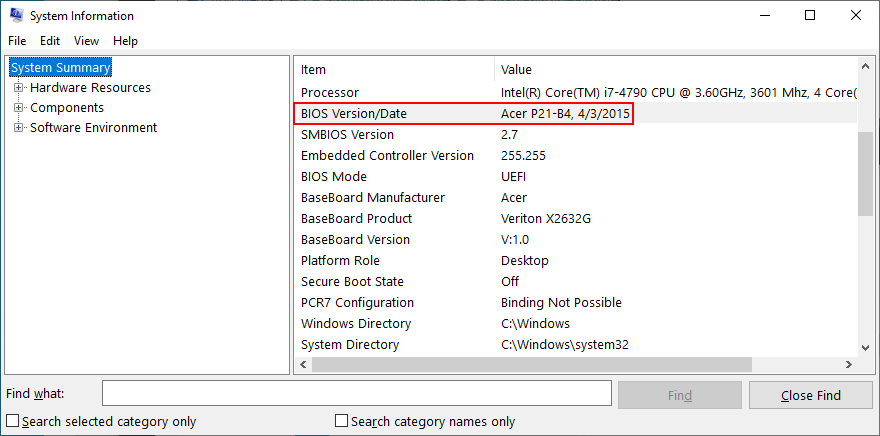
- Press the Win key, type System Information, and open this app
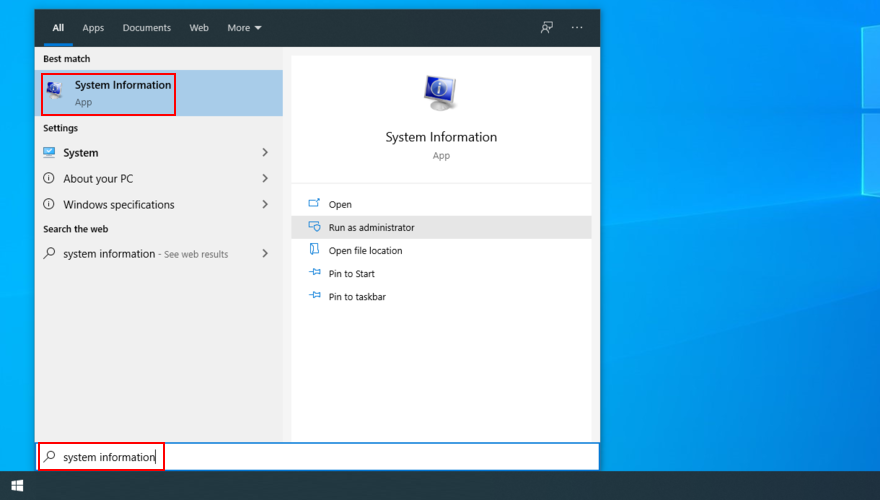
- Go to the System Summary section
- Write down the info displayed at BIOS Version/Date
- Go to the website of your BIOS manufacturer
- Find and download a newer BIOS version that’s compatible with your PC
- Unzip the BIOS setup file to a USB flash drive
- Restart your computer and access BIOS
- Back up the current BIOS version to the pen drive
- Start BIOS setup
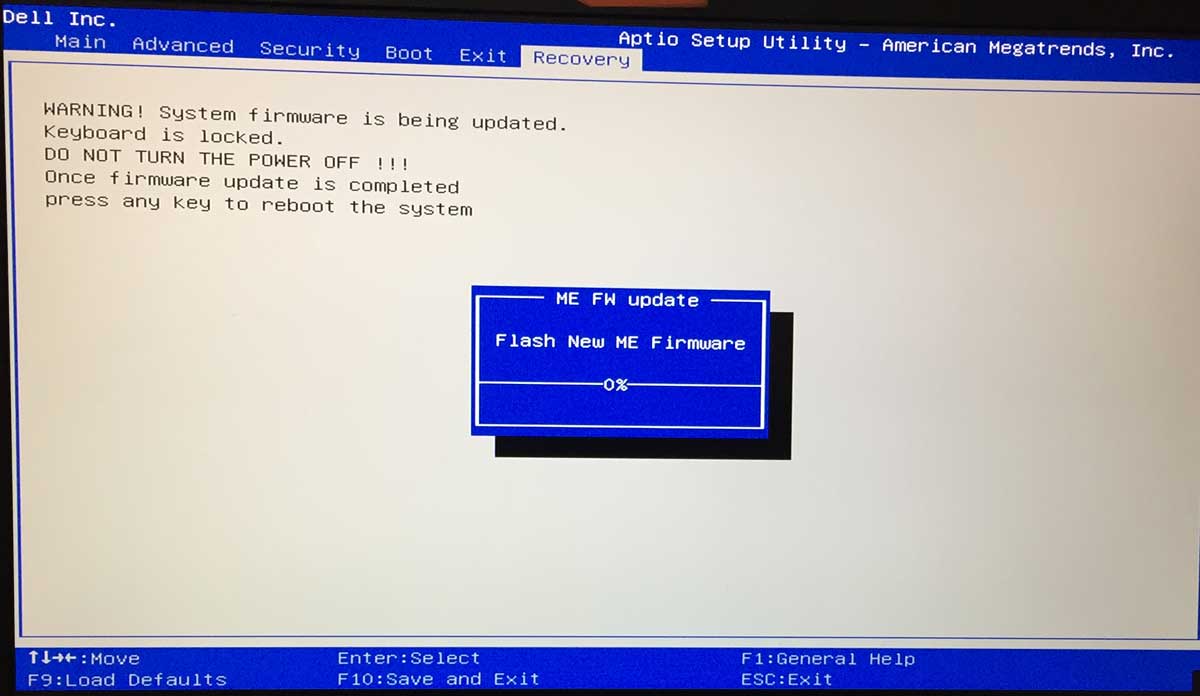
- Don’t turn off or restart your PC during setup
- Boot Windows as normal and check for audio issues
22. Use System Restore
If the audio renderer error was caused by a software event that you can’t pinpoint, you can fix it by rolling back Windows 10 to a previous restore point. Here’s how to do its easily:
- Make sure you’re logged in to Windows 10 with admin rights
- Press Win key + R, type control panel, and press Enter
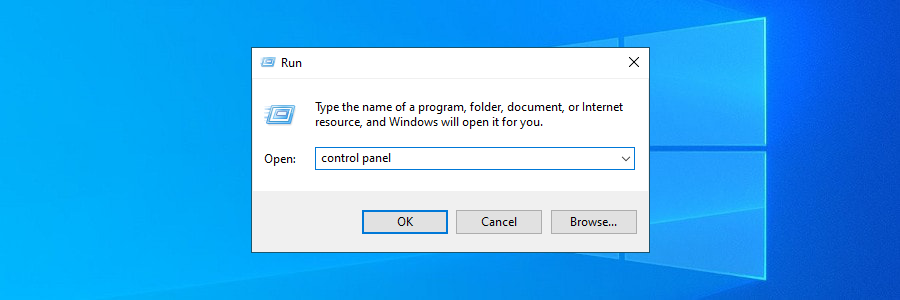
- Go to the Recovery area
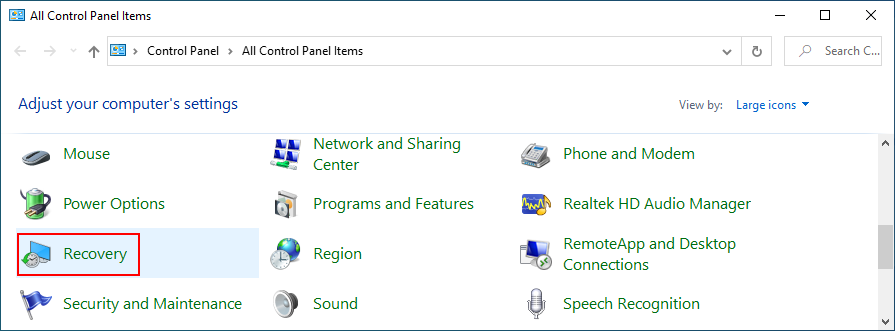
- Click Open System Restore
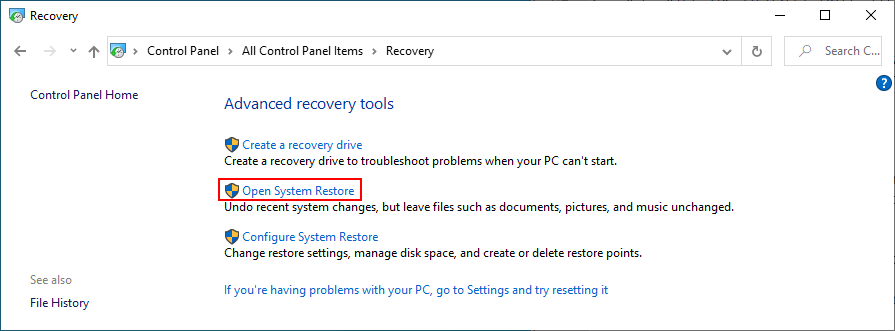
- Select a system restore point from the list
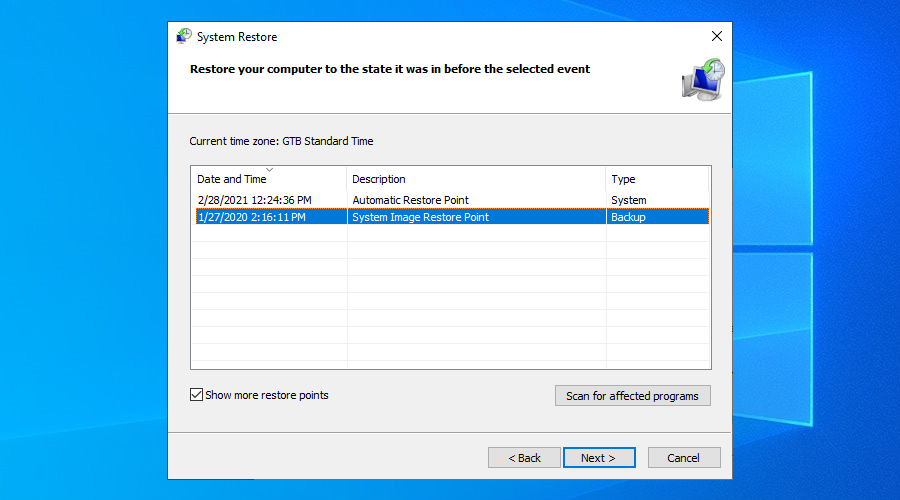
- Click Next and follow the on-screen instructions
- Restart your PC and check for audio issues
The Audio renderer error can be fixed
To review, you can stumble upon the audio renderer error when trying to watch a video on YouTube, in your media player, or anywhere else. It’s caused by a hardware or software issue which you should be able to fix.
For instance, you can clear browser cache, run the audio troubleshooter, make sure the sound device is enabled and set as default, restart the Windows Audio service, synchronize the sample rate for ASIO drivers, as well as run audio tests on HP laptops.
It’s also a good idea to reinstall the audio adapter, update the audio driver or roll back to a compatible version, check the cables and remove extra peripheral devices, disable any audio mixing software, update your web browser, as well as disable hardware acceleration.
Furthermore, you can turn off your ad blocker, try using a different browser, update Windows 10 or uninstall unstable system updates, sign in to Windows 10 using a different account, reset BIOS and update it to the latest version, as well as roll back Windows 10 using System Restore mode.
How did you manage to finally get rid of the audio renderer error? Did we miss any essential steps? Let us know in the comment area below.