DNS_PROBE_FINISHED_NO_INTERNET là một thông báo lỗi được hiển thị bởi Google Chrome khi cố gắng truy cập bất kỳ trang web nào. Nó chỉ ra sự cố với máy chủ DNS của bạn, điều này khiến bạn không thể điều hướng Internet và xem nội dung yêu thích của mình.
Có nhiều cách để xử lý lỗi này mà không cần nhờ đến sự trợ giúp của chuyên gia. Tuy nhiên, cần xác định xem có vấn đề gì xảy ra với trình duyệt web, cài đặt máy tính hoặc kết nối Internet của bạn hay không.
Cách sửa lỗi DNS_PROBE_FINISHED_NO_INTERNET trên bất kỳ nền tảng nào
Hãy xem các giải pháp sau và đảm bảo thực hiện từng bước một. Chúng tôi đã tính đến nền tảng Windows 10 và macOS.
1. Thử một trình duyệt khác
Cách đơn giản nhất để tìm hiểu xem DNS PROBE ĐÃ KẾT THÚC KHÔNG CÓ INTERNET chỉ ra vấn đề với trình duyệt web của bạn hay không là cố gắng sử dụng một ứng dụng khác để truy cập Internet.
Nếu bạn có thể lướt web thành công bằng một trình duyệt khác như Firefox, Edge hoặc Safari, điều đó sẽ khiến mọi thứ trở nên dễ dàng hơn vì bạn chỉ cần khắc phục sự cố Chrome. Nếu không, nó chỉ ra một vấn đề lớn hơn không chỉ ảnh hưởng đến Chrome mà ảnh hưởng đến toàn bộ máy tính và có thể cả kết nối Internet của bạn.
2. Khởi động lại Chrome
Nghe có vẻ quá đơn giản để làm việc, nhưng việc khởi động lại Google Chrome thường khắc phục được lỗi DNS_PROBE_FINISHED_NO_INTERNET. Tuy nhiên, bạn phải đảm bảo đóng đúng tất cả các quy trình của nó trước khi khởi động lại.
Cách khởi động lại Chrome trên Windows 10 một cách chính xác:
- Nhấp chuột phải vào thanh tác vụ và đi tới Trình quản lý Tác vụ

- Trong tab Quy trình , tìm và chọn Google Chrome và toàn bộ cây quy trình của nó
- Nhấp vào Kết thúc tác vụ
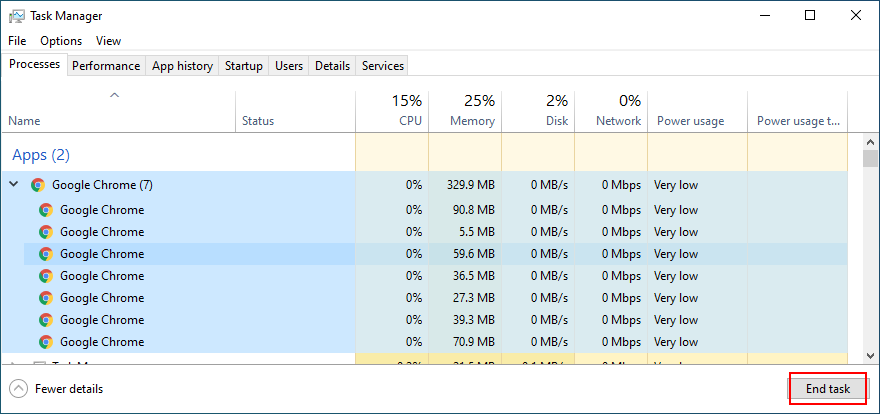
- Khởi chạy Chrome và kiểm tra lỗi DNS
Cách khởi động lại Chrome trên Mac một cách chính xác:
- Chọn cửa sổ Chrome
- Nhấp vào nút Apple và chọn Buộc thoát từ trình đơn
- Khởi chạy lại Chrome và kiểm tra kết quả
3. Xóa bộ nhớ cache của trình duyệt
Sự cố kết nối DNS có thể do bộ nhớ cache của trình duyệt gây ra, như cookie đã lưu. Vì vậy, bạn nên xóa bộ nhớ cache của Chrome trước khi cố gắng truy cập bất kỳ trang web nào. Đây là những gì bạn cần làm.
Cách xóa bộ nhớ cache của Chrome (Windows và Mac):
- Khởi động Chrome và nhấp vào nút Thêm ở góc trên cùng bên phải
- Chọn Cài đặt từ trình đơn
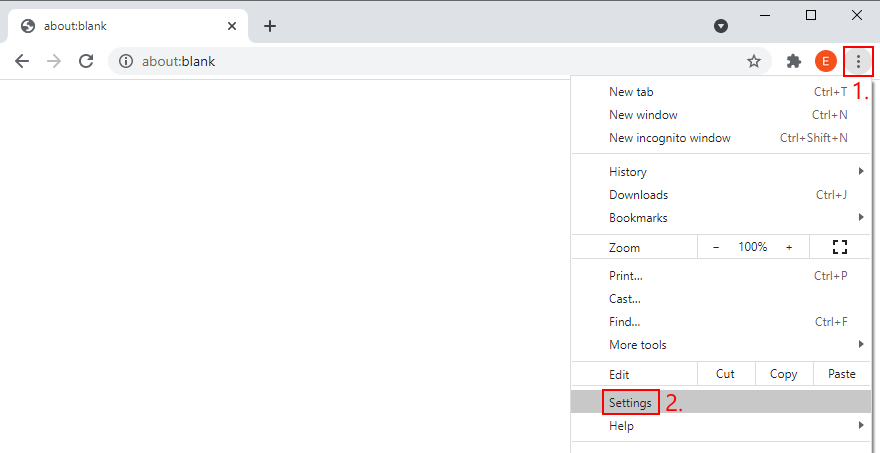
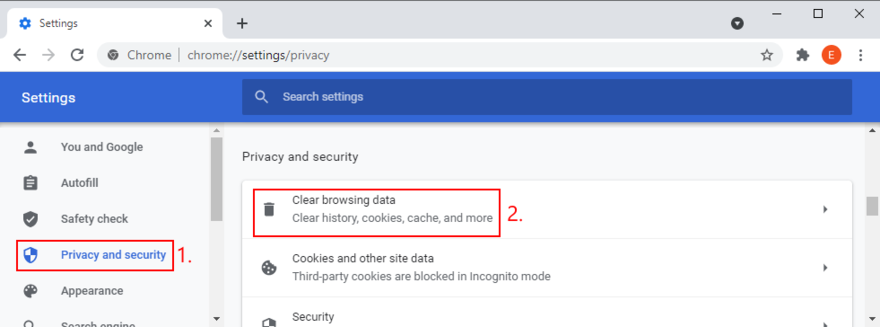
- Chuyển đến phần Quyền riêng tư và bảo mật (hoặc truy cập địa chỉ
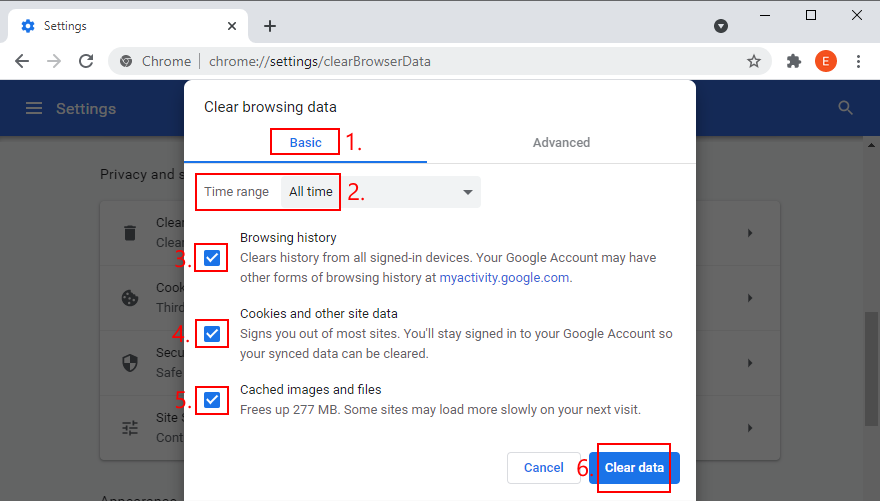
chrome://settings/privacylàm lối tắt) - Nhấp vào Xóa dữ liệu duyệt web

- Vẫn ở trong khu vực Cơ bản
- Đặt Phạm vi thời gian thành Mọi lúc
- Đảm bảo bật các tùy chọn sau:
- Lịch sử duyệt web
- Cookie và các dữ liệu trang web khác
- Tệp và hình ảnh được lưu trong bộ nhớ cache
- Nhấp vào Xóa dữ liệu khi bạn đã sẵn sàng

- Khởi động lại Chrome và kiểm tra lỗi DNS
4. Cập nhật Chrome
Trên phiên bản mới nhất của Windows và macOS, điều cần thiết là phải cập nhật Chrome lên phiên bản mới nhất. Bằng cách này, bạn sẽ có quyền truy cập ngay lập tức vào không chỉ các tính năng hoàn toàn mới mà còn bất kỳ cải tiến và sửa lỗi nào đối với các lỗi DNS đã biết.
Cách cập nhật Chrome trên Windows và Mac:
- Mở Chrome và nhấp vào nút Thêm
- Đi tới phần Trợ giúp
- Nhấp vào Giới thiệu về Google Chrome . Ngoài ra, bạn có thể truy cập địa chỉ
chrome://settings/help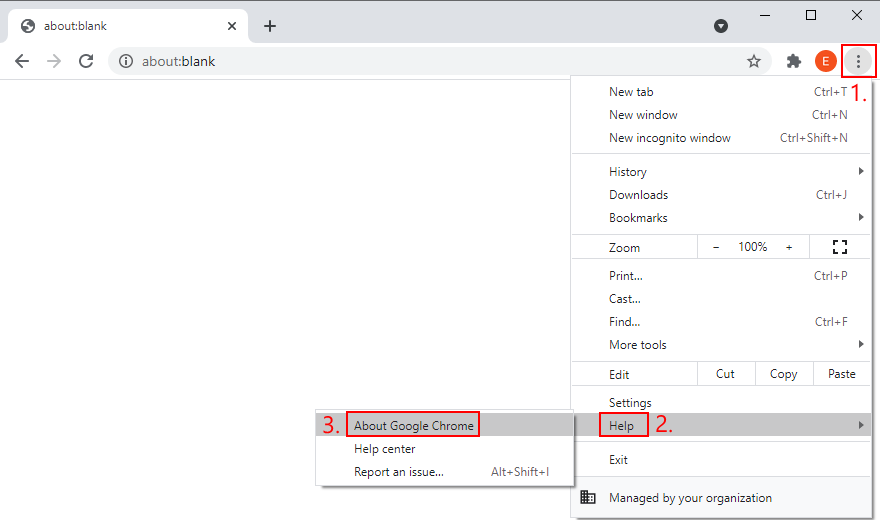
- Chờ cho đến khi Chrome tìm thấy và thực hiện cập nhật
- Khởi động lại trình duyệt khi trình duyệt kết thúc và kiểm tra các sự cố DNS
5. Đặt lại Chrome về cài đặt mặc định
Nếu bạn hoặc một tiện ích mở rộng của trình duyệt đã định cấu hình quá nhiều cài đặt trong Chrome, có lẽ cấu hình DNS cũng bị rối. Rất khó để tìm và sửa các tùy chọn bị hỏng. Một giải pháp đơn giản và thanh lịch hơn là đặt lại Chrome về mặc định.
Cách khôi phục Chrome về cài đặt gốc trên Windows và Mac:
- Mở trình đơn Thêm và chọn Cài đặt (hoặc truy cập địa chỉ
chrome://settings/) - Đi xuống cuối trang và nhấp vào Nâng cao
- Tại phần Đặt lại và dọn dẹp , nhấp vào Khôi phục cài đặt về mặc định ban đầu

- Khi được yêu cầu xác nhận, hãy nhấp vào Đặt lại cài đặt
- Khởi động lại Chrome và kiểm tra các sự cố DNS
6. Tắt tiện ích mở rộng của Chrome
Một số tiện ích mở rộng trình duyệt nhất định có quyền thay đổi cấu hình IP và DNS của Chrome, chẳng hạn như VPN dịch vụ và các công cụ proxy. Nếu nó không được thực hiện đúng cách, điều này có thể cắt đứt quyền truy cập Internet vào toàn bộ trình duyệt của bạn.
Để khắc phục sự cố này, bạn nên gỡ cài đặt mọi tiện ích mở rộng Chrome đáng ngờ hoặc không xác định. Đây là những gì bạn cần làm (Windows và Mac):
- Từ trình đơn Thêm , chuyển đến Công cụ khác
- Chọn Tiện ích mở rộng . Nếu không, hãy truy cập địa chỉ
chrome://extensions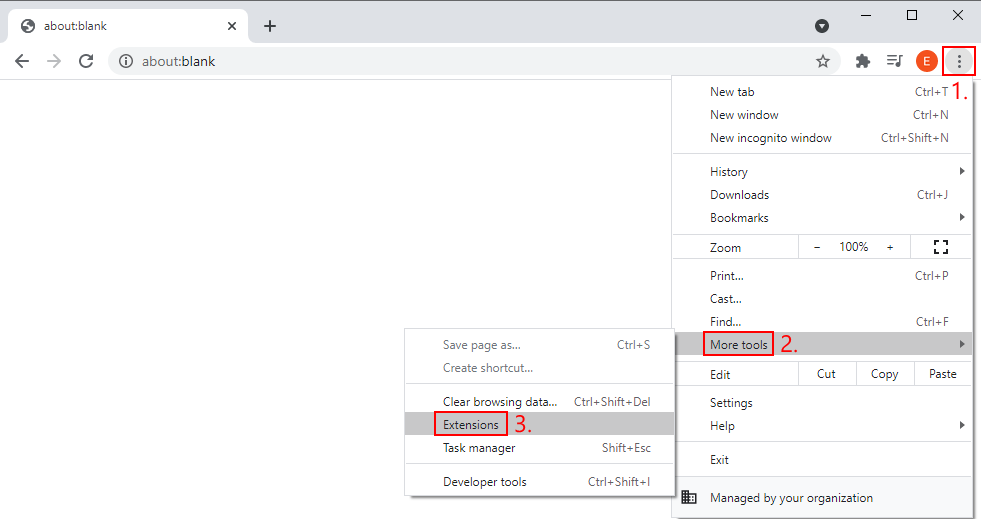
- Xóa mọi tiện ích mở rộng có quyền truy cập vào cấu hình IP và DNS của bạn, bao gồm cả các công cụ VPN và proxy
- Khởi chạy lại Chrome và kiểm tra kết quả
7. Cài đặt lại Chrome
Nếu Chrome vẫn ném cho bạn lỗi DNS_PROBE_FINISHED_NO_INTERNET sau khi thử các giải pháp ở trên, bạn nên xóa nó khỏi máy tính của mình rồi cài đặt lại.
Cách cài đặt lại Chrome trên Windows 10 một cách chính xác:
- Nhấp chuột phải vào thanh tác vụ và chọn Trình quản lý Tác vụ
- Chọn Google Chrome và nhấp vào Kết thúc tác vụ

- Nhấp chuột phải vào nút Bắt đầu và chuyển đến Ứng dụng và tính năng
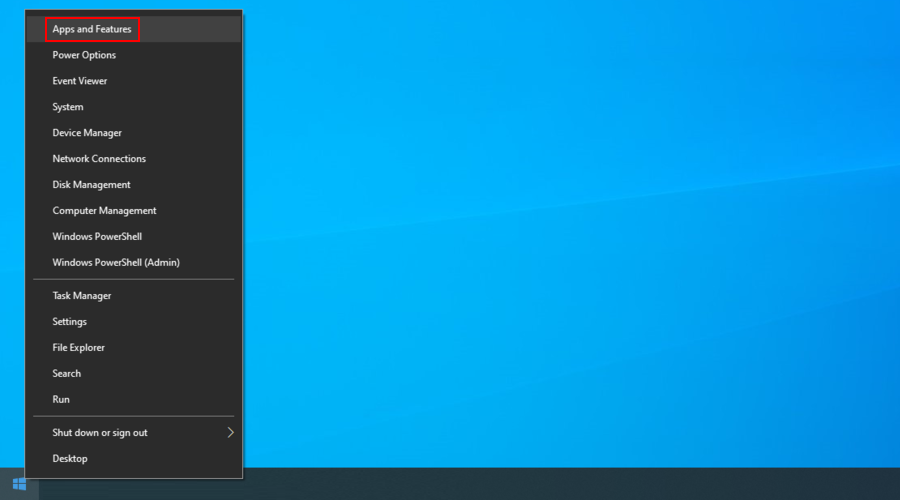
- Định vị và chọn Google Chrome

- Nhấp vào Gỡ cài đặt và sau đó một lần nữa để xác nhận
- Tiến hành thao tác xóa
- Tải xuống Chrome từ trang web chính thức
- Khởi động Chrome và kiểm tra lỗi DNS
Cách cài đặt lại Chrome trên Mac một cách chính xác:
- Khởi chạy Chrome và mở trình đơn Apple
- Nhấp vào Buộc thoát
- Sử dụng ứng dụng Finder để theo dõi Chrome
- Kéo và thả Chrome vào Thùng rác
- Nếu được yêu cầu, hãy nhập tên người dùng và mật khẩu quản trị viên của bạn để xác nhận việc xóa ứng dụng
- Chọn Dọn sạch thùng rác trong Công cụ tìm kiếm
- Tải xuống Chrome từ trang web chính thức
- Mở Chrome và cố gắng truy cập một trang web
8. Sử dụng kênh ổn định của Chrome
Chrome có nhiều kênh phát hành có sẵn để tải xuống: Ổn định, Beta, Nhà phát triển và Canary. Ba phiên bản cuối cùng cung cấp cho bạn quyền truy cập vào các tính năng và cải tiến mới phải được thử nghiệm trước khi chúng đến được kênh Ổn định. Một số người trong số họ không bao giờ làm vậy.
Mặc dù rất thú vị khi được ngồi ở hàng đầu và khám phá các tính năng mới thú vị của Chrome, nhưng tính năng này cực kỳ không ổn định và nên tránh nếu bạn không muốn gặp các sự cố kết nối Internet như lỗi DNS_PROBE_FINISHED_NO_INTERNET.
Chỉ cần sử dụng phiên bản ổn định của Chrome và bạn sẽ tìm thấy. Đây là bản có sẵn để tải xuống trên trang web chính thức .
Bạn có thể tải xuống riêng phiên bản Beta, Developer hoặc Canary vì chúng sẽ không ghi đè phiên bản Ổn định. Nhưng đừng sử dụng chúng khi bạn cần kết nối Internet đáng tin cậy.
9. Hạ cấp Chrome (Windows)
Nếu bạn có phiên bản Windows cũ hơn, nó có thể không hỗ trợ đầy đủ phiên bản Google Chrome mới nhất. Điều này có thể dẫn đến tất cả các loại vấn đề khi Chrome phát triển và hệ điều hành của bạn bị bỏ lại phía sau.
Giải pháp an toàn nhất ở đây là chuyển sang Windows 10 vì bạn có thể tận dụng các bản vá bảo mật do Microsoft phát hành và bảo vệ máy tính của bạn khỏi phần mềm độc hại.
Tuy nhiên, nếu không thể, bạn nên hạ cấp Chrome xuống phiên bản cũ hơn, phiên bản vẫn tương thích với hệ điều hành lỗi thời của bạn. Hãy nhớ rằng tất cả hồ sơ người dùng và dữ liệu bộ nhớ cache của bạn sẽ bị xóa.
Cách tắt cập nhật tự động của Chrome:
- Nhấp vào nút Bắt đầu , tìm kiếm Dịch vụ và mở ứng dụng này
- Tìm Dịch vụ cập nhật của Google (gpupdate) , nhấp chuột phải vào dịch vụ đó và đi tới Thuộc tính
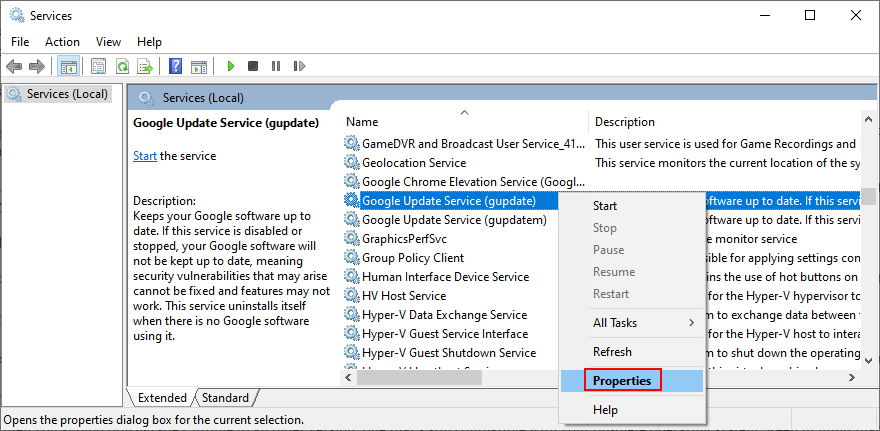
- Đặt Loại khởi động thành Đã tắt

- Nhấp vào Áp dụng và thoát
- Nhấp đúp vào Dịch vụ cập nhật của Google (gpupdatem) để xem các thuộc tính của nó
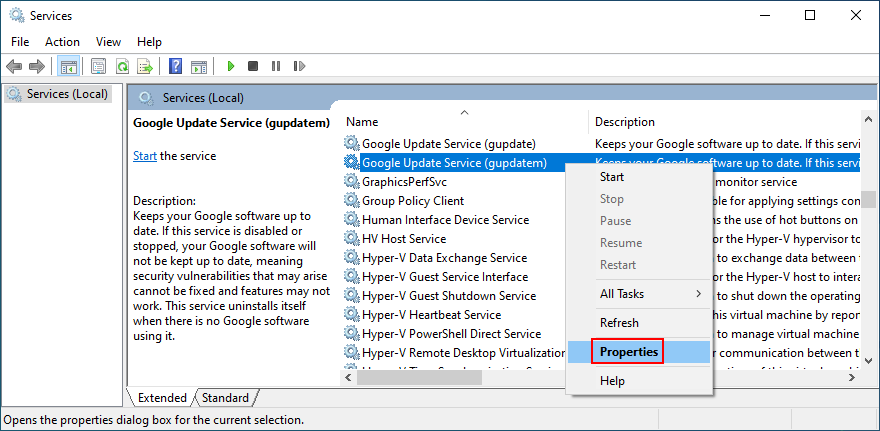
- Đặt Loại khởi động thành Đã tắt

- Nhấp vào Áp dụng và thoát Dịch vụ
Cách gỡ cài đặt Chrome:
- Nhấp chuột phải vào nút Bắt đầu và chọn Ứng dụng và tính năng
- Chọn Google Chrome và nhấp vào Gỡ cài đặt
- Tiến hành các bước xóa
Cách cài đặt Chrome cũ:
Rất tiếc, Google không cho phép người dùng tải xuống các phiên bản Chrome cũ hơn vì lý do bảo mật. Tuy nhiên, bạn vẫn có thể tìm thấy các phiên bản Chrome cũ hơn trên các trang web của bên thứ ba, chẳng hạn như SlimJet .
Chỉ cần lưu ý rằng bạn sẽ tự chịu rủi ro khi tải xuống và cài đặt các tệp đó. Cần thận trọng.
10. Khởi động lại dịch vụ Máy khách DNS (Windows)
Máy chủ DNS của Windows được vận hành bởi dịch vụ Máy khách DNS, dịch vụ này phải chạy tự động mỗi khi khởi động hệ thống và vẫn chạy khi bạn đang làm việc trên máy tính của mình.
Tuy nhiên, nếu có vấn đề gì xảy ra với dịch vụ, bạn sẽ không gặp phải lỗi DNS PROBE FINISHED NO INTERNET trong Chrome. Điều đó cũng có nghĩa là kết nối Internet của bạn bị tắt trên bất kỳ ứng dụng nào bạn cố gắng sử dụng, không chỉ Chrome.
Cách khởi động lại dịch vụ Máy khách DNS:
- Nhấn phím Win + R , nhập services.msc và nhấn Enter

- Tìm và nhấp chuột phải vào Máy khách DNS
- Đi tới Thuộc tính

- Đặt Kiểu khởi động thành Tự động
- Nếu Trạng thái dịch vụ cho biết Đã dừng , hãy nhấp vào nút Bắt đầu
- Nhấp vào Áp dụng và thoát
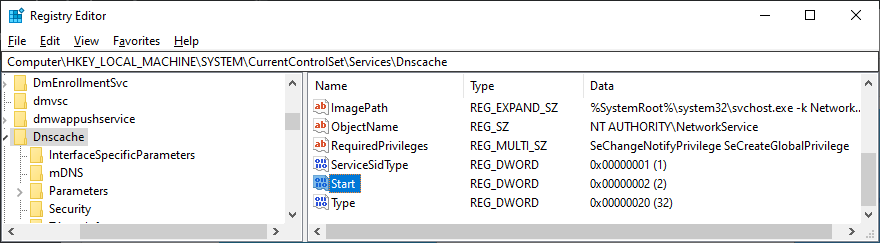
Nếu các nút dịch vụ Máy khách DNS chuyển sang màu xám, đây là việc cần làm:
- Nhấn phím Win + R , nhập regedit và nhấn Enter

- Nhấp vào Có nếu UAC (Kiểm soát tài khoản người dùng) nhắc nhở
- Sao chép và dán địa chỉ sau:
Máy tính \ HKEY_LOCAL_MACHINE \ SYSTEM \ CurrentControlSet \ Services \ Dnscache
- Định vị và nhấp đúp vào mục nhập Bắt đầu
- Đặt Dữ liệu giá trị thành 2
- Đặt Cơ sở thành Hệ thập lục phân
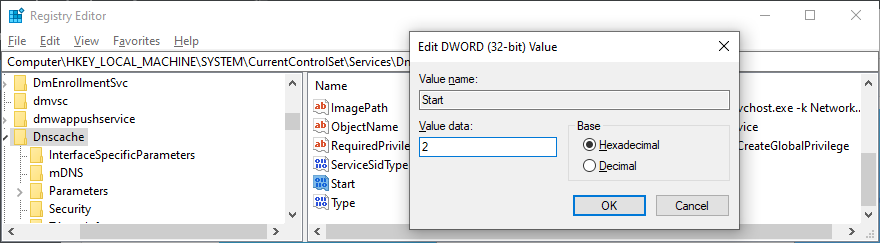
- Nhấp vào OK và thoát Dịch vụ
- Khởi động lại PC của bạn
- Khởi chạy Chrome và kiểm tra lỗi DNS

11. Sử dụng máy chủ DNS của Google
Theo mặc định, máy tính của bạn sử dụng máy chủ DNS do ISP của bạn chỉ định. Nếu chúng quá chậm đối với Chrome, thì trình duyệt web của bạn có thể hiển thị lỗi DNS_PROBE_FINISHED_NO_INTERNET dưới dạng cảnh báo. Bạn có thể khắc phục sự cố này bằng cách thay đổi máy chủ DNS của mình thành một thứ khác.
Chúng tôi khuyên bạn nên sử dụng Google Public DNS vì nó cung cấp các máy chủ DNS miễn phí, công khai và an toàn được tối ưu hóa cho Chrome. However, you can also try others like OpenDNS or Cloudflare.
How to set Google Public DNS servers on Windows 10:
- Make sure to log in to Windows 10 with an admin account
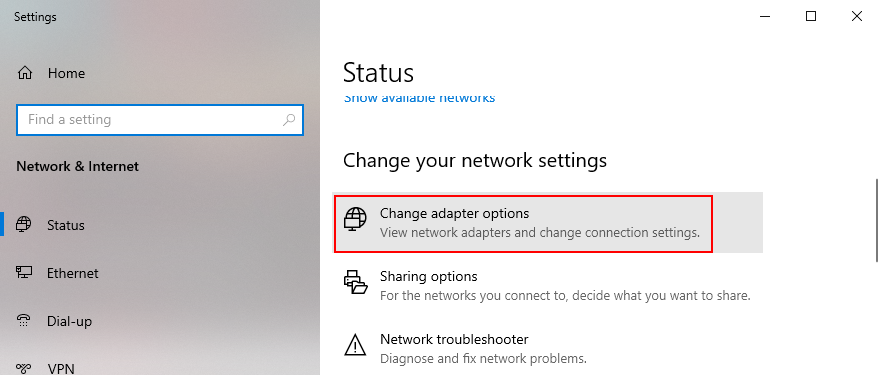
- Click the connections icon in the systray and then Network & Internet settings
- Press Change adapter options
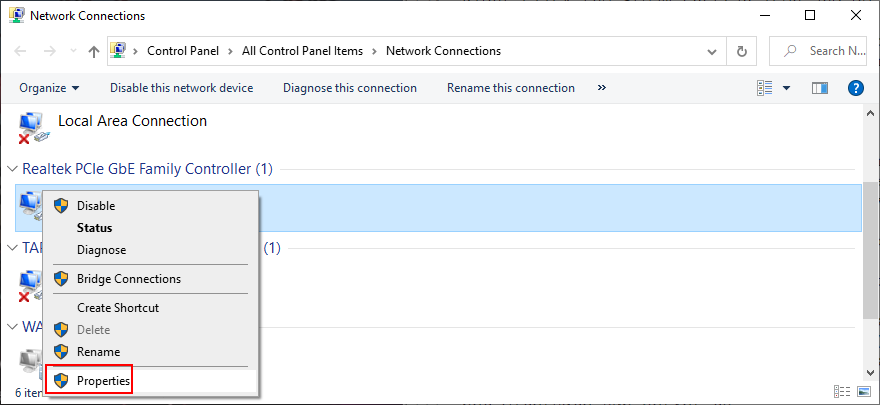
- Choose your Internet connection from the list, right-click it, and go to Properties
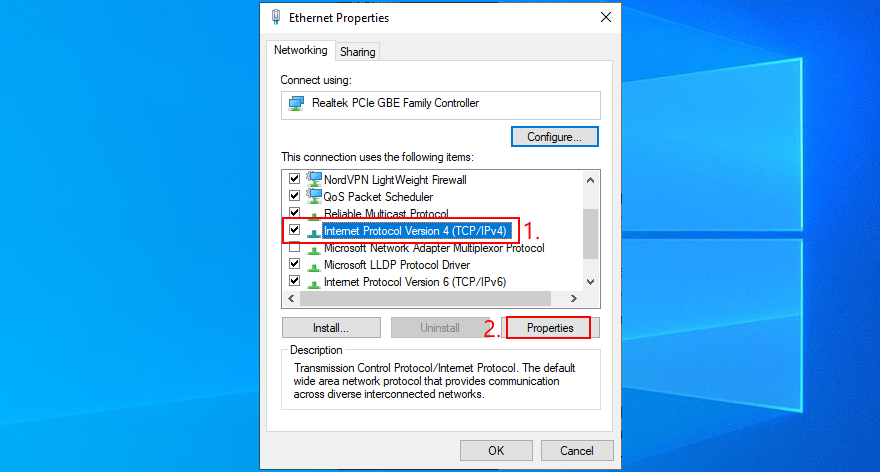
- Select the Internet Protocol Version 4 (TCP/IPv4) entry and click Properties
- Remain in the General section
- Select Use the following DNS server addresses
- Set Preferred DNS server to 8.8.8.8
- Set Alternate DNS server to 8.8.4.4
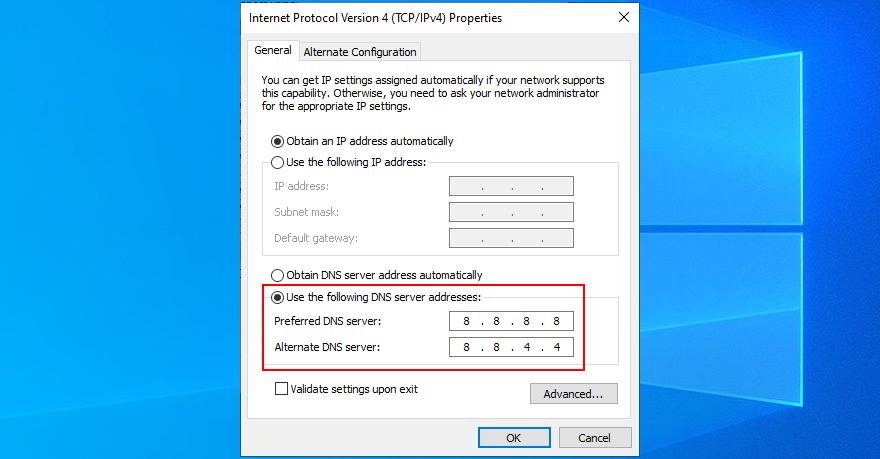
- Check the Validate settings upon exit option
- Click OK and exit
- Try to use Chrome now
How to set Google Public DNS servers on Mac:
- Open the Apple menu on the upper-right part of the screen
- Select System Preferences
- Go to Network > Advanced
- Choose the DNS section
- Click the + symbol and write 8.8.8.8
- Press it again to also add 8.8.4.4
- Click OK and exit
- Launch Chrome and check for DNS errors
12. Clear the DNS cache
Just like your web browser, the system’s DNS cache might get full and cause connectivity errors instead of loading the pages you’re attempting to access. But you can fix this problem by entering a couple of lines of code in Command Prompt on Windows and Terminal on Mac, in order to clear the DNS cache.
How to clear the DNS cache on Windows 10:
- Press the Win key, search for Command Prompt, and open this app
- Paste the following lines of code (press Enter after each one):
-
ipconfig/flushdns
-
ipconfig/registerdns
-
ipconfig/release
-
ipconfig/renew
-
netsh winsock reset
-
- Thoát khỏi Command Prompt và khởi động lại PC của bạn
- Fire up Chrome and check for DNS errors
How to clear the DNS cache on macOS:
- Open the Terminal app
- Type
sudo killall-HUP mDNSResponderand press Return - When asked, write your admin username and password to confirm
- Restart macOS
- Launch Chrome and inspect results
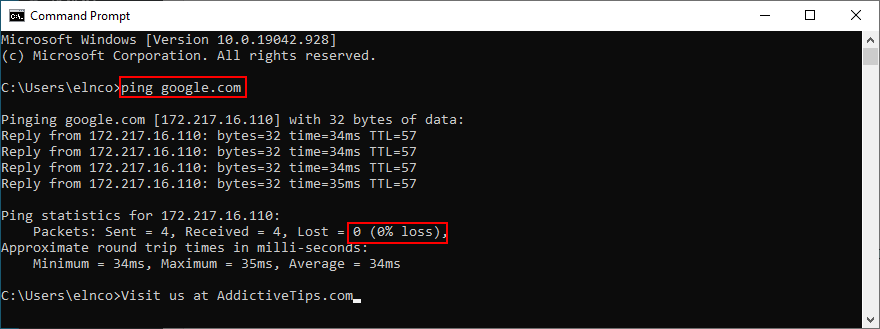
13. Run a ping test
A ping test helps you measure the connectivity signal between your device and Chrome. You can use it as a guide to figure out if the Internet connection is too slow or doesn’t work at all. It’s possible to use ping in Command Prompt on Windows or Terminal on Mac. Alternatively, you can turn to third-party ping applications.
How to run a ping test on Windows 10:
- Click the Start button, search for Command Prompt, and open this application
- Ping Google by typing
ping google.comand pressing Enter - Wait until the ping test is complete
- Check out the % loss noted at Ping statistics
How to run a ping test on Mac:
- Go to Applications > Utilities
- Launch the Terminal app
- Type
ping.google.comand press Return - Patiently wait while the ping test is working
- Note the 0% packet loss written at Server ping statistics
If you have 100% packet loss, it means that your device can’t reach Google at all, indicating an issue with your Internet connection. Any value lower than 100% says that the connection is active but unstable. It’s good news because you can take action to improve it.
14. Visit a website by IP address
You normally visit a website by entering its domain in the Chrome address bar. However, if the DNS resolver isn’t doing its job properly and shows the DNS_PROBE_FINISHED_NO_INTERNET instead, try entering the domain’s IP address.
To discover a domain’s name, you can use the ping command with the help of Command Prompt on Windows or Terminal on macOS. No administrative rights are required. Just send the ping website_name command. For example, if you want to find out the IP address used by Google, type ping google.com.
Right before the logging details, you can spot the IP address next to the domain name. In the example below, the domain name is google.com and its IP is 172.217.20.14.
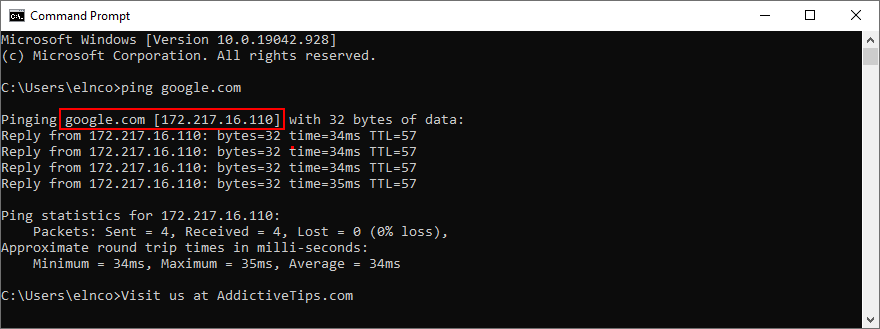
In the next step, launch Chrome, enter the IP address in the address bar, and see what happens. If Google loads after visiting 172.217.20.14, it means that your DNS resolver is at fault and there’s nothing wrong with your device or Internet connection.
15. Disable the VPN or proxy
A lot of privacy-concerned users turn to VPN or proxy tools to hide their IP address and encrypt their data traffic. It has numerous benefits, like accessing websites that aren’t normally available to your country.
However, the IP address change could affect Chrome entirely, especially if you’re using a free VPN or proxy server (they are notoriously unreliable). To stay on the safe side and restore the connectivity of your web browser, you should disable any VPN or proxy services.
For example, if you have a proxy or VPN browser extension installed on Chrome, make sure to turn it off. When it comes to desktop applications designed for Windows or Mac, uninstall them from Apps and Features. Or, if you have system-wide manual connections set up, here’s how to deactivate them.
How to disable VPN and proxy on Windows 10:
- Click the network icon in the notifications area and select Network & Internet settings
- Go to VPN on the left panel
- Select any active VPN connections and click Disconnect
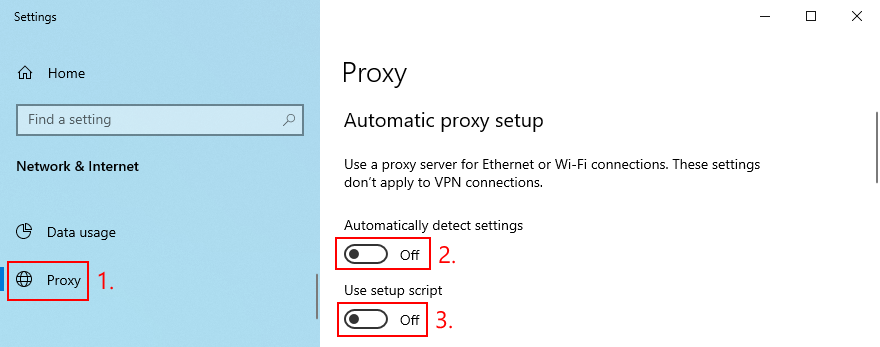
- Shift your attention to the Proxy area on the left side
- Disable Automatically detect settings and Use setup script
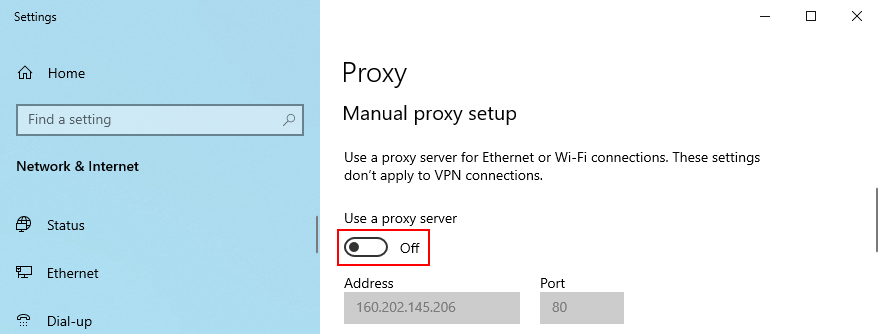
- Scroll down and also turn off Use a proxy server
- Khởi động lại PC của bạn
- Fire up Chrome and check for DNS issues
How to disable VPN and proxy on macOS:
- Nhấp vào nút Apple ở góc trên cùng bên trái
- Select System Preferences
- Head over to Network
- Choose VPN on the left side
- If there’s an ongoing VPN connection, click Disconnect
- Choose your Internet connection from the list and go to Advanced
- Select the Proxies tab and turn off all settings
- Click OK and restart macOS
- Launch Chrome and check for DNS errors
16. Check firewall settings for Chrome
Under normal circumstances, Chrome gets added as an exception to the system firewall at installation. However, your firewall settings might have been changed in the meantime. It’s not unusual but can be fixed without any issues.
How to add Chrome as an exception to the firewall on Windows 10:
- Sign in to Windows 10 with elevation rights
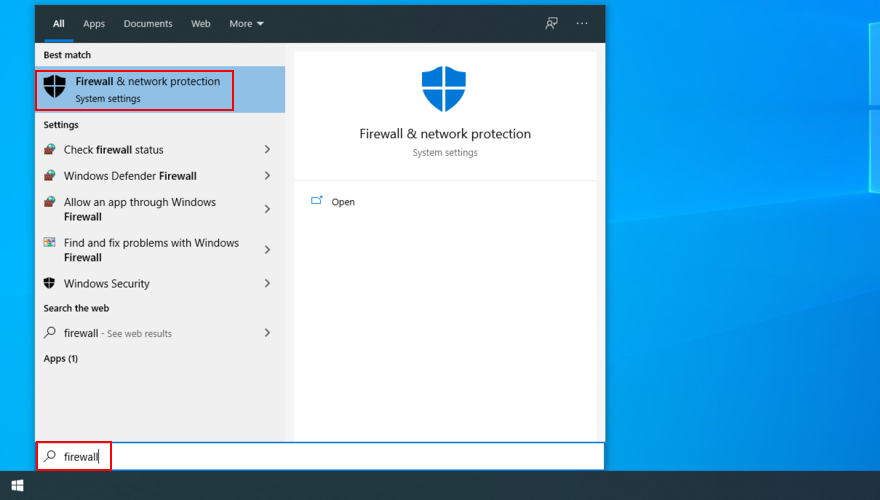
- Press the Win key button, search for firewall, and open Firewall & network protection
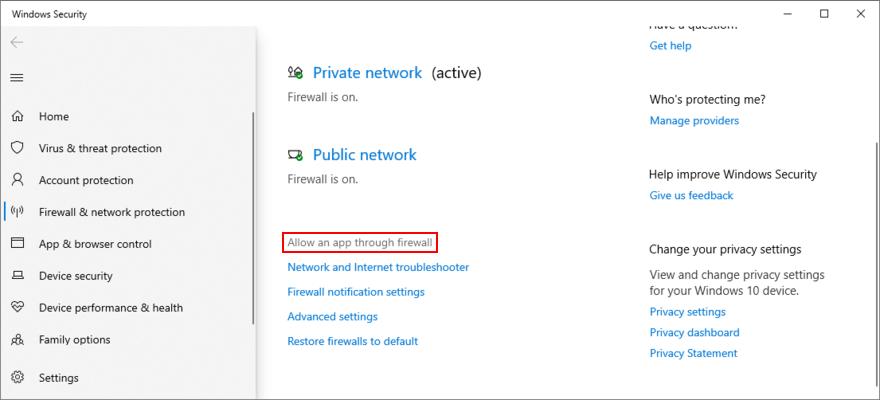
- Click Allow an app through firewall
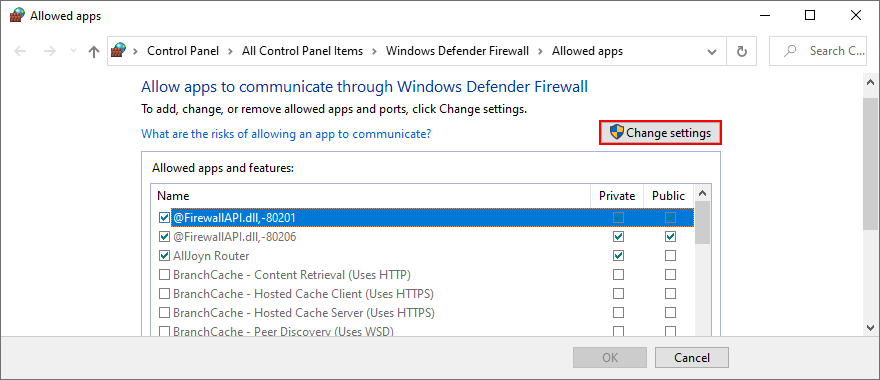
- Then, click Change settings
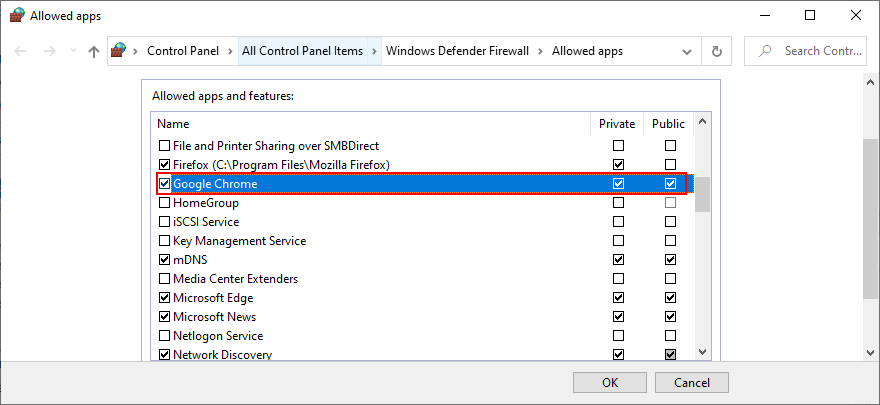
- Try to find Google Chrome on this list. If it’s not there, click Allow another app and then Browse to track down and add the Chrome executable file (on Windows 64-bit, it’s in
C:\Program Files (x86)\Google\Chrome\Application\chrome.exeby default) - Tick the Private and Public boxes next to Google Chrome
- Click OK
- Fire up the web browser and try to access something
If you have a third-party firewall installed that overrides Windows Firewall, adjust the steps above for that application.
How to add Chrome as an exception to the firewall on macOS:
- Open the Apple menu
- Go to System Preferences > Security
- Choose the Firewall section
- Press the lock symbol and specify your admin username and password if required
- Go to Firewall > Firewall Options > Add Application
- Choose Google Chrome and click Add
- Click OK
- Open the Chrome app and check for DNS errors
17. Uninstall antivirus tools
If you have third-party Internet security solutions installed on your computer, you should check their settings since they might be configured to block browser traffic as a security measure. However, when it comes to free antivirus tools, it’s safer to just remove them from your PC.
Just head over to the Apps and Features section of Windows, locate your security solution, and proceed with the uninstallation process. On Mac, you just have to drag the app to the Trash using Finder.
18. Verify parental control settings
Many parents turn to specialized solutions to protect the online privacy of their children and prevent them from accessing websites with inappropriate content: parental control tools. Some of them also give you the possibility to schedule allowed times for Internet navigation.
If you have such a program installed on your computer, check its settings and make sure to temporarily turn it off while you’re using Google Chrome. Otherwise, you might wake up with the DNS_PROBE_FINISHED_NO_INTERNET error due to permission issues.
19. Inspects the Hosts file (Windows)
The Windows Hosts file contains information about your TCP/IPv4 configuration. It can also be used to block access to specific websites. If you’re receiving the DNS error when trying to reach a particular page although Chrome seems to load others without any problems, it’s worth inspecting and modifying the Hosts file. Here’s how:
- Press Win key + R to open File Explorer
- Visit the following location:
C:\Windows\System32\drivers\etc
- Locate the Hosts file and copy it to create a backup

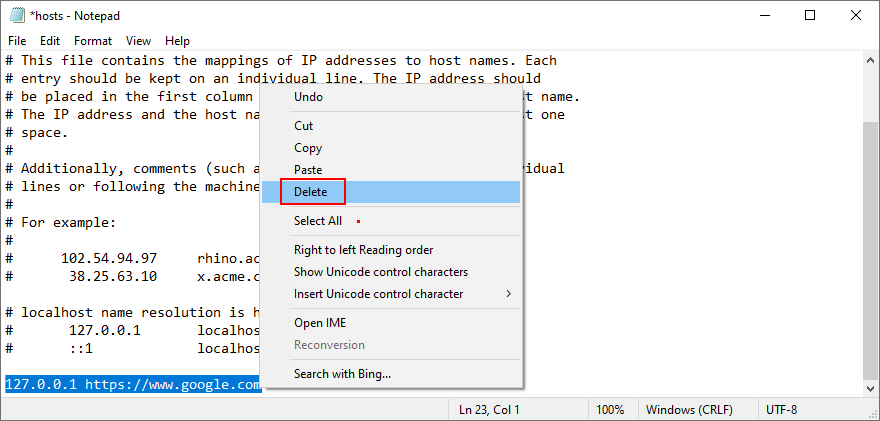
- Open the Hosts file in a text editor like Notepad (you must run the text editor with admin rights)
- Look for any lines that mention the website you’re trying to visit. For example, if you can’t access Google, try to locate
127.0.0.1 https://www.google.comor something similar - Delete those lines and save the new Hosts file
- Launch Chrome and try to access your website now
- If you need to restore the previous Hosts version, you just have to replace the newest file with the backup
20. Update your OS
Your operating system should have automatic access to updates, but that’s not always possible. In case you haven’t updated your OS for a long time, you should take care of that issue right away. It’s an opportunity to resolve a wide range of PC problems, including the DNS PROBE FINISHED NO INTERNET error on Google Chrome.
Cách cập nhật Windows 10:
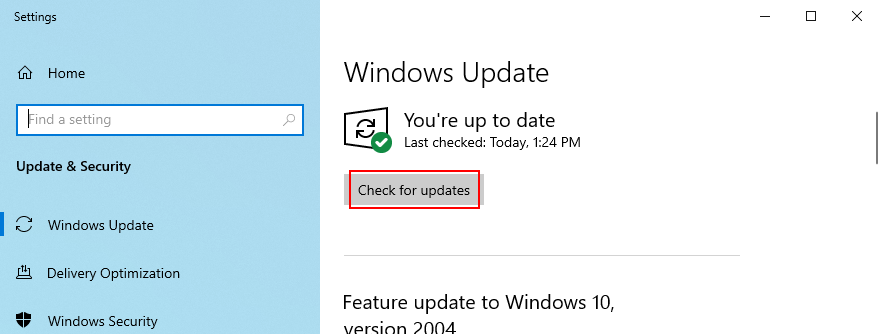
- Click the Start button, search for Check for updates, and hit Enter

- If the auto-search doesn’t begin automatically, press the Check for updates button
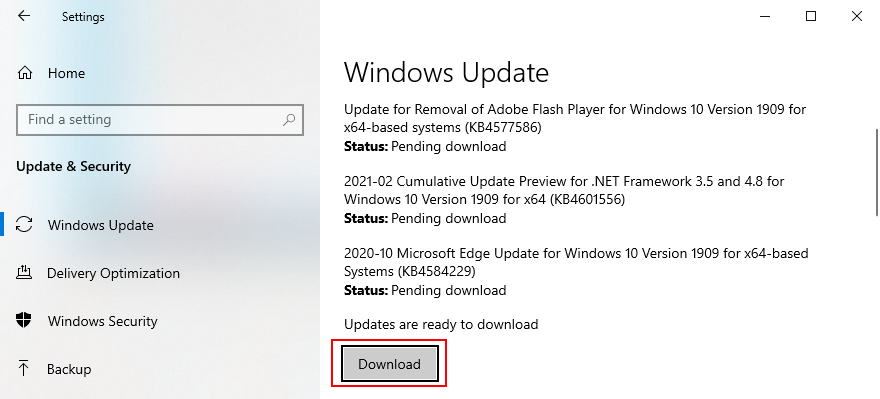
- Wait until Windows locates any available updates. If it finds anything, click Download
- Your PC might restart one or more times to complete the update
- When it finishes, launch Chrome and check for DNS issues
Cách cập nhật macOS:
- Nhấp vào nút Apple ở góc trên cùng bên trái
- Press Software Update
- macOS will start looking for and downloading new updates
- When it finishes, restart the computer
- Launch Chrome and check for DNS errors
21. Check the network driver
There might be something wrong with your network device, which is causing DNS errors in your web browser. Try reinstalling the network adapter, updating its driver, or downgrading an incompatible driver to a stable version. Here’s everything you need to know.
How to reinstall the network device on Windows 10:
- Press Windows key + R, type devmgmt.msc, and press Enter
- In Device Manager, open the Network adapters category
- Identify your network adapter, right-click it, and select Uninstall device

- Proceed with the removal steps
- Mở trình đơn Hành động và nhấp vào Quét các thay đổi phần cứng
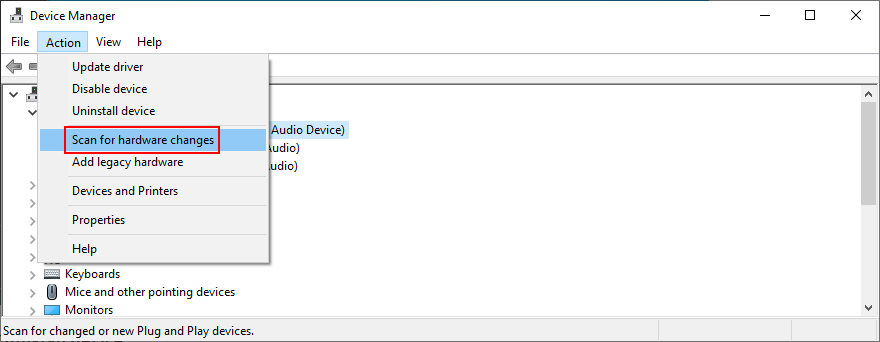
- Khởi động lại PC của bạn. Windows will auto-reinstall the missing network adapter
- Check Chrome for DNS errors
How to update the network driver on Windows 10:
- Go to Device Manager
- Expand the Network adapters group
- Right-click your network adapter and choose Update driver
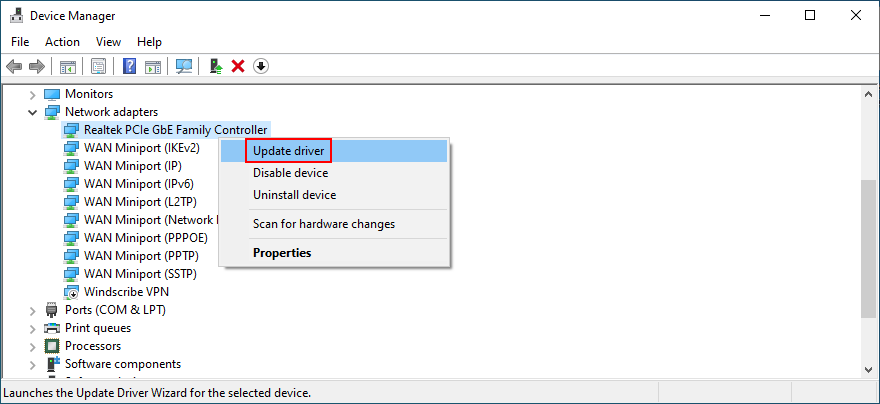
- Click Search automatically for updated driver software
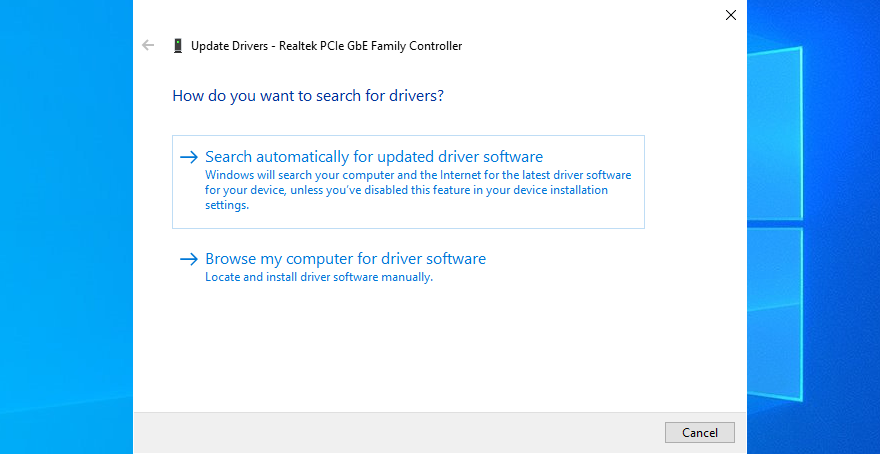
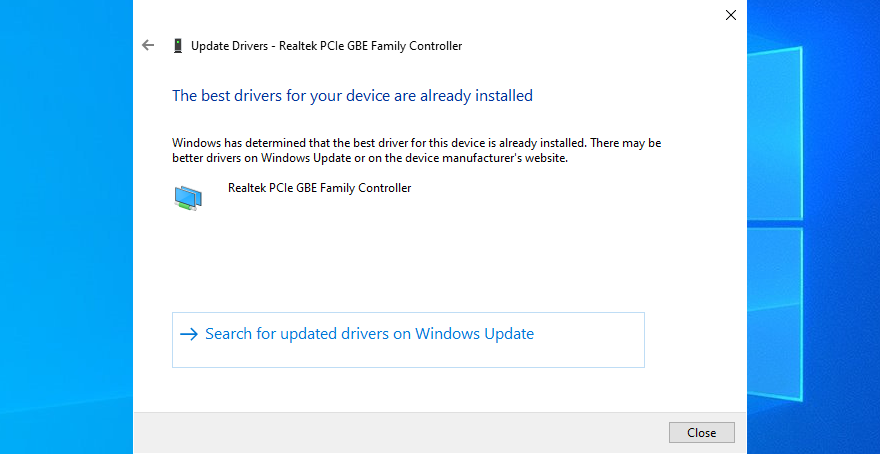
- If the online search doesn’t return any results, click Search for updated drivers on Windows Update. However, if you have already used Windows Update in a previous solution, you can skip this step
- Khởi động lại PC của bạn
- Start Chrome and check for DNS errors
If Windows can’t find a network driver available for download, you should visit the manufacturer’s website and look for a newer version yourself. Alternatively, you can turn to a driver update app to update all your device drivers and avoid getting incompatible versions that could cause system stability issues.
On the other hand, if you have already installed a network driver that doesn’t support Windows 10, you should roll it back to the previous, stable version.
How to roll back the network driver on Windows 10:
- Open Device Manager
- Right-click your network device and go to Properties
- Chuyển sang tab Trình điều khiển
- Click Roll Back Driver and follow the step-by-step instructions
- If the button is greyed out, it means that you can’t perform the rollback because a previous version doesn’t exist on your computer
- Restart your computer
- Launch Chrome and check for DNS issues
22. Check IPv4 and IPv6 connectivity
If you don’t have Internet access at all but get the DNS PROBE FINISHED NO INTERNET error when trying to visit a webpage in Chrome, you should check the IPv4 and IPv6 settings of your Internet connection.
For example, if your network doesn’t support IPv6 connections but has it enabled in the properties panel, make sure that your device is still getting assigned with an IPv4 address, regardless of whether IPv6 is enabled or not.
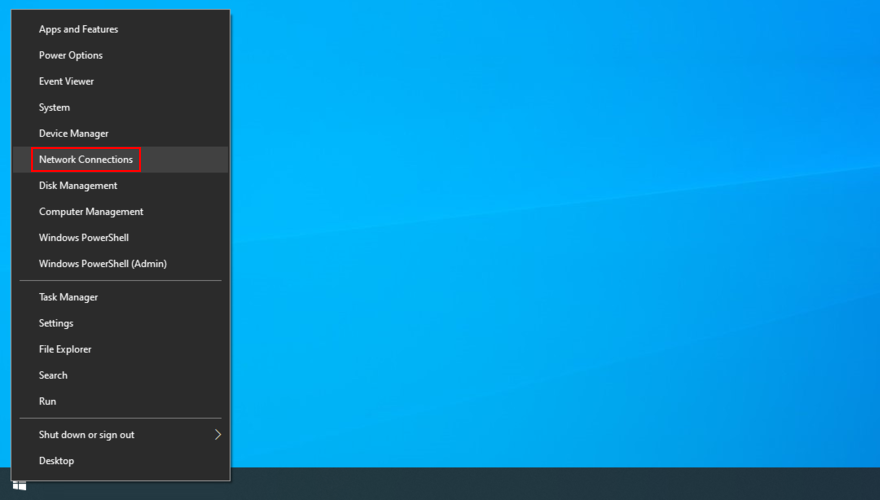
How to verify IPv4 and IPv6 on Windows 10:
- Right-click the Start button and select Network Connections
- Click Change adapter options
- Right-click your Internet connection and go to Properties
- Check the box next to Internet Protocol Version 4 (TCP/IPv4)
- Uncheck the box next to Internet Protocol Version 6 (TCP/IPv6)
- Click OK
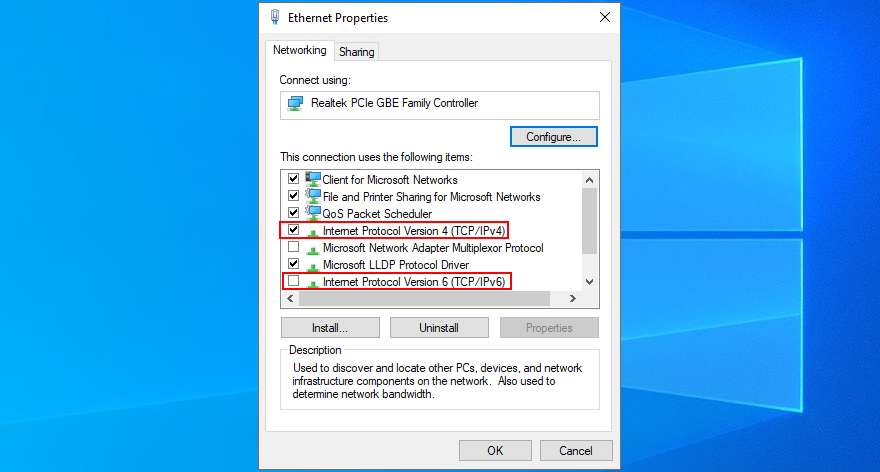
- Launch Chrome and try to use it
23. Run the Internet Connections troubleshooter (Windows)
You can run the Internet Connections troubleshooter built into Windows 10 to resolve common issues that could have a negative impact on your browsing experience and trigger the DNS_PROBE_FINISHED_NO_INTERNET error in Chrome. Here’s how:
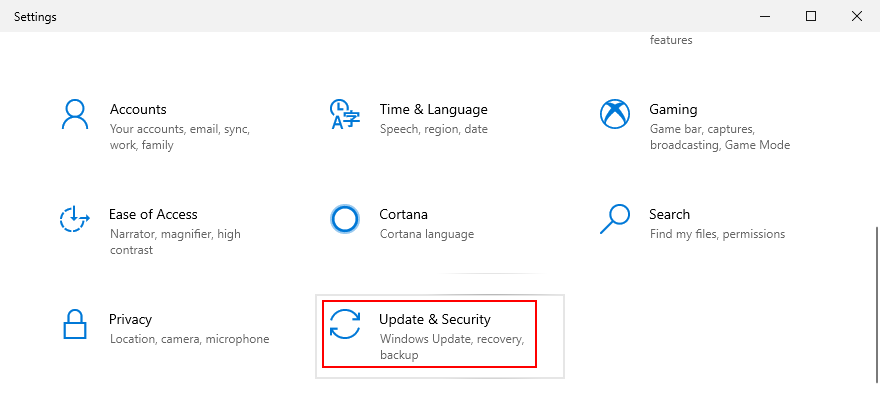
- Press the Windows key, search for Settings, and press Enter
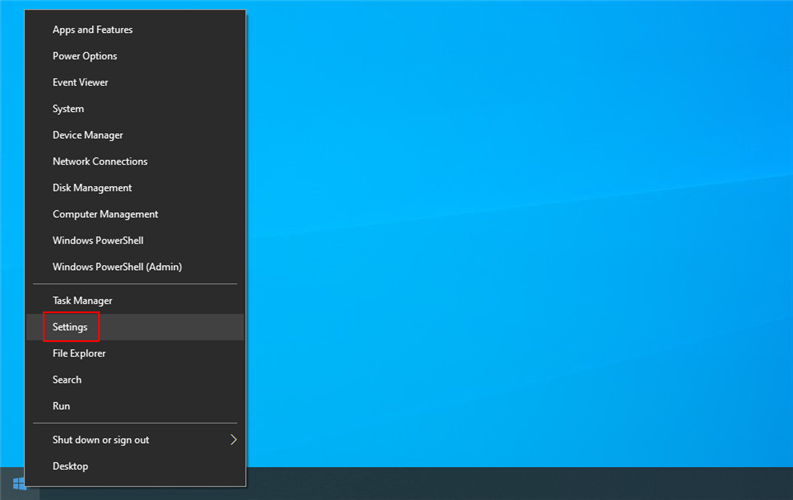
- Go to the Update & Security area
- Select Troubleshoot
- Nhấp vào Trình gỡ rối bổ sung

- Select Internet Connections and click Run the troubleshooter
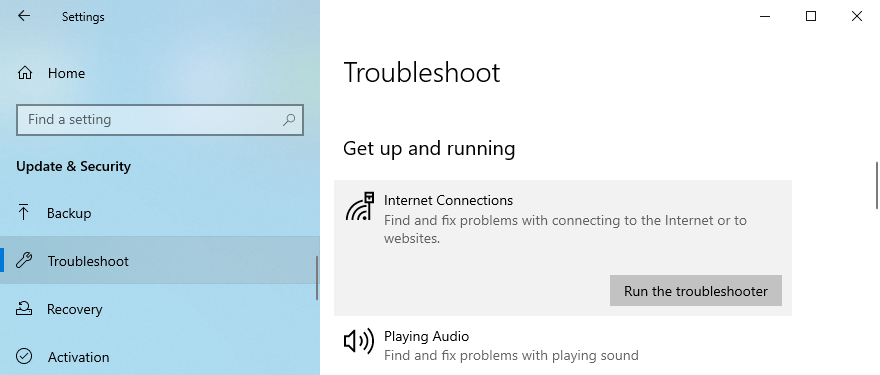
- Proceed with the wizard steps
- Restart your computer and try to use Chrome now

24. Reboot your router and modem
To refresh your Internet connectivity settings, it’s a good idea to shut down your router and modem, wait for a few minutes, and then start them up again. Then, you can shift your attention to your computer, fire up Chrome, and see if you can access any pages.
The DNS_PROBE_FINISHED_NO_INTERNET issue can be solved
To recap, DNS_PROBE_FINISHED_NO_INTERNET is an error message that appears in Chrome and prevents you from going online. It describes a problem with the DNS servers, which can be used by incorrect DNS, computer, or Internet settings. There are multiple ways to repair it.
You should try using a different browser, restart Chrome, clear the browsing cache, update Chrome, reset it to default settings, disable any third-party browser extensions, reinstall the application, and always use the Chrome stable channel.
Furthermore, you should downgrade Chrome if you’re using an older Windows version, restart the DNS client service, use Google DNS servers, clear the DNS cache, run a ping test, visit a website by IP address instead of domain name, and turn off any VPN or proxy apps.
It’s also a good idea to check firewall settings, uninstall antivirus tools, check parental control settings, examine the Hosts file, update your operating system, check the network driver, check IPv4 and IPv6 connectivity, run the Internet Connections troubleshooter, as well as reboot your router and modem.
How did you manage to fix the DNS_PROBE_FINISHED_NO_INTERNET error on your device? Hãy cho chúng tôi biết trong phần bình luận bên dưới.