0x80080005 là mã lỗi được nhiều người dùng báo cáo khi cố gắng chạy Windows Update. Nó ngăn hệ điều hành của bạn tải xuống và áp dụng các bản cập nhật mới nhất, điều này có thể gây ra các vấn đề nghiêm trọng về lâu dài.
Ví dụ: bạn có thể có sự cố khi cập nhật ứng dụng Microsoft Store mà không có bản cập nhật hệ thống mới nhất. Lỗi có thể do lỗi phần mềm hoặc phần cứng gây ra. Nó thường liên quan đến cài đặt máy tính hoặc kết nối mạng của bạn, có nghĩa là bạn có thể dễ dàng giải quyết chúng bằng cách sử dụng các giải pháp bên dưới.

Cách khắc phục lỗi cập nhật Windows 10 0x80080005
Trước khi bắt đầu quá trình khắc phục sự cố, hãy đảm bảo tạo điểm khôi phục hệ thống trên PC của bạn. Nếu bạn gặp phải các sự cố khác trong quá trình này, bạn có thể hoàn tác chúng bằng cách đưa Windows 10 trở lại điểm khôi phục.
Hơn nữa, bạn nên thử chạy Windows Update để xác nhận lỗi:
- Nhấp chuột phải vào nút Bắt đầu và đi tới Cài đặt
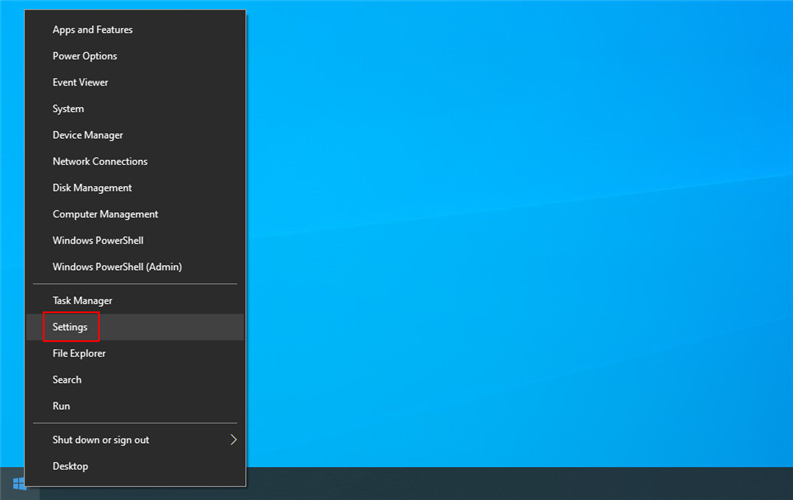
- Chọn Cập nhật & Bảo mật

- Nhấp vào Windows Update ở phía bên trái
- Nhấp vào Kiểm tra các bản cập nhật


1. Chạy trình gỡ rối Windows Update
Bạn có thể bắt đầu với một giải pháp dễ dàng: sử dụng Trình gỡ rối Windows Update . Nó được thiết kế để xác định và sửa chữa các sự cố phổ biến khiến hệ điều hành của bạn không được cập nhật. Dưới đây là cách sử dụng nó:
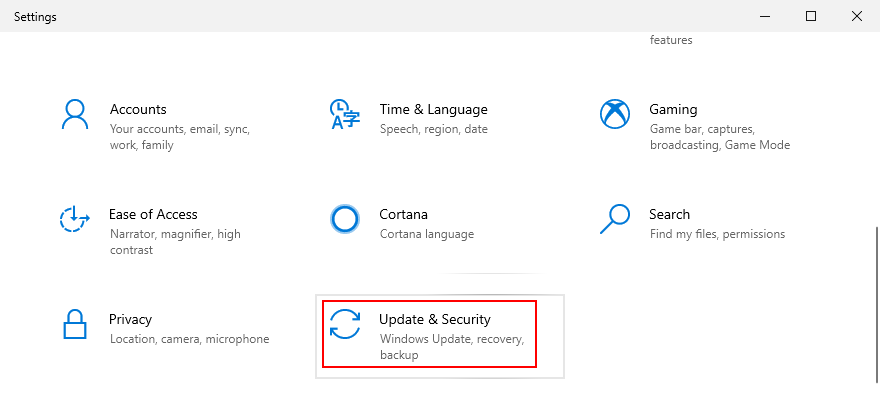
- Nhấp vào nút Bắt đầu , tìm kiếm Cài đặt và mở ứng dụng này
- Truy cập Cập nhật & Bảo mật
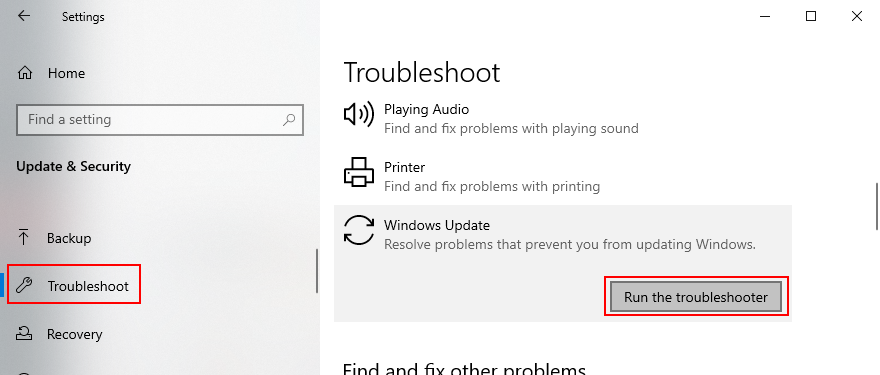
- Chuyển đến Khắc phục sự cố ở bên trái
- Nhấp vào Trình gỡ rối bổ sung

- Chọn Windows Update và nhấp vào Chạy trình khắc phục sự cố
- Làm theo các bước hướng dẫn và áp dụng bất kỳ bản sửa lỗi nào
- Khởi động lại PC của bạn và thử chạy Windows Update ngay bây giờ


2. Sử dụng chẩn đoán Windows Update
Nếu trình khắc phục sự cố tích hợp không thực hiện được thủ thuật này, bạn có thể chuyển sang Chẩn đoán Windows Update. Đây là một công cụ do Microsoft tạo ra để chẩn đoán và sửa chữa các sự cố Windows Update phải được cài đặt riêng. Dưới đây là cách sử dụng nó:
- Đảm bảo đăng nhập vào Windows 10 bằng tài khoản quản trị viên
- Tải xuống Chẩn đoán Windows Update từ trang web chính thức
- Khởi chạy ứng dụng
- Trong trình hướng dẫn, chọn Windows Update và nhấp vào Tiếp theo

- Làm theo hướng dẫn từng bước
- Khi quá trình kết thúc, hãy khởi chạy lại Chẩn đoán Windows Update
- Chọn Chẩn đoán mạng Windows và nhấp vào Tiếp theo
- Sau khi trình hướng dẫn áp dụng các bản sửa lỗi, hãy khởi động lại PC của bạn
- Cố gắng chạy Windows Update ngay bây giờ

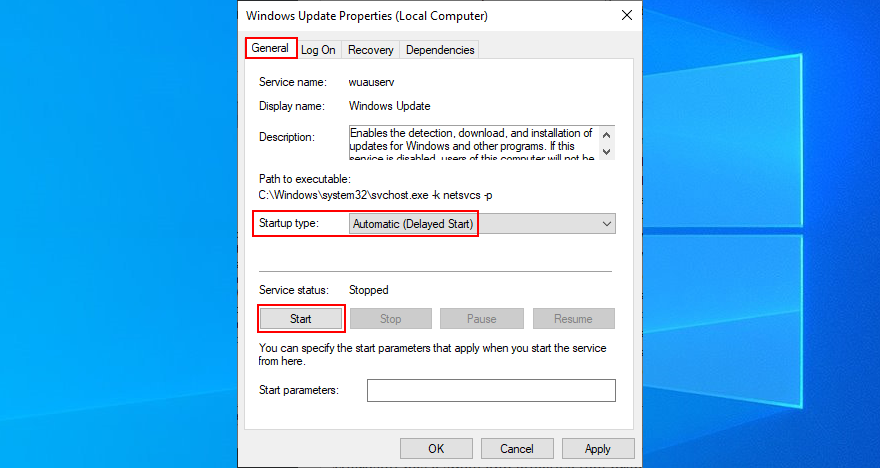
3. Khởi động lại dịch vụ Windows Update
Windows Update được kiểm soát bởi một dịch vụ sẽ tự động khởi động khi khởi động hệ thống và chạy mọi lúc. Nếu vì lý do nào đó mà điều đó không xảy ra thì bạn có thể gặp phải các mã lỗi như 0x80080005. Rất may, bạn có thể dễ dàng khắc phục sự cố này:
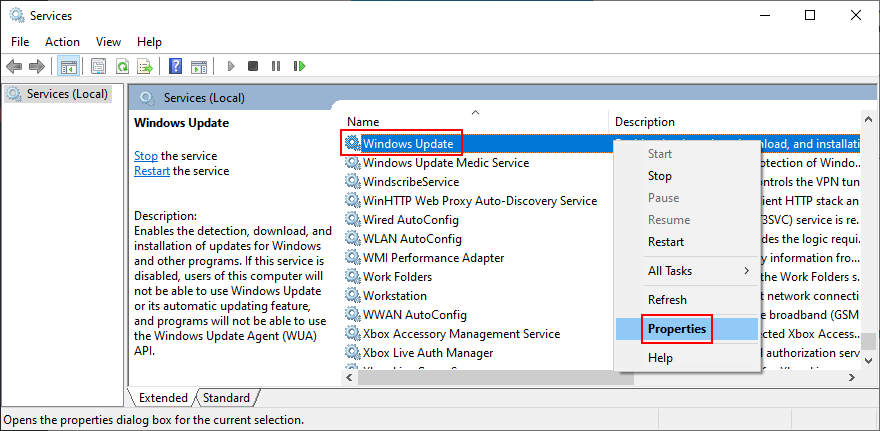
- Nhấp vào nút Bắt đầu , tìm kiếm Dịch vụ và khởi chạy ứng dụng này
- Tìm và nhấp đúp vào Windows Update để xem các thuộc tính của nó
- Ở trong tab Chung
- Đặt Kiểu khởi động thành Tự động (Bắt đầu bị trễ)
- Nếu dịch vụ bị dừng, hãy nhấp vào nút Bắt đầu
- Nhấp vào Áp dụng để thực hiện các thay đổi và thoát ra cửa sổ chính của Dịch vụ

- Tìm Dịch vụ truyền tải thông minh trong nền và Tính sẵn sàng của ứng dụng để thực hiện các tác vụ tương tự
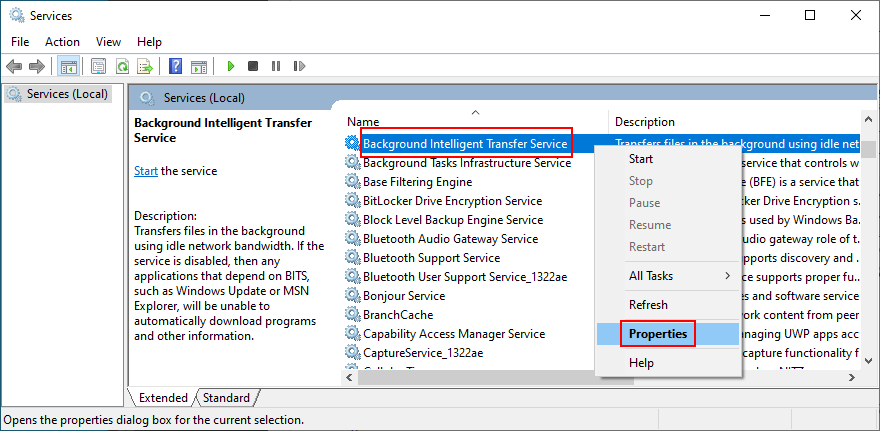
- Cố gắng chạy Windows Update

4. Tắt dịch vụ danh sách mạng
Dịch vụ danh sách mạng là bắt buộc, nhưng một số người dùng báo cáo rằng dịch vụ này gây ra sự cố Windows Update dẫn đến lỗi 0x80080005. Dưới đây là cách tắt tính năng này:
- Nhấn phím Win + R , nhập services.msc và nhấn Enter

- Định vị và nhấp đúp vào Dịch vụ danh sách mạng
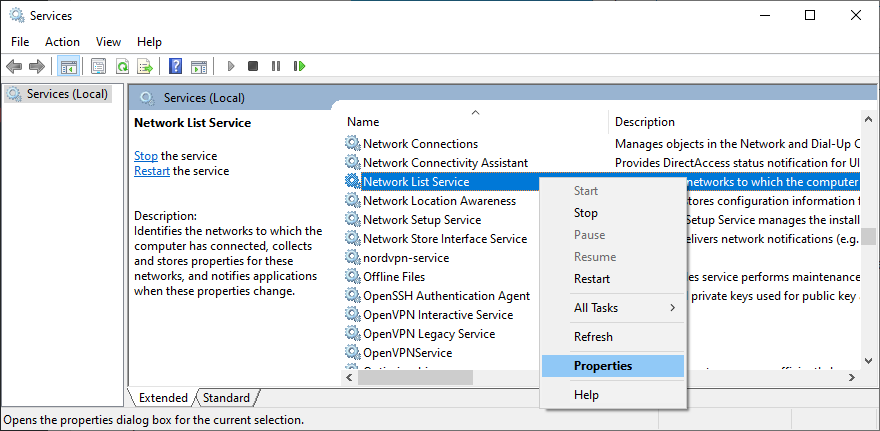
- Đặt Loại khởi động thành Đã tắt
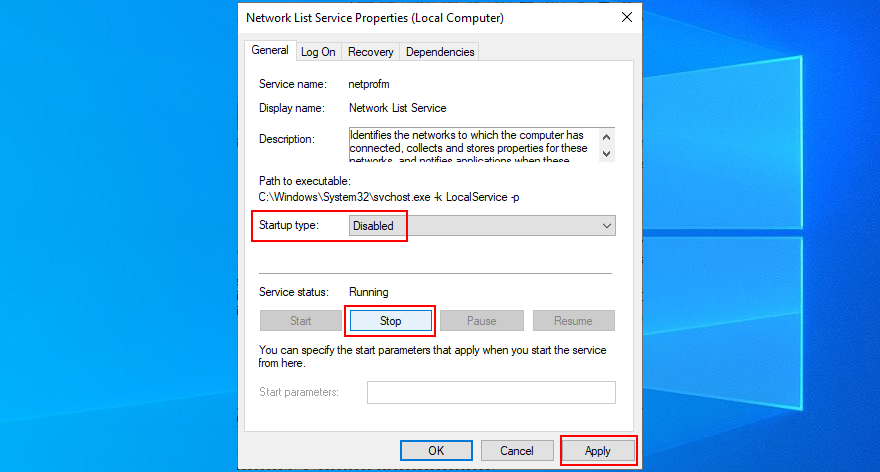
- Nếu dịch vụ đang chạy, hãy nhấp vào Dừng
- Nhấp vào Áp dụng và thoát
- Thử chạy Windows Update ngay bây giờ
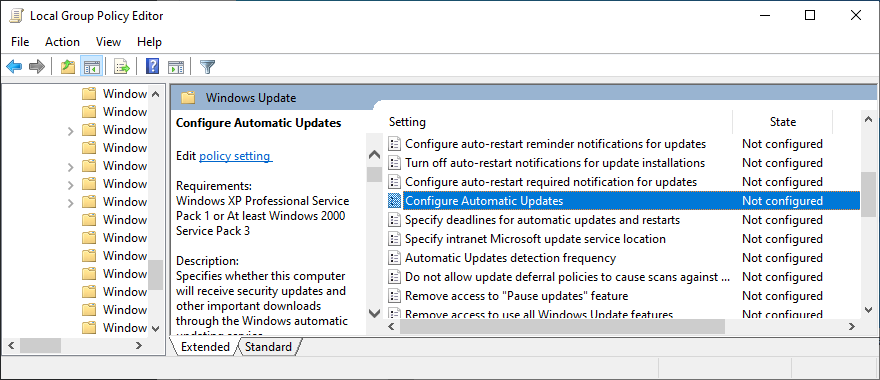
5. Kiểm tra cài đặt Chính sách nhóm
Có thể mã lỗi Windows Update 0x80080005 đã được kích hoạt bởi cài đặt không chính xác trong Chính sách nhóm. Dưới đây là cách kiểm tra và khắc phục sự cố này:
- Nhấn phím Win + R , nhập gpedit.msc và nhấn Enter để mở Local Group Policy Editor

- Đi tới Cấu hình máy tính > Mẫu quản trị > Cấu phần Windows > Windows Update
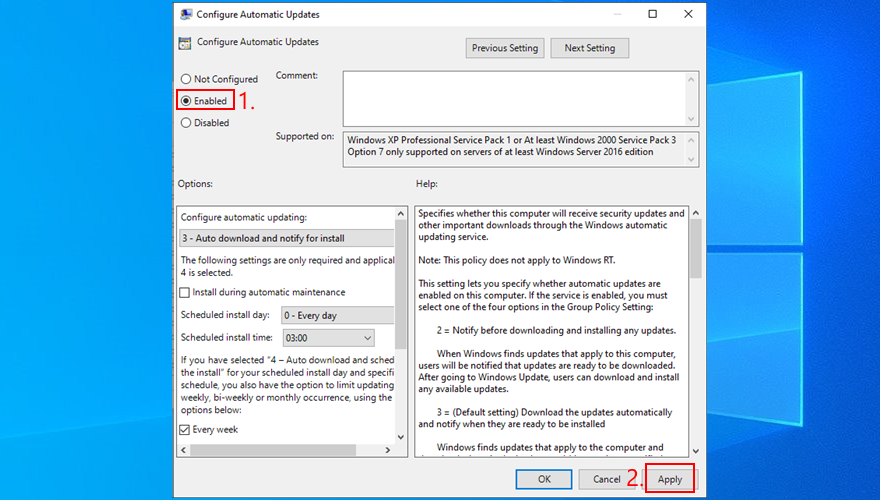
- Định vị và nhấp đúp vào Định cấu hình Cập nhật Tự động để xem các thuộc tính của nó
- Chọn Đã bật và nhấp vào Áp dụng

- Khởi động lại PC của bạn
- Thử chạy Windows Update
6. Đặt lại Windows Update
Bạn có thể nhanh chóng đặt lại các cấu phần Windows Update để xóa bộ nhớ cache và khắc phục các sự cố phổ biến có thể dẫn đến lỗi 0x80080005. Để thực hiện điều này, bạn chỉ cần sử dụng Command Prompt. Đây là những gì bạn nên làm:
- Đảm bảo đăng nhập vào Windows 10 với quyền nâng cấp
- Nhấp vào nút Bắt đầu , tìm kiếm Dấu nhắc Lệnh và nhấn Nhập
- Sao chép và dán các lệnh tiếp theo (nhấn Enter sau mỗi dòng văn bản):
- Thoát khỏi Command Prompt và khởi động lại PC của bạn
- Cố gắng chạy Windows Update
7. Rút phích cắm tất cả các thiết bị ngoại vi
Bất kỳ thiết bị bên ngoài nào mà bạn mới cắm vào máy tính của mình gần đây đều có thể gây ra mã lỗi 0x80080005 do sự cố về khả năng tương thích hoặc trình điều khiển. Hãy nghĩ về bất kỳ phần cứng mới nào bạn đã mua hoặc nhận được làm quà tặng, chẳng hạn như ổ cắm bút USB, bộ điều hợp Wi-Fi hoặc webcam có tính năng plug-and-play.
Để xử lý vấn đề này, hãy tắt máy tính của bạn và rút phích cắm của tất cả các thiết bị ngoại vi, ngoại trừ bàn phím và chuột. Sau đó, khởi động hệ điều hành và chạy Windows Update để xác nhận rằng bạn không gặp lỗi nữa.
Bạn có hai lựa chọn tại thời điểm này: cắm lại tất cả các thiết bị và tháo chúng ra bất cứ khi nào bạn cần chạy Windows Update hoặc chọn ra thiết bị có lỗi để sửa hoặc ngừng sử dụng thiết bị đó.
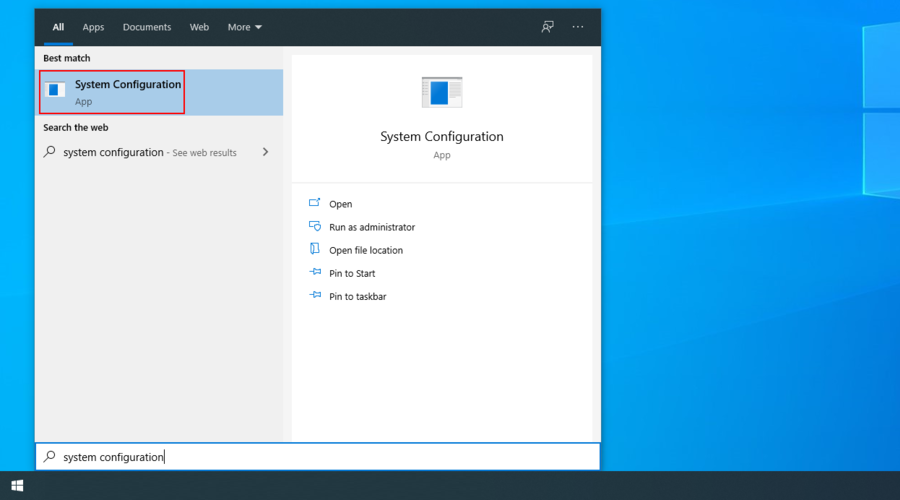
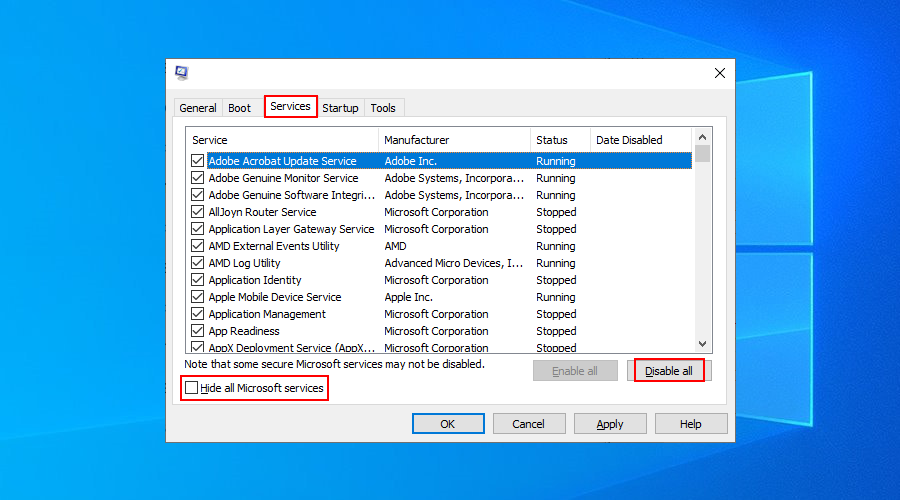
8. Chạy khởi động sạch
Một khởi động Windows 10 sạch sẽ có nghĩa là tắt tất cả các thành phần không cần thiết có thể gây ra sự cố phần mềm, chẳng hạn như trình điều khiển, dịch vụ và quy trình. Nó có thể giúp bạn loại trừ các sự cố dẫn đến lỗi Windows Update 0x80080005. Đây là những gì bạn cần làm:
- Nhấn phím Windows , tìm kiếm Cấu hình hệ thống và nhấn Enter
- Chuyển sang tab Dịch vụ
- Bỏ chọn Ẩn tất cả các dịch vụ của Microsoft và nhấp vào Tắt tất cả

- Thoát Cấu hình hệ thống
- Nhấp chuột phải vào thanh tác vụ và chọn Trình quản lý Tác vụ

- Chuyển sang tab Khởi động
- Nhấp vào cột Trạng thái để sắp xếp tất cả các ứng dụng theo trạng thái (trước tiên là Đã bật )
- Chọn ứng dụng đầu tiên và nhấp vào Tắt
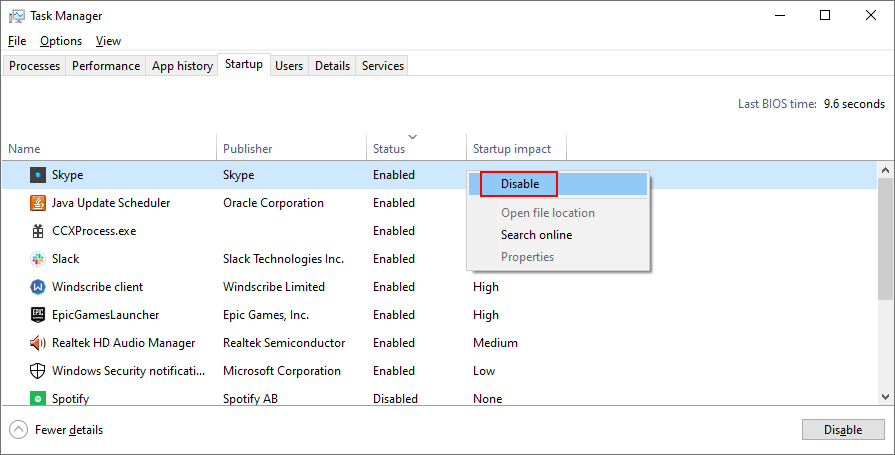
- Thực hiện việc này cho tất cả các ứng dụng có trạng thái Đã bật
- Khởi động lại PC của bạn
- Thử chạy Windows Update ngay bây giờ
9. Tắt tường lửa của bạn
Điều này khó xảy ra nhưng Windows Update có thể bị tường lửa của bạn chặn. Điều này thường xảy ra khi bạn thay đổi cài đặt tường lửa mặc định hoặc cài đặt ứng dụng tường lửa của bên thứ ba khiến điều đó xảy ra.
Để luôn an toàn, bạn có thể tạm thời tắt tường lửa để Windows có đủ thời gian cài đặt các bản cập nhật. Chỉ cần đảm bảo khởi động lại nó sau đó. Nếu không, bạn sẽ khiến máy tính của mình tiếp xúc với phần mềm độc hại.
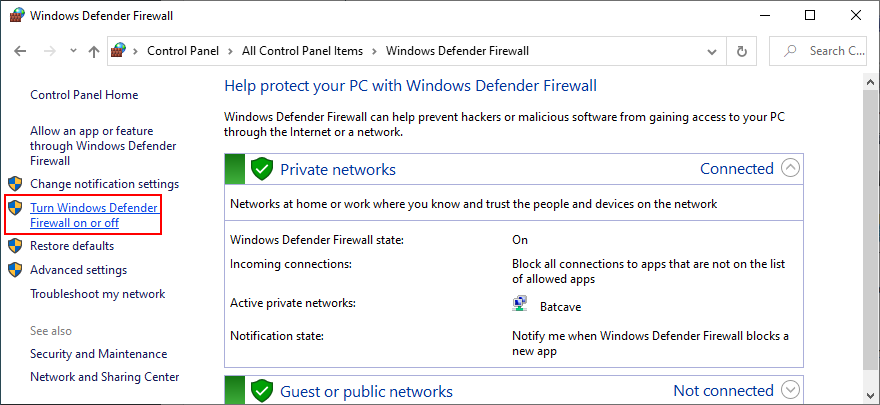
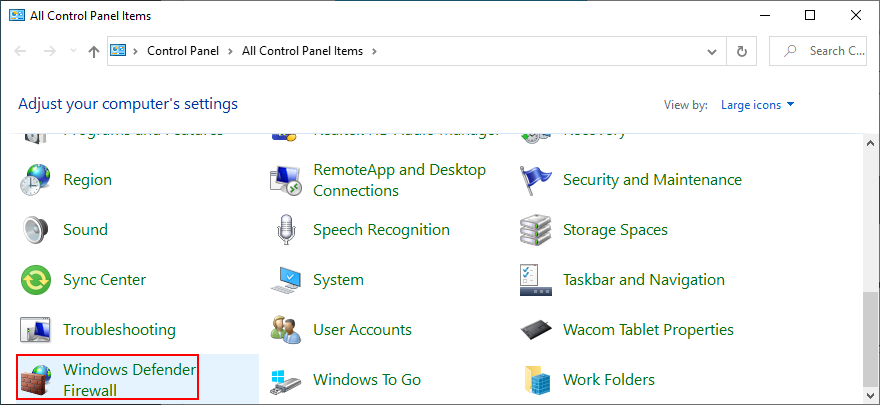
Cách tắt và kích hoạt lại Tường lửa của Windows:
- Đăng nhập vào Windows 10 bằng quyền quản trị
- Nhấp vào nút Bắt đầu , tìm kiếm Bảng điều khiển và mở ứng dụng này
- Tìm và nhấp vào Tường lửa của Bộ bảo vệ Windows

- Nhấp vào Bật hoặc tắt Windows Defender trên bảng điều khiển bên trái
- Chọn Tắt Tường lửa của Bộ bảo vệ Windows (không được khuyến nghị) tại Cài đặt mạng riêng và Cài đặt mạng công cộng
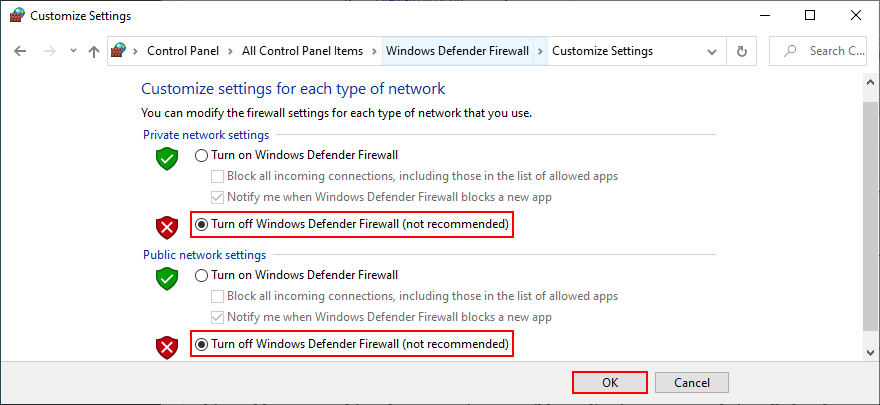
- Nhấp vào OK để xác nhận
- Thử chạy Windows Update
- Sau khi cập nhật xong, quay lại Bảng điều khiển > Tường lửa của Bộ bảo vệ Windows
- Chọn Khôi phục mặc định ở bên trái
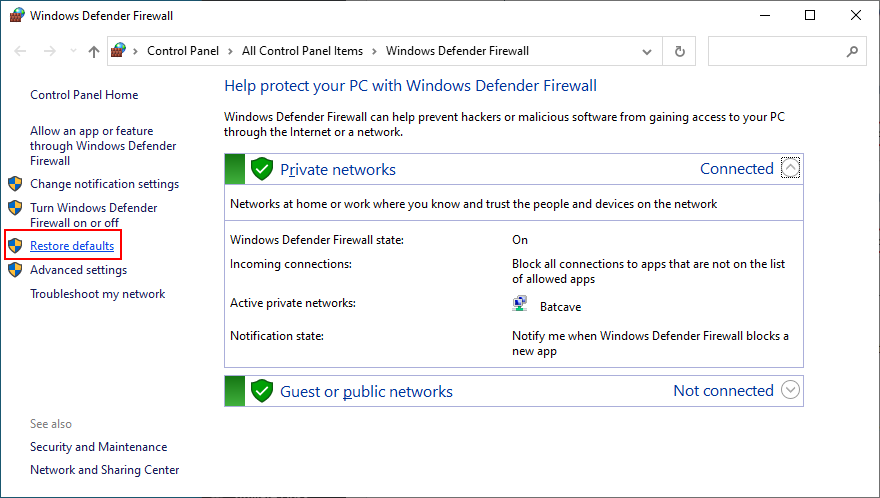
- Nhấp vào Khôi phục mặc định và Có để xác nhận
Nếu bạn có tường lửa của bên thứ ba tiếp quản Tường lửa của Windows, hãy điều chỉnh các bước ở trên để tạm thời tắt nó.
10. Gỡ cài đặt phần mềm của bên thứ ba
Trong giải pháp trước, chúng tôi đã đề cập rằng tường lửa của bên thứ ba có cài đặt không chính xác có thể chặn Windows Update và sau đó, kích hoạt các mã lỗi như 0x80080005. Tuy nhiên, cũng có thể ứng dụng tường lửa được xây dựng kém hoặc không hỗ trợ đầy đủ cho phiên bản Windows của bạn.
Nó không chỉ áp dụng cho các ứng dụng tường lửa mà còn cho bất kỳ chương trình nào có quyền truy cập Internet. Điều này bao gồm các giải pháp bảo mật Internet, dịch vụ VPN , trình duyệt web hoặc máy khách torrenting.
Nếu bạn bắt đầu gặp lỗi Windows Update ngay sau khi thêm một phần mềm mới vào PC của mình, đó có thể là bên có tội. Nhưng bạn có thể khắc phục sự cố này bằng cách gỡ cài đặt.
Cách gỡ cài đặt phần mềm gần đây:
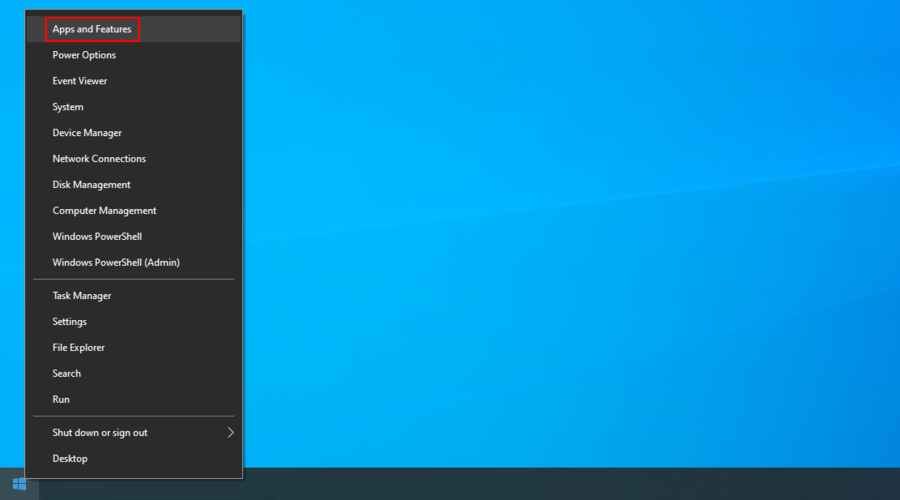
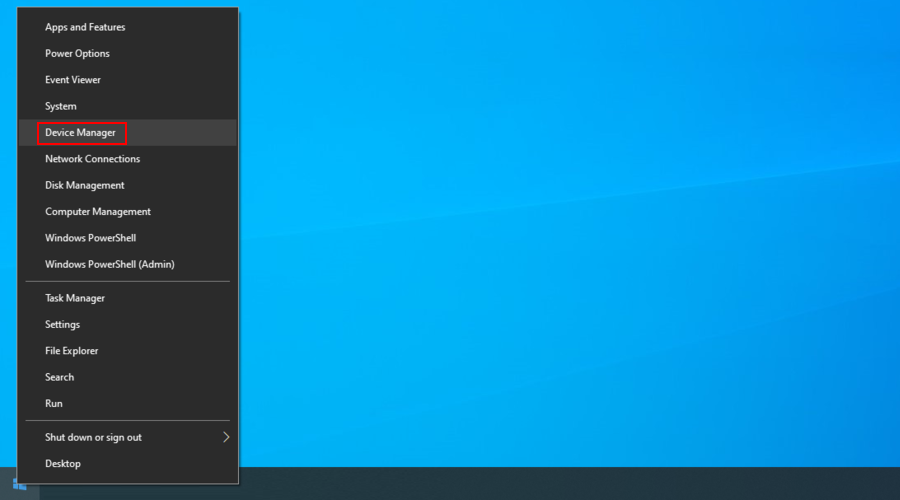
- Nhấp chuột phải vào nút Bắt đầu và chọn Ứng dụng và tính năng
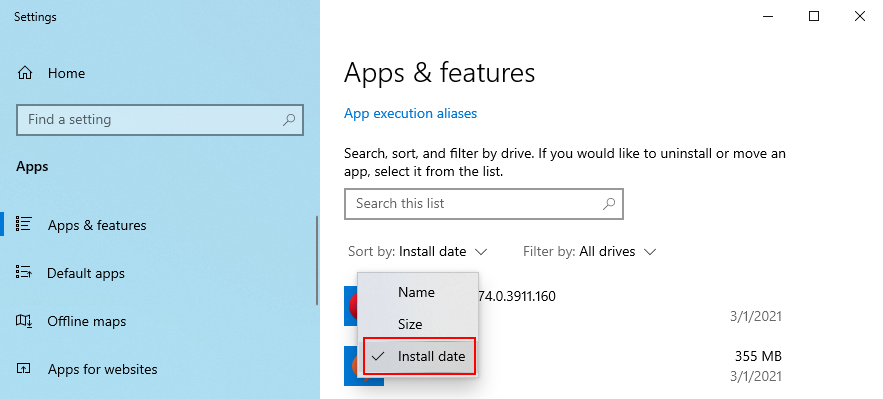
- Trong phần Ứng dụng và tính năng , đặt Sắp xếp theo thành Ngày cài đặt (mới nhất trước)
- Pick the first program in the list and click Uninstall
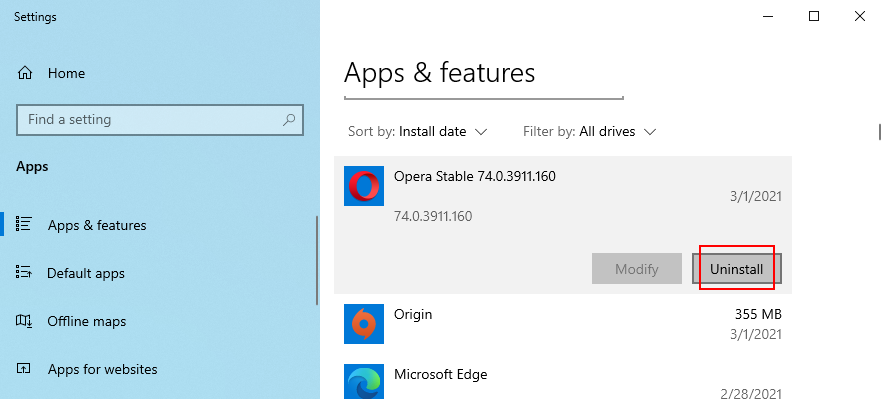
- Click Uninstall again to confirm and proceed with the wizard steps
- If you recently installed multiple fishy programs, make sure to remove all of them
- Reboot your PC and try running Windows Update
The Windows 10 built-in uninstaller is not that effective. If you prefer a more thorough solution that removes not only programs but also any leftover files and registry entries, use a third-party app uninstaller.
11. Uninstall system updates
Not only software applications can cause Windows Update issues but also a faulty system update. It’s not uncommon for Microsoft to push unreliable updates that affect the computers of millions of users. In some cases, this could even lead to error code 0x80080005.
But you can fix it by uninstalling the most recent Windows updates. Here’s how:
- Press Win key + R, type appwiz.cpl, and press Enter

- Click View installed updates

- Click the Installed On column to sort the updates by time (newest first)
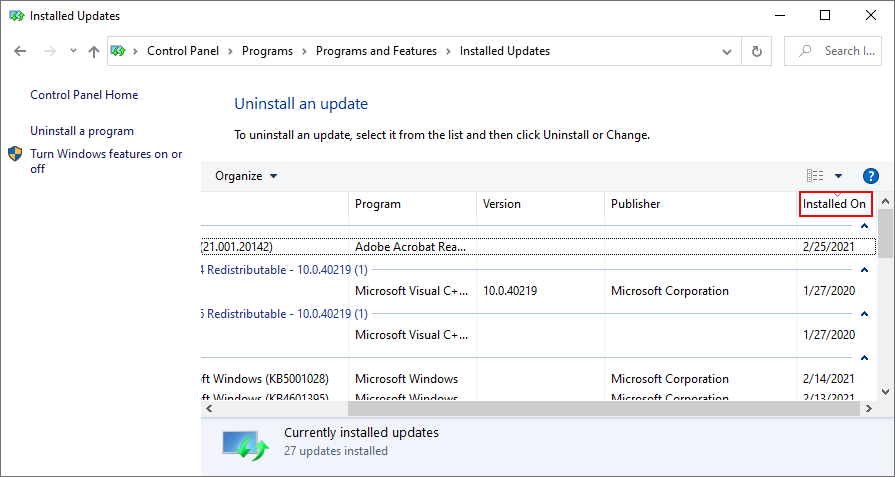
- Double-click the first entry in the Microsoft Windows category
- Click Yes to confirm and proceed with the removal
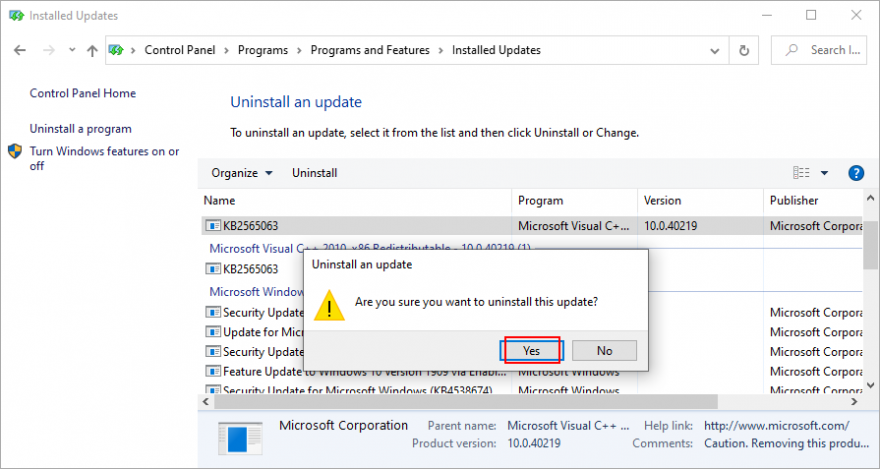
- Restart your PC and try to run Windows Update now
- If Windows Update works now, make sure to avoid installing the same update that was giving you trouble
12. Check the disk space
If there isn’t enough free disk space on your computer, Windows Update might not be able to carry out its activities, like downloading files or running background processes. You can tell if you get the insufficient disk space message in the notifications center.
To fix this problem, you can increase the disk space on the C: drive (or wherever you have Windows installed) by turning to a partition manager. However, if you don’t want to install any third-party tools, Disk Management should do the trick.
How to use Disk Management:
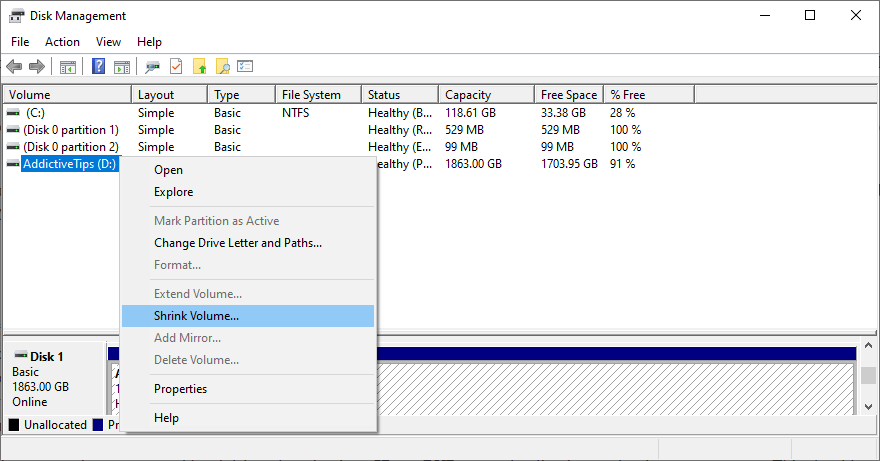
- Right-click the Start button and select Disk Management
- Select a large drive that doesn’t contain Windows (like D:)
- Right-click D: and select Shrink Volume
- Write the new volume size and click Shrink
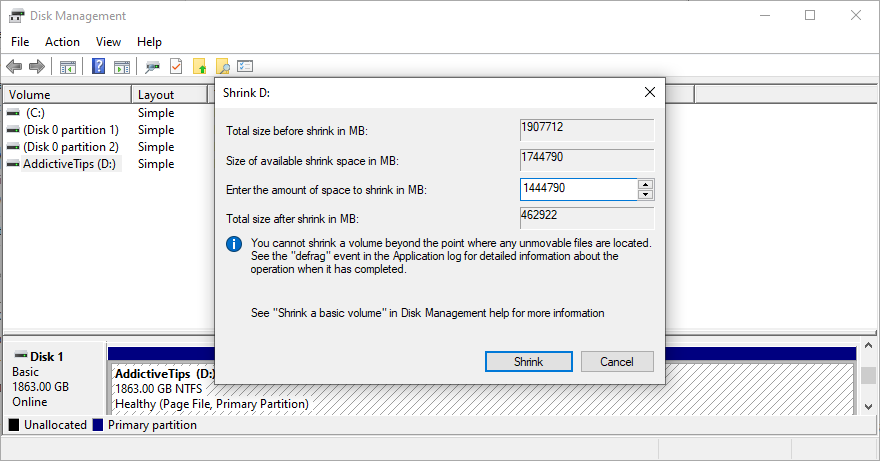
- Return to the main window
- Right-click the C: drive (or where you have Windows installed) and choose Extend Volume
- Set the new volume size and click Extend
- Try to run Windows Update now
If your hard disk is not big enough to allocate disk space from one partition to another, a workaround is to remove files from your PC to make room for Windows Update. Move personal photos and videos to an external hard disk, burn them to DVDs, or upload them to cloud storage accounts.
You can also uninstall large games and applications, as well as get rid of junk files with the help of a system cleaner. Or, if you don’t want to install anything extra, check out the Windows Disk Cleanup utility.
How to use Disk Cleanup:
- Sign in to Windows 10 with admin rights
- Go to Downloads and Recycle Bin to back up or restore any files you would like to keep since these folders will be emptied
- Press Win key + E to open File Explorer
- Select the C: drive or where you have your OS installed
- Right-click the drive and go to Properties
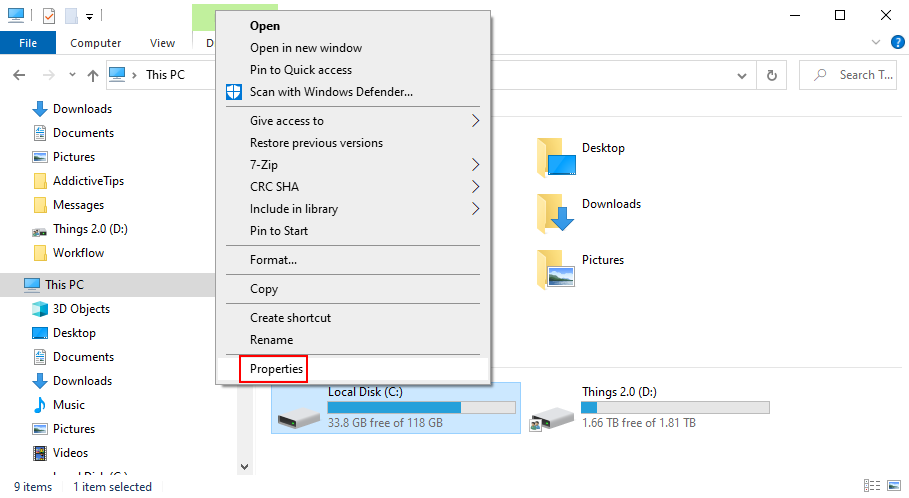
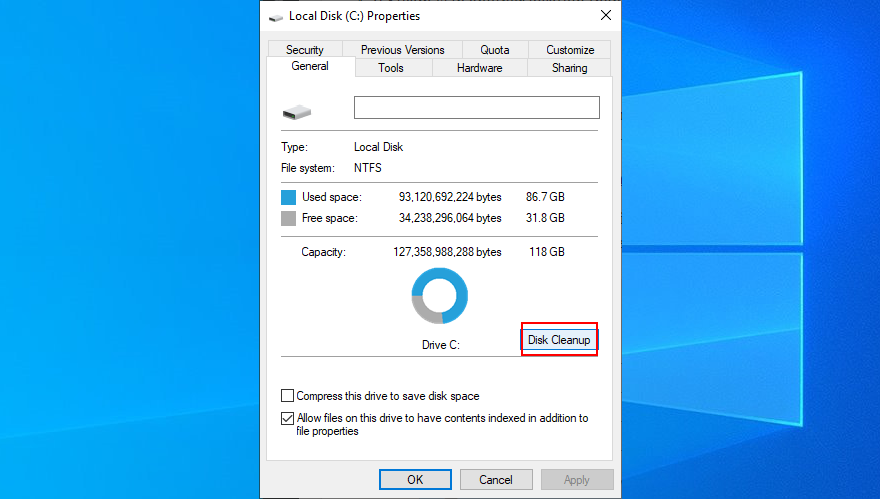
- In the General tab, click Disk Cleanup
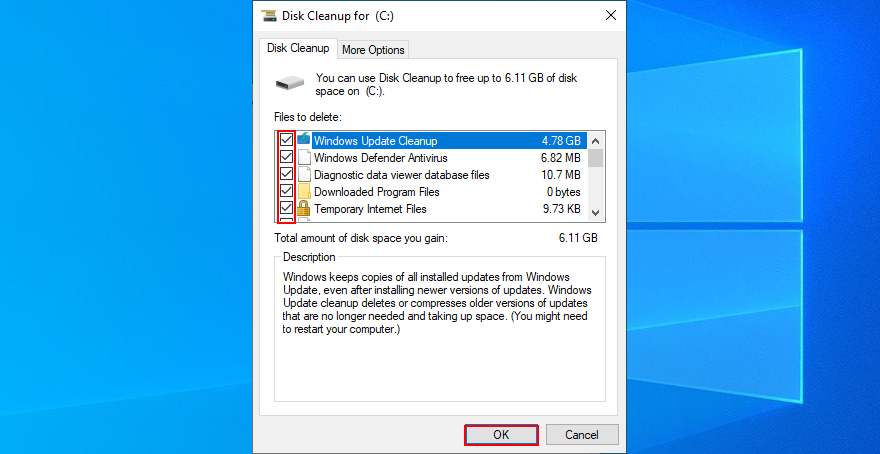
- At Files to delete, select everything and click Clean up system files
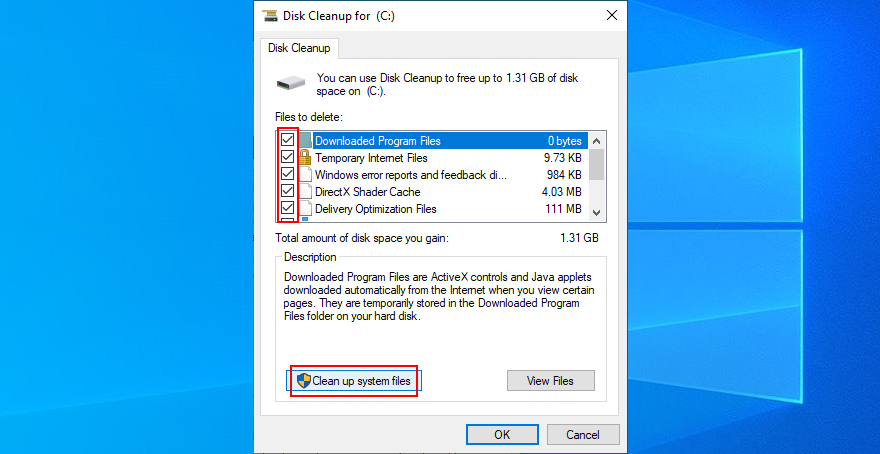
- Once the file search is over, choose all items again and press OK
- Restart your PC when the cleanup is over
- Try to run Windows Update now
13. Check the network drivers
It’s common for driver issues to interfere with all applications and system utilities that require Internet access, including Windows Update. For instance, if your network device is not working properly, it could be the reason why you keep getting error code 0x80080005. It’s also possible that your network driver is obsolete or incompatible with your operating system. Here’s what you need to do:
How to quickly reinstall the network device:
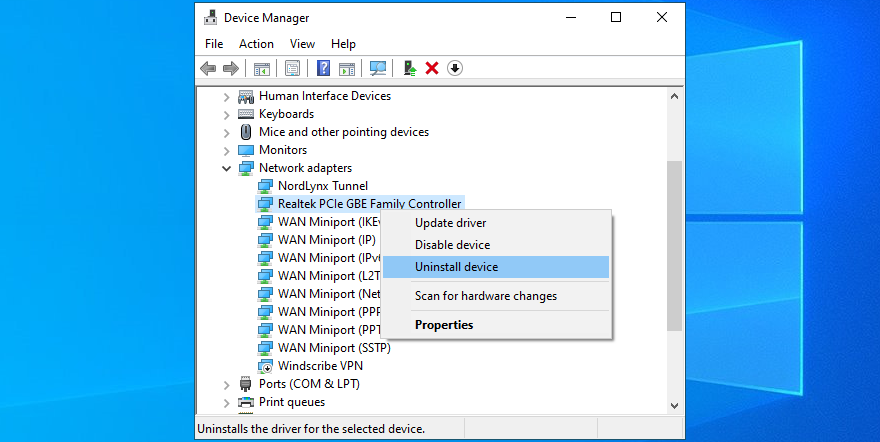
- Right-click the Start button and go to Device Manager
- Open the Network adapters category
- Select and right-click your main network device, then click Uninstall device
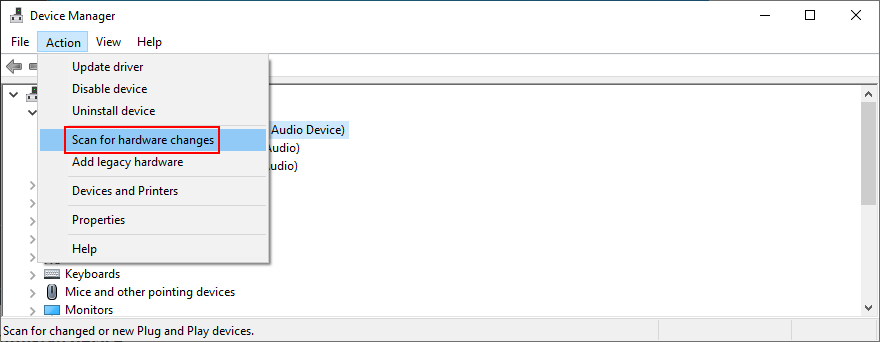
- Mở trình đơn Hành động và nhấp vào Quét các thay đổi phần cứng
- Restart your computer. Windows will auto-reinstall the missing network device
- Check for Windows Update errors
How to update your network driver:
- Return to Device Manager
- Right-click your network device and select Update driver
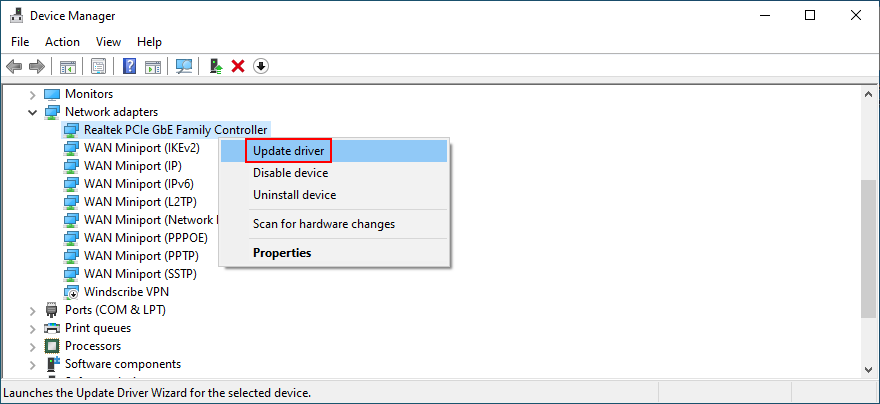
- When prompted with two options, click Search automatically for updated driver software
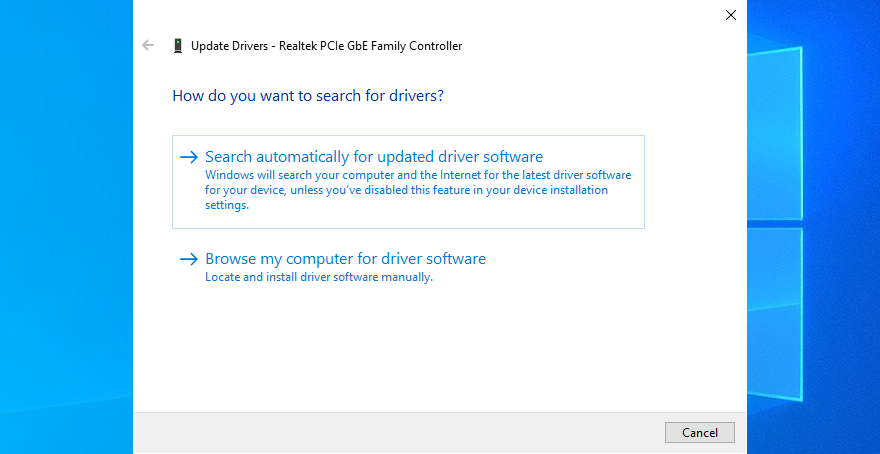
- Wait a bit until Windows checks for updates. If it doesn’t find anything, exit
If Windows fails to find a network driver, we suggest turning to a driver update tool. It identifies all outdated drivers on your PC and finds newer versions on the web that are compatible with your operating system. Furthermore, it can automatically download and install all drivers.
How to roll back an incompatible network driver:
- Go back to Device Manager
- Right-click your network adapter and go to Properties
- Switch to the Driver section
- Click Roll Back Driver and follow the on-screen steps
- If the button is greyed out, it means that no previous network driver exists on your PC, so you can’t complete the rollback
- If the rollback was successful, reboot your machine and try to run Windows Update
14. Repair hard disk and system errors
Data corruption in the hard disk or operating system can be devastating to all system utilities, including Windows Update. If you have a missing or damaged file that’s critical for the updater component, it’s no wonder that you get error codes like 0x80080005.
To fix HDD errors, you can use CHKDSK (Check Disk). When it comes to damaged system files, use SFC (System File Checker). Lastly, for more serious problems with the component store of the Windows image, turn to DISM (Deployment Image Servicing and Management).
How to use CHKDSK:
- Click the Start button, search for Command Prompt, and click Run as administrator
- Type
chkdsk c:/fif your operating system is installed on the C: drive. If it’s not, replacec:with the correct partition letter. Press Enter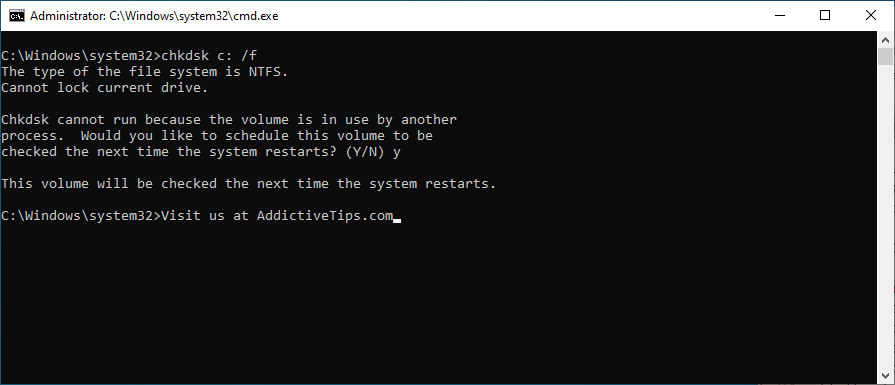
- When asked to confirm the CHKDSK scheduling at the next system boot, type y and hit Enter
- Reboot your PC
- During restart, CHKDSK will scan your hard disk and fix any errors
- After boot, try running Windows Update
How to use SFC:
- Press Win key + R, type cmd, and press Ctrl + Shift + Enter to run CMD as admin. Click Yes if prompted by UAC (User Account Control)

- Type
sfc/scannowand press Enter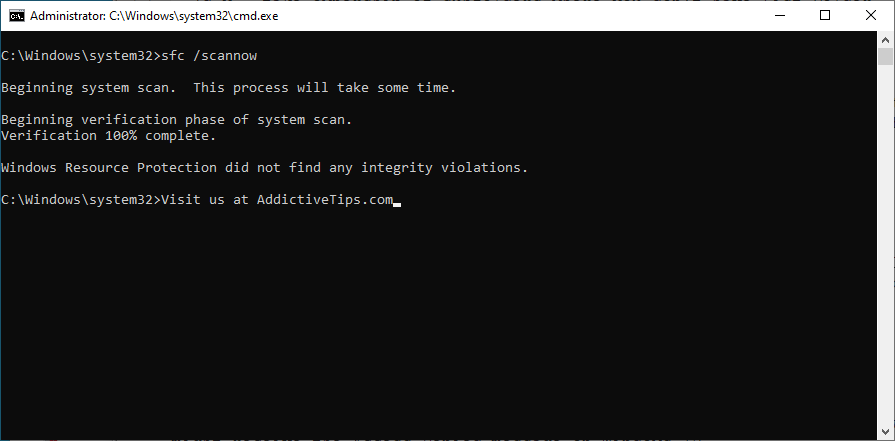
- Patiently wait while SFC performs the system scan and fixes any issues
- Restart your PC
- Run Windows Update and check if you still get error 0x80080005
How to use DISM:
- Launch Command Prompt as admin
- Run
DISM/online/cleanup-image/scanhealthto check the health of your operating system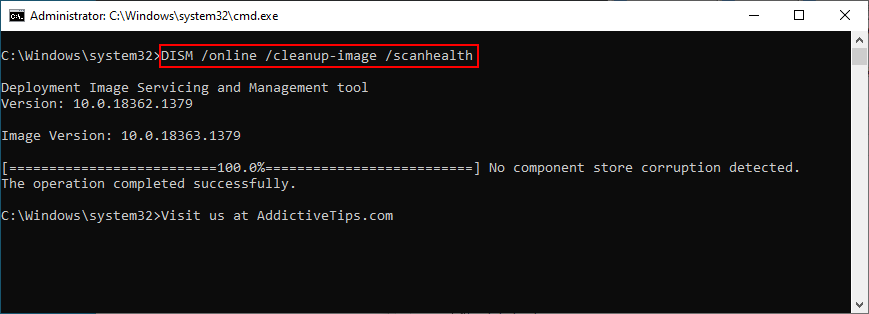
- If DISM finds any issues, type
DISM/online/cleanup-image/restorehealthand press Enter to fix them - Reboot your PC after the process is complete
- Open CMD as admin again
- Run SFC (
sfc/scannow) - Restart your computer one last time
- Try to run Windows Update now
15. Run a malware scan
If your antivirus solution failed to fend off malware attacks, then an infection could have affected the entire operating system and its utilities, including Windows Update. You need to immediately perform a computer scan and remove any viruses from your PC.
How to run Windows Defender:
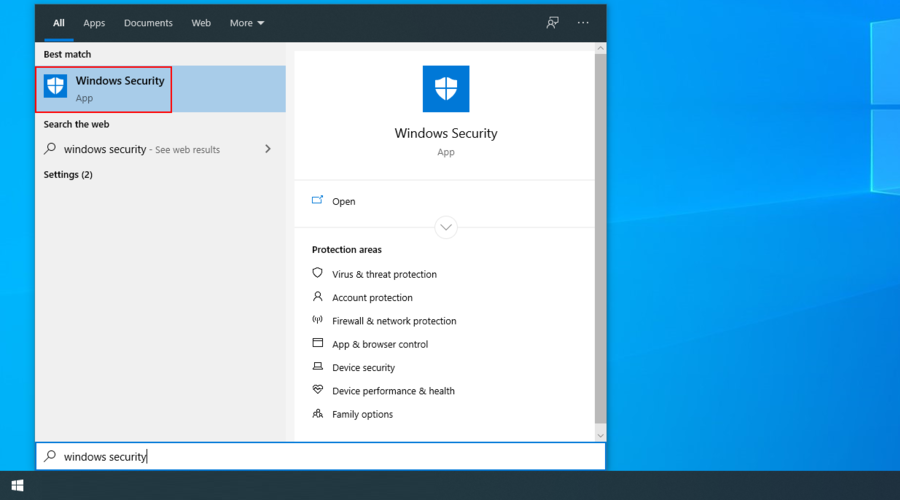
- Click the Start button, search for Windows Security, and press Enter
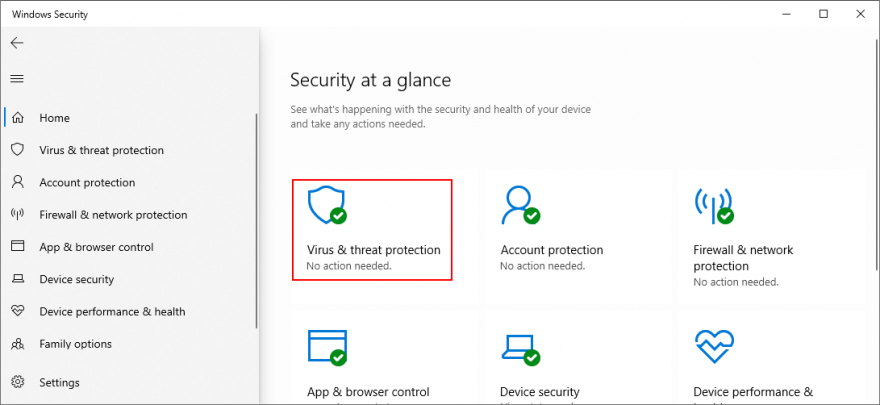
- Jump to Virus & threat protection
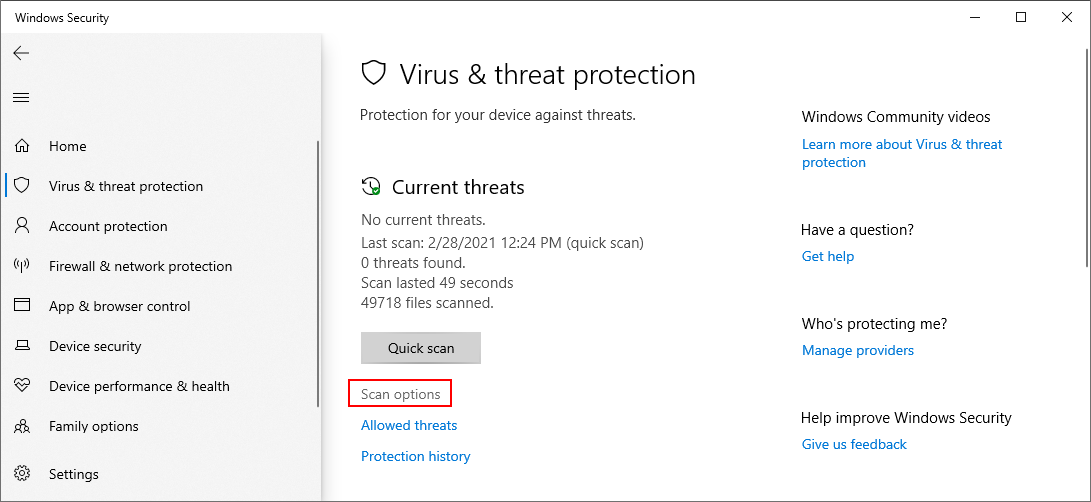
- Click Scan options
- Select Quick scan and click Scan now
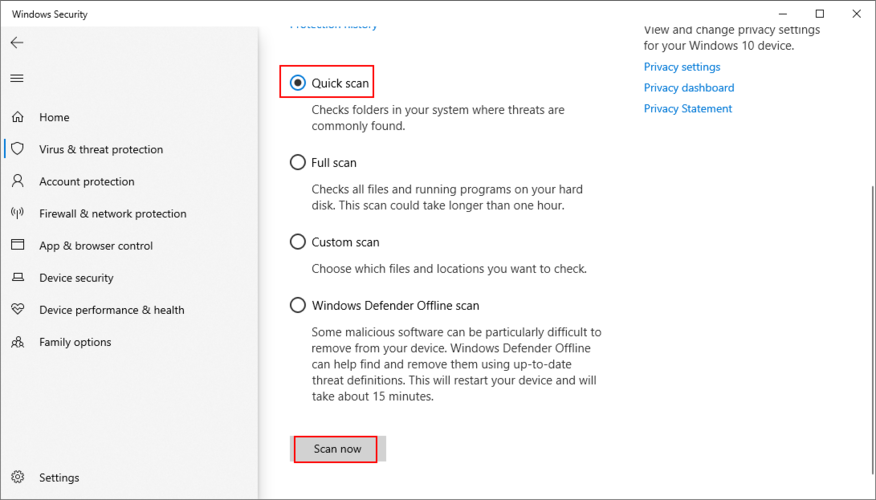
- Wait until Windows runs the scan. If it doesn’t find anything, select Windows Defender Offline scan and click Scan now
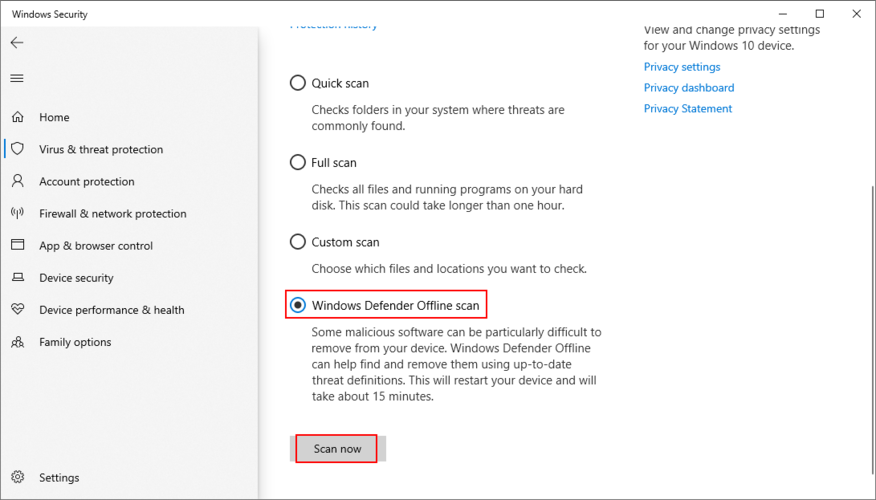
- Once the threats have been eliminated from your PC, restart
- Try to run Windows Update now
16. Turn off IPv6
It’s a bit unusual, but IPv6 connectivity may conflict with Windows Update if your network doesn’t support IPv6. In turn, this can lead to error codes like 0x80080005. Unless you’re absolutely sure that your ISP supports IPv6 (you can contact it and ask), it’s safer to disable IPv6 connections on your PC.
How to disable IPv6 on Windows 10:
- Click the network icon in the system tray and visit Network & Internet settings
- Go to Change adapter options
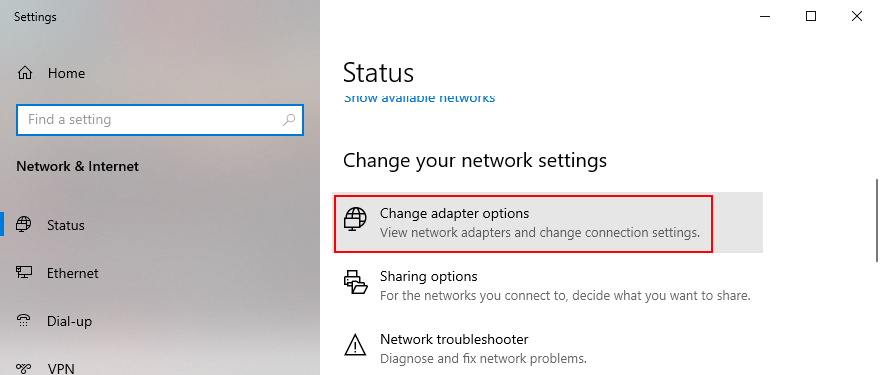
- Select your Internet connection, right-click it, and choose Properties (you need admin rights)
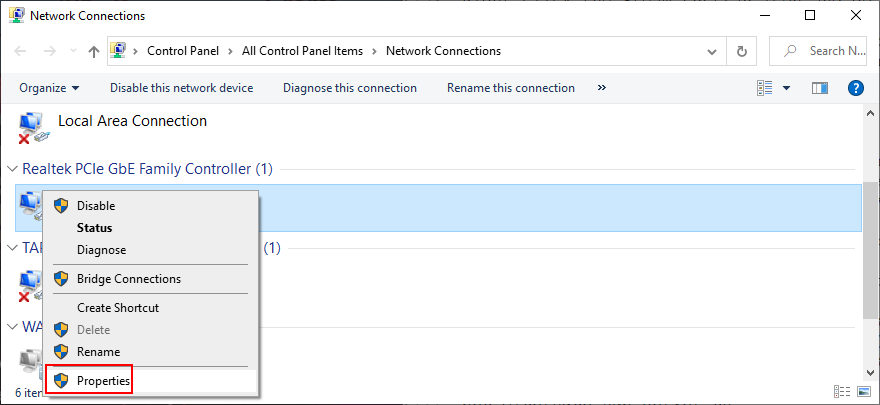
- Remain in the Networking tab
- Find and uncheck Internet Protocol Version 6 (TCP/IPv6)
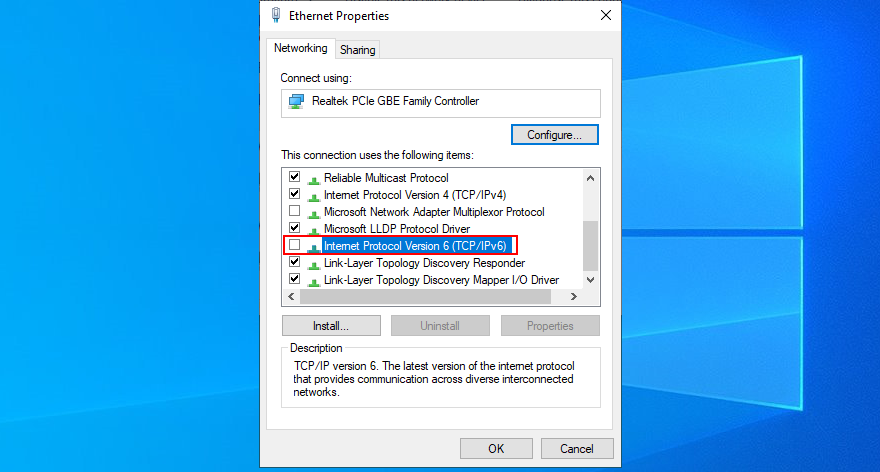
- Click OK and exit
- Try to run Windows Update now
It’s also a good idea to turn disable IPv6 connectivity from your router’s admin panel.
17. Fix registry settings
You can also fix the 0x80080005 Windows Update error code by fixing several system registry settings. Don’t worry since you don’t need any previous experience, as long as you follow the instructions below.
- Click the Start button, search for Registry Editor, and open this app
- If prompted by User Account Control, click Yes
- In Registry Editor, create a backup:
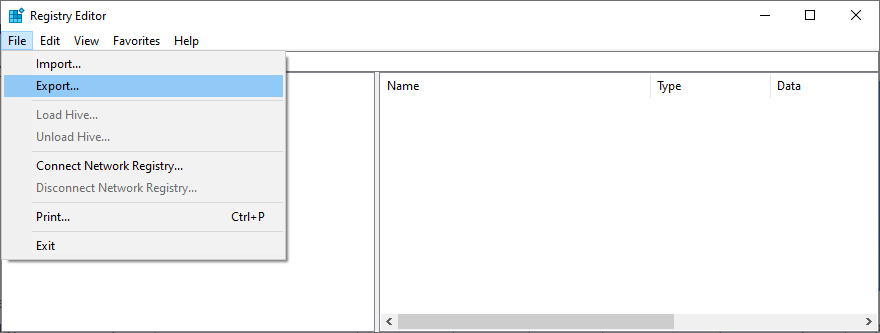
- Open the File menu
- Select Export
- Set a new file name and indicate a destination
- Click Save to save the current registry settings as backup (.reg format)
- Copy and paste the following address to visit this location:
Computer\HKEY_LOCAL_MACHINE\SOFTWARE\Microsoft\Windows\CurrentVersion\WindowsUpdate\Auto Update
- If you spot the EnableFeaturedSoftware entry, check if Data is 0x00000001 (1). Otherwise:
- Double-click the entry
- Set Value data to 1
- Set Base to Hexadecimal
- Click OK
- If the EnableFeaturedSoftware entry doesn’t exist:
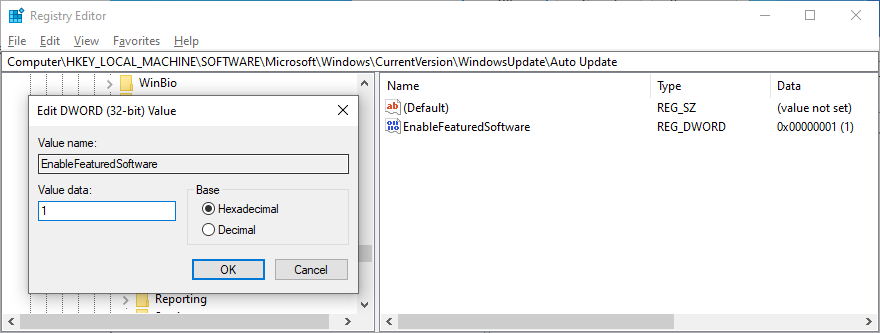
- Open the Edit menu
- Select New > DWORD (32-bit) Value
- Set the name to EnableFeaturedSoftware
- Double-click the entry
- Set Value data to 1
- Set Base to Hexadecimal
- Click OK
- Go to the following location:
HKEY_LOCAL_MACHINE\SOFTWARE\Microsoft\WindowsUpdate\UX
- Find and double-click IsConvergedUpdateStackEnabled
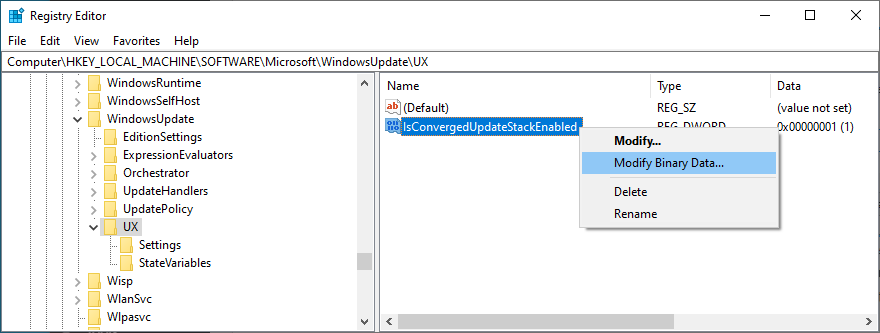
- Set Value data to 0
- Set Base to Hexadecimal
- Click OK
- Now, visit this address:
HKEY_LOCAL_MACHINE\SOFTWARE\Microsoft\WindowsUpdate\UX\Settings
- Locate UxOption

- Double-click the entry
- Set Value data to 0
- Set Base to Hexadecimal
- Click OK
- Finally, visit this location:
HKEY_LOCAL_MACHINE\SOFTWARE\Policies\Microsoft\SystemCertificates
- If you spot the CopyFileBufferedSynchronousIo entry, make sure that its data is set to 0x00000001 (1). If it’s not:
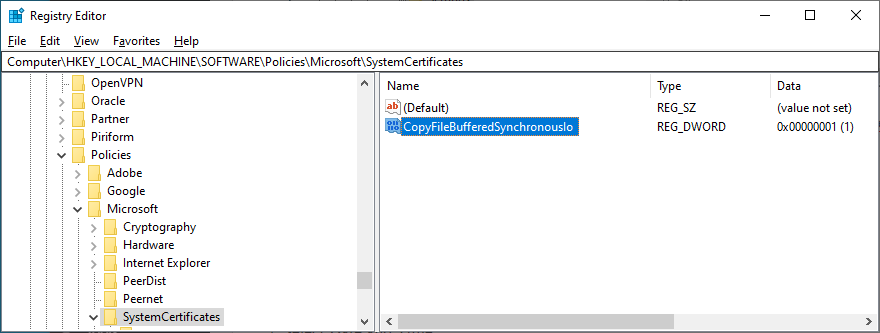
- Double-click the entry
- Set Value data to 1
- Set Base to Hexadecimal
- Click OK
- If CopyFileBufferedSynchronousIo doesn’t exist:Open the Edit menu
- Select New > DWORD (32-bit) Value
- Set the entry name to CopyFileBufferedSynchronousIo
- At Value data, write 1
- Set Base to Hexadecimal
- Click OK
- Exit Registry Editor and restart your computer
- Try to run Windows Update now
If, for any reason, you need to roll back the changes you made in the registry, just double-click the.reg backup file you previously created to restore the original registry configuration.
18. Fix Windows startup problems
The Windows advanced troubleshooting mode gives you the possibility to repair startup issues that might prevent your operating system from working properly. It’s worth a shot when it comes to repairing Windows Update errors. Here’s how to use it:
- Make sure to save any ongoing projects
- Nhấp chuột phải vào nút Bắt đầu và đi tới Cài đặt
- Select Update & Security
- Jump to Recovery on the left side
- At Advanced startup, click Restart now
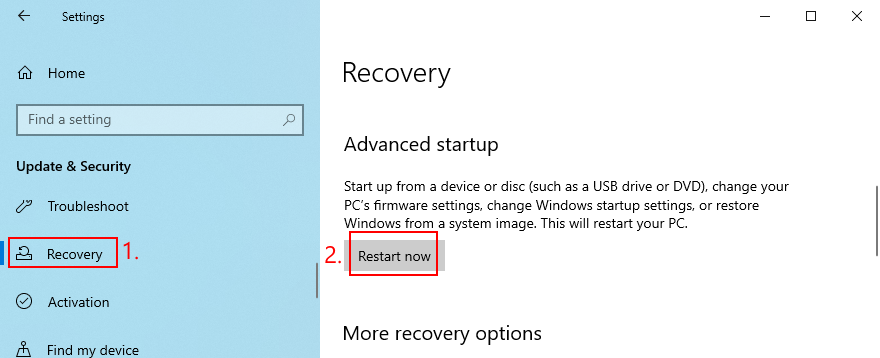
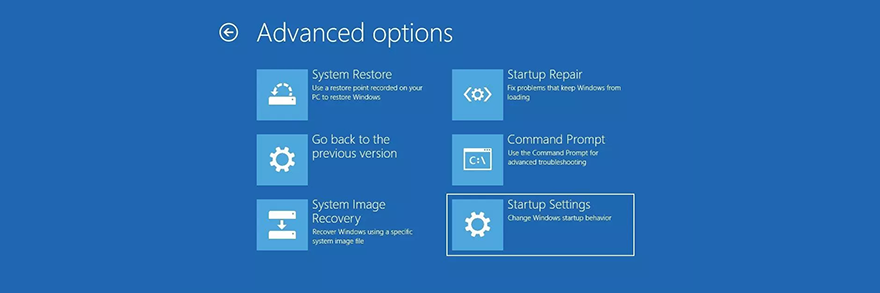
- Windows will restart in recovery mode. When the screen turns blue and loads various options, go to Troubleshoot

- Select Advanced options > Startup Repair
- Select your admin account and enter your password
- Follow the step-by-step instructions to fix startup problems
- After Windows starts, try running the system updater
19. Roll back Windows 10
For any other unforeseen software events that you can’t identify but may have damaged Windows Update, turn to System Restore. If you have created a restore point before starting to receive error code 0x80080005 on each attempt to update the OS, you can roll back Windows 10 to that state. Here’s how:
- Click the Start button, search for Control Panel, and open this app
- Select the Recovery section

- Pick a restore point from the list or select Show more restore point to go back further
- To view which applications will be removed from your PC, click Scan for affected programs
- Click Next and follow the on-screen instructions
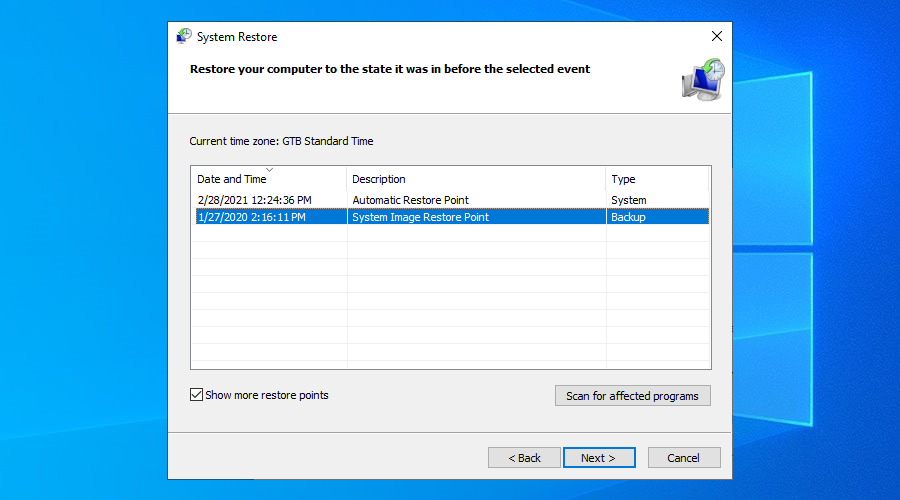
- After your PC restarts, try to run Windows Update
20. Reset Windows 10
Unfortunately, System Restore fails to work on many occasions. After exhausting all the previous solutions and still getting hampered by error code 0x80080005, it’s time to reset Windows 10.
Your files, downloads, and game saves will be left untouched. However, all your applications will disappear from your PC. Here’s what you need to do:
- Right-click the Windows 10 Start button and select Settings
- Visit the Update & Security section
- Jump to Recovery
- At Reset this PC, click Get started
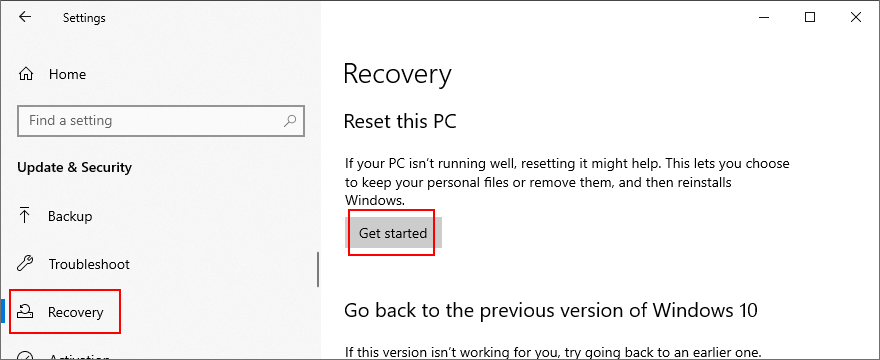
- When prompted with two options, select Keep my files
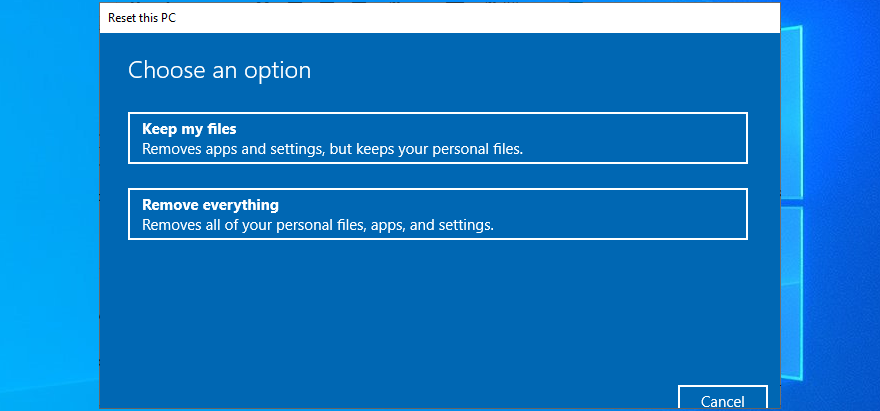
- Follow the on-screen steps to reset Windows 10
- Once the task is complete, run Windows Update to install all required updates
Windows Update error 0x80080005 can be fixed
To sum up, 0x80080005 is an error code that pops up on the screen when trying to run Windows Update. It’s typically caused by a hardware or software problem that can be resolved.
Start by running the Windows Update troubleshooter and using the Windows Update Diagnostic tool. If these fail, restart the Windows Update and dependent services, turn off Network List Service, check Group Policy settings, reset Windows Update components, and unplug all peripheral devices.
You can also run a clean boot, temporarily deactivate your firewall, uninstall recent third-party software and system updates, check the disk space and network drivers, as well as repair any hard disk and operating system errors.
It’s also a good idea to run a computer scan to remove any malware, disable IPv6 connectivity if you don’t use it, fix registry settings and Windows startup problems, and roll back Windows 10 to a previous checkpoint. If everything fails, it’s time to factory reset Windows 10.
How did you manage to get rid of 0x80080005?
Did we miss any important steps? Let us know in the comment area below.